Page 1 of 2 12 LastLast
Results 1 to 15 of 26

Thread: Ray Iles Mortice Chisel Issue

  1. #1
    Join Date
    Apr 2008
    Location
    Sierra Nevada Mtns (5K feet)
    Posts
    267

    Question Ray Iles Mortice Chisel Issue

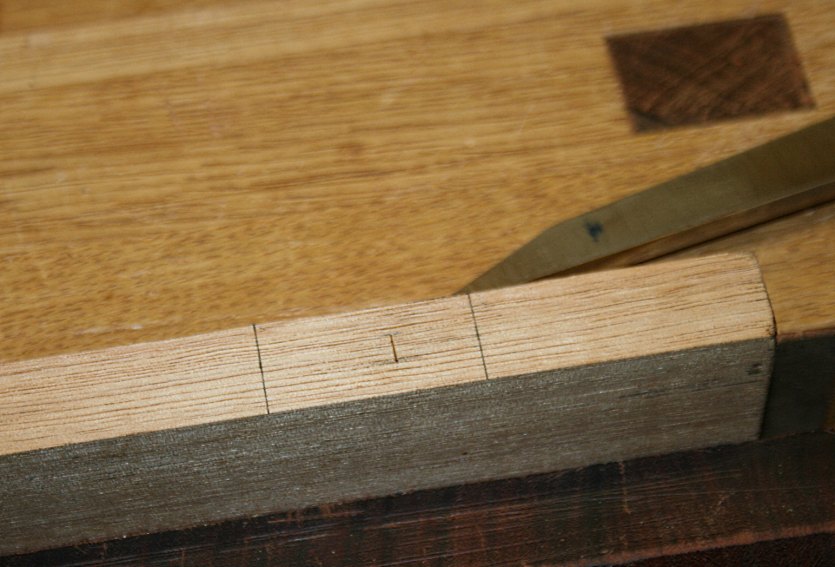
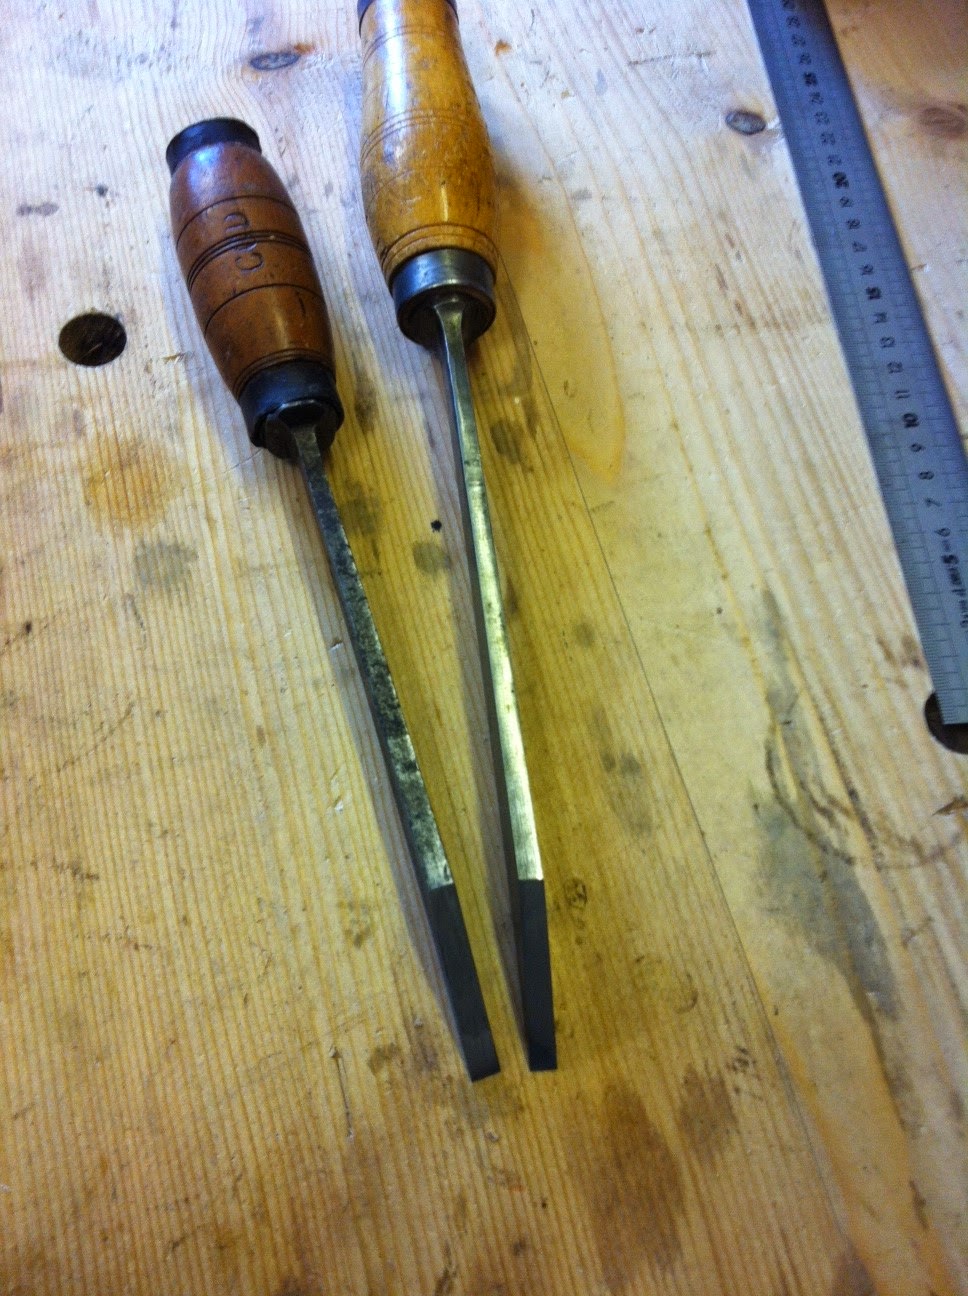
    I bought a set of three Ray Iles mortise chisels about a year ago, 1/4, 5/16, and 3/8 inches. I never did much with them; mostly just playing around and practicing chopping mortises. Recently I decided to use them on a large project. Around 200 or so mortises for mortise and tenon work. Many of these are 1/4 inch wide mortises. To save time I drilled out waste near one end of the mortise, then used the chisel to chop out the mortise. I couldn’t seem to center the chisel on the drilled hole. I was always just a little off, one side or the other. Frustrating, and I thought my technique needed improvement. So I practiced on scrap, and still just couldn’t get that chisel centered on the drilled hole. Finally I did what I should have done much sooner: I measured the width of the chisel with a micrometer. What a surprise! The 1/4 inch Ray Iles chisel measured at .268 inches (s/b .250). That’s .018 wider than specification. That seems rather much to me. It’s noticeable if trying for a snug mortise/tenon joint. Yes I can compensate for the difference with my tenons, but I would rather have a true .250 wide chisel. Is this oversize normal for a mortise chisel? Normal for the Ray Iles mortise chisel? I have other standard bench chisels that are pretty much dead on .250. Has anyone out there experienced this problem? Is it even a problem or am I being too picky? Is this a manufacturing defect or deliberate for some reason unknown to me?
    The other two Ray Iles chisels are also a bit wide, but not nearly as much. The 5/16 measures at .322 and s/b .3125. Not too bad. The 3/8 measures at .379 and s/b .375. Very close. I have no qualms about using either of these two. It’s only the 1/4 inch that I am unhappy with.

  2. #2
    Join Date
    Jun 2013
    Location
    Neither here nor there
    Posts
    3,838
    Blog Entries
    6
    That is surprising. I would expect it to be precisely 1/4". You could always grind it, but for the money you shouldn't have to.

  3. #3
    Join Date
    Feb 2004
    Location
    Perth, Australia
    Posts
    9,492
    Mine is 1/4" wide. Spot on. I imagine that there will always be minute variations present in any blade from any company. What is an acceptable variation is more relevant. If yours is outside the measurement range you expect, then you have two choices - fix it yourself or return it for replacement.

    Edit: My comment above was about the manufacturing specs of the chisel, per se. Warren, below, correctly points out that the slight difference would be irrelevant since one takes the measurements for the mortice and tenon from the chisel. The only time that the chisel is an issue is when the mortice it chops needs to match a groove made by a plough plane. This match is more relevant to me than the chisel accuracy, per se.


    Insert the ends of the blades at the outer edges of the chisel mark, and then slide the body against the reference side of the stretcher. (Set aside the gauge to later mark the tenons).


    Regards from Perth

    Derek
    Last edited by Derek Cohen; 08-02-2015 at 4:04 AM.

  4. #4
    Join Date
    Jun 2010
    Location
    twomiles from the "peak of Ohio
    Posts
    12,169
    Lets see. over sized by....0.018"???? Ok, take a little off each side, works out to be, what....0.009? or so? My scrub planes take more than that off.

    keep the calipers handy. Sand one side until the reading goes down by 0,009. Then do the other side. How hard can this be to do? Even a decent mill file could do this. Might take...15 minutes tops for both sides?

    Get busy...

  5. #5
    The exact width of the chisel is of no consequence. In practice we set the mortise gauge by the width of the chisel and use the gauge to lay out both mortise and tenon.

  6. #6
    Quote Originally Posted by steven c newman View Post
    Lets see. over sized by....0.018"???? Ok, take a little off each side, works out to be, what....0.009? or so? My scrub planes take more than that off.

    keep the calipers handy. Sand one side until the reading goes down by 0,009. Then do the other side. How hard can this be to do? Even a decent mill file could do this. Might take...15 minutes tops for both sides?
    if you try taking a mill file to a hardened D2 chisel, you will have a ruined file in about 30 seconds and maybe a few scratches on the chisel.

    I have had to take as much as .009" off the side of a pigsticker (because it was rusted and pitted, not because I cared about the width). It takes hours, and that's for friendly old cast steel. Trying to take .018 off a D2 chisel would be insane without proper power grinding equipment.

    Getting back to the OP, I totally understand your initial frustration, especially since you were in the middle of a project. But now that you're past that, I think I would just live with it. Warren is right, it makes absolutely no difference. Does the chisel cut nicely and feel good in your hand? If yes, that's what's important.

  7. #7
    Join Date
    Jan 2011
    Location
    Montana
    Posts
    157
    David,
    My work process is like Warren's in that I set the mortice gauge to the chisel, so in effect, the true width of the chisel is of no real consequence; out of curiosity I measured my Ray Iles chisels (2):
    1/4" is actually .256, so slightly over
    3/8" is actually .377, less but still slightly over
    Regards,
    Randy

  8. #8
    My antique ones are nowhere near a nominal size. They don't match the plow plane irons either. So I first chop the mortices and only then plow the grooves. After some thought I decided that a bit of a misfit between the two didn't matter.

  9. #9
    Join Date
    Apr 2010
    Location
    Tokyo, Japan
    Posts
    1,550
    Unlike butt chisels or most other chisels, mortice chisels are used for very precise work, and so need to be made very precisely. If you use them a lot, a good mortice chisel will give you confidence, while a bad chisel can make woodworking more trouble than joy.

    As Derek said, always match the intended width of the mortice to the chisel you intend to use. His example with a 2-bladed marking gage is right on the money.

    There are several critical dimensions and angles in a mortice chisel you must pay attention too, and perhaps remedy if they are wrong; (1) Blade warpage; (2) Blade taper; (3) Blade cross section; and (4) cutting edge skew.

    Warpage
    Some blades, even high quality ones, develop wind or go banana shaped during heat treatment. A twisted or banana shaped blade cannot cut a straight, square mortice. This can be remedied with a precision straightedge, dykem (or marking pen), and a flat lapping plate. It takes time and patience to make right.

    Taper
    Ideally, the sides are flat, and precisely parallel the entire length of the blade when you buy the chisel new, but they seldom are. On the other hand, there is no harm if the blade is a tad wider at the cutting edge and tapers thinner towards the handle. Talking about no more than .001". This helps keep the blade from binding in the mortice, speeding up your work, and is especially useful for wider mortice chisels. This is an advanced technique, however, and beginners are better off with no taper at all. However, if the blade tapers towards the cutting edge, well, the blade will always bind, eventually inducing mental illness.

    Cross Section: Sides
    Assuming the sides are flat, and straight, and free of wind, if they are not square with the cutting edge, the chisel will twist and dig into the left or right wall of the mortice. Actually, it is most efficient if the the sides are bit hollow, but this is another advanced technique, and difficult to achieve, and one the beginner need not worry about. If the sides are bowed out or rounded, the chisel will induce mental illness. These defects must all be remedied.

    Cross Section: Back and Flat

    Likewise, if the back and flat are not parallel to each other, the chisel will dive to the left or right, causing you to doubt your ability, possibly resulting in loss of self respect, and inducing an overpowering urge to drink warm beer.

    Cutting Edge Skew

    Lastly, the cutting edge must be perfectly square to the sides. It is easy for this to get a bit angled one way or the other after repeated sharpenings, and while a bit of skew doesn't matter much for other chisels, in the case of mortice chisels, a skewed cutting edge will make the blade cut to the left or right like it was being pushed off course by the Pope's ballistic imps.

    Get a precision square and a quality vernier caliper or C micrometer. Make your sharpening stones and lapping plate very flat, checking and truing occasionally when warranted.

    Start by measuring and truing the chisel's flat. This will be the reference plane against which all other dimensions and angles are compared. Once it is flat and true, don't work it on a anything but your finest sharpening stone.

    The wind, banana, and taper need to be straightened at the same time the side angles are corrected.

    Make the back parallel to the flat after the wind, banana, and taper are gone and the side angles are trued.

    Work slowly and measure frequently. Remark with dykem or marking pen every few minutes to ensure you are focusing your effort on the correct area. Spend the attention, time, and elbow grease necessary to get these dimensions, lines and angles right, and you will have a tool that will be a joy to use, one that will improve your work efficiency tremendously, and perhaps preserve your mental health. Take it from someone that has seen the asylum.

    When you are done, and all the dimensions and angles corrected, the 90 degree angle formed by the chisel's sides and flat should be sharp enough to cut your fingers if held while striking the chisel with a hammer. These sharp, precise angles will cut the wood fibers cleanly, and help keep the chisel from being pushed around by uncooperative wood fibers.

    Also, when using the chisel, continuously stab it into an oilpot, wiping all four sides on the clean, oily rag to lubricate it. This will reduce friction and give you greater control. It won't hurt the glue bond.

    When you are using a good chisel, with careful attention, and after just a little bit of experience, you should not need to clean the sides of narrower mortices, less than 5/8" for example, used in furniture, because the chisel will not gouge up the walls in the first place, and will shave them clean as a matter of course. Big mortices in timbers are another matter.

    Stan
    Last edited by Stanley Covington; 08-04-2015 at 12:31 AM.

  10. #10
    My Dutch, 19th century mortise chisels are tapered in every direction. There is nothing square about them. According to your post they are defect, but somehow even with my meager skills I can cut a square hole with them. The chisels for example from the Seaton chest would also have been defective according to your post.

  11. #11
    Join Date
    Apr 2010
    Location
    Tokyo, Japan
    Posts
    1,550
    Quote Originally Posted by Kees Heiden View Post
    My Dutch, 19th century mortise chisels are tapered in every direction. There is nothing square about them. According to your post they are defect, but somehow even with my meager skills I can cut a square hole with them. The chisels for example from the Seaton chest would also have been defective according to your post.
    This is like your post a couple of years ago where you insisted that shooting boards are unnecessary and useless, and then came back some months later with a treatise on shooting boards. I have never seen your Dutch chisel, but I am absolutely confident you cannot cut a square, clean mortise with it as quickly as I can with a straight, well-tuned one. Once again, you damage your credibility just to be contrary.

    Stan

  12. #12


    I always try to look for more and more freehand techniques, not relying on machined perfectness. Mortise chisels have always been tapered in width and depth. Square mortise chisels are a modern invention. So, somehow, when machines were not yet introduced at large in the woodshops, they managed pretty well with these less then perfect shapes. Of course, never having used a modern one, I can't really compare.

    Here's a pic of my chisels (sorry for the large format):


  13. #13
    Join Date
    Apr 2010
    Location
    Tokyo, Japan
    Posts
    1,550
    Thanks for the pics. I wish I had some chisels like those.

    While it may not be the case in Holland, there are millions of examples of square chisels made prior to "modern" times. A little more actual research may help you in your search for more freehand techniques.

    I find the taper in depth one sees in your pictures is very attractive, and it makes perfect sense. But are they twisted? Are they banana shaped? Do the sides bulge out? Do they bind in deep mortices? Obviously, the cutting edges are square to the axis of the chisel. I doubt the chisels in you pictures have ANY of the problems I pointed out in my post.

    Is it your opinion that everyone should just accept tolerance problems in the mortise chisels they purchase, and never give a thought to improving their performance? Sounds like more of your shooting board logic. By that logic only hacks would sharpen their chisels on anything but rocks found in a field, or would consider truing a board with any tools more advanced than axe and adze. But I suspect you are not truly that retro except in your posts to SC.

    Very few people nowadays are able to get their hands on well made mortice chisels, but have to make do with what is available. I suggest you do them a disservice by insisting that they must be satisfied with sub-par tools, instead of learning how to tune them to perform better.

    Stan

  14. #14
    The only square mortise chisels I know about are the LN ones, but like I said, I didn't try them. The original English ones are all tapered a bit in the "height" of the cross section of the chisel. They also usually taper from the edge towards the handle. So when you start with a chisel width a bit over a 1/4", you will be undersized when you reach the end of the usable toolsteel. All this tapering helps against binding in a deep mortise. It probably also helps the manufacturer to create the tool.

    When you start one of your posts, explaining in detail all the precision steps, I certainly get the urge to take on a contrary view. The handtool history is a prime example of the abilities of men to do great work with good hand-eye coordination. None of their tools were ever machine perfect. I think it is good to be reminded of that.

    But I understand that the OP has in the mean time modified his chisel so it is closer to the nominal value of 1/4". I applaud him for doing that. Modifying tools so they suit you better is a good idea, even when in this case I think it wasn't neccessary.

  15. #15
    Join Date
    Aug 2007
    Location
    Dickinson, Texas
    Posts
    7,655
    Blog Entries
    1
    [QUOTE=Kees Heiden;2451635]The only square mortise chisels I know about are the LN ones, but like I said, I didn't try them. The original English ones are all tapered a bit in the "height" of the cross section of the chisel. They also usually taper from the edge towards the handle.

    That's exactly why we need a complete set of both Ray Iles and LN chisels.

    OBTW, I do and some Narex pig stickers also.

Posting Permissions

  • You may not post new threads
  • You may not post replies
  • You may not post attachments
  • You may not edit your posts
  •