Page 2 of 3 FirstFirst 123 LastLast
Results 16 to 30 of 31

Thread: Intro and First (Very) Large Project, 10ft Cherry Countertop

  1. #16
    Quote Originally Posted by Prashun Patel View Post
    Travis, thinking more about this I don't think you should kerf. It will solve the problem and is the easiest, but won't look right. If you do it I would only do one around the middle. Doing more would be overkill and trying to make it look like a design feature wouldn't look right on imho. You would do this only as damage control and accept it looking substandard from the edges.

    if it were me, I would try to pop the edges loose. You have a lot of surface underneath against which you can strike a mallet. Remove the pocket screws, tap the edges loose and then widen the leaving hole of the pocket screw and re attach. You don't need to remove the piece entirely, you just want to break the glue bond over the rear 2/3 of the edge. You can leave the littered spline in tact.

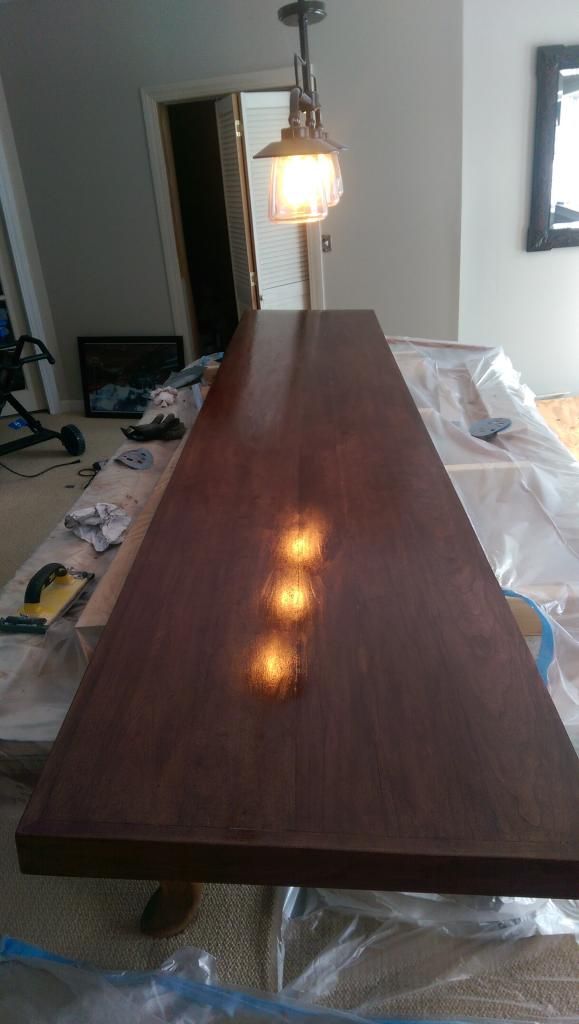
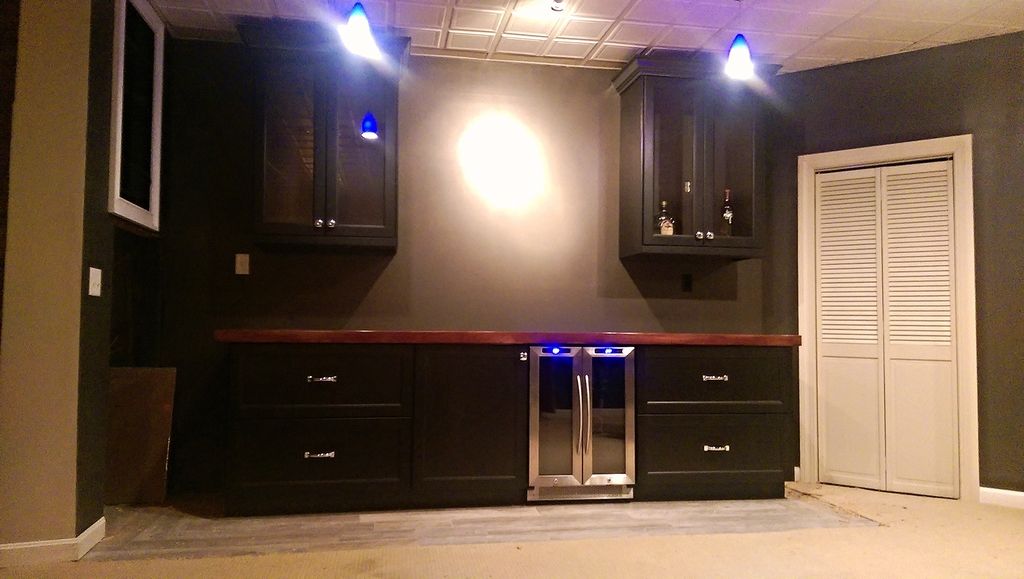
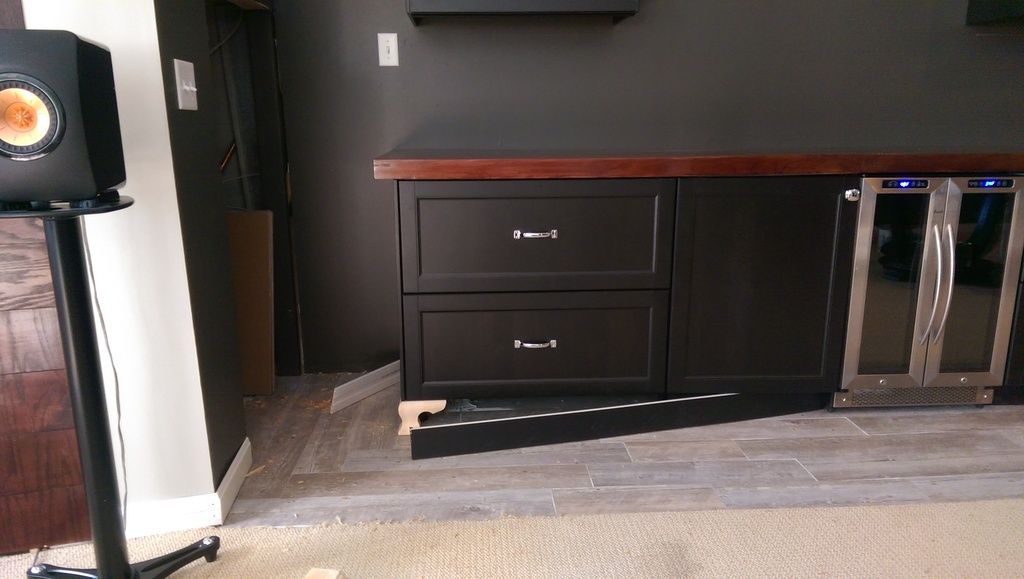
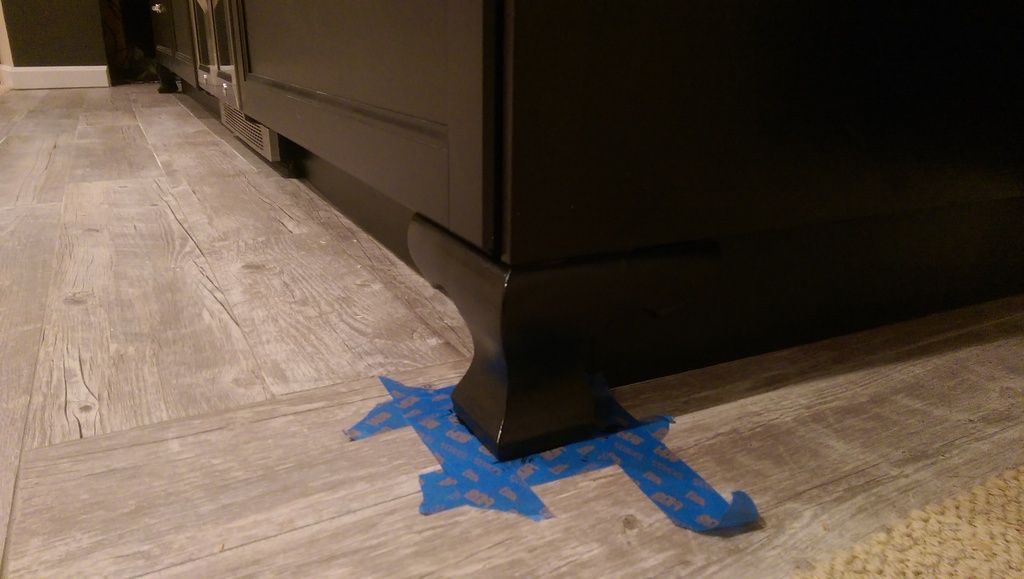
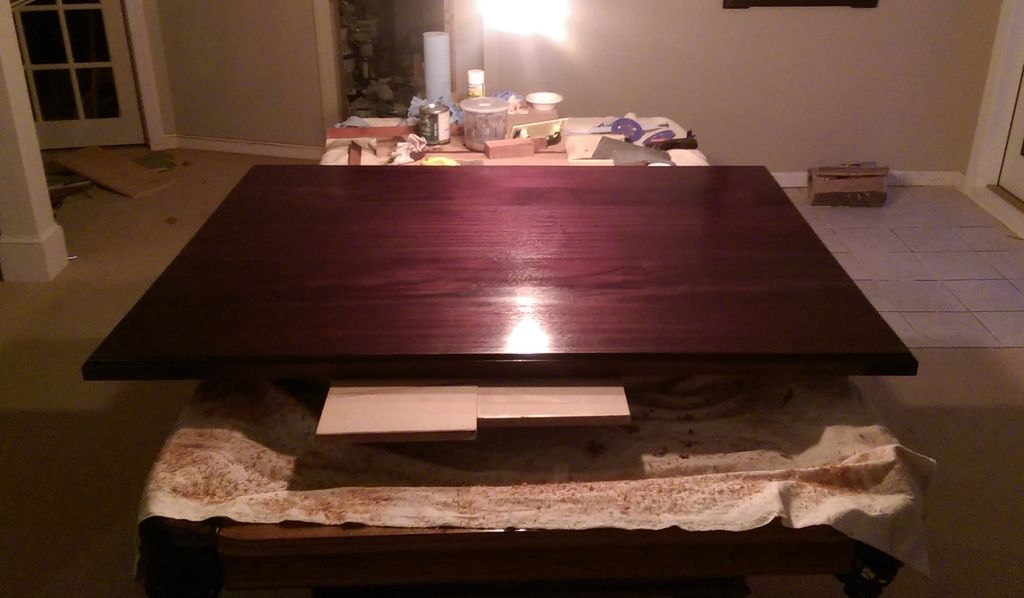
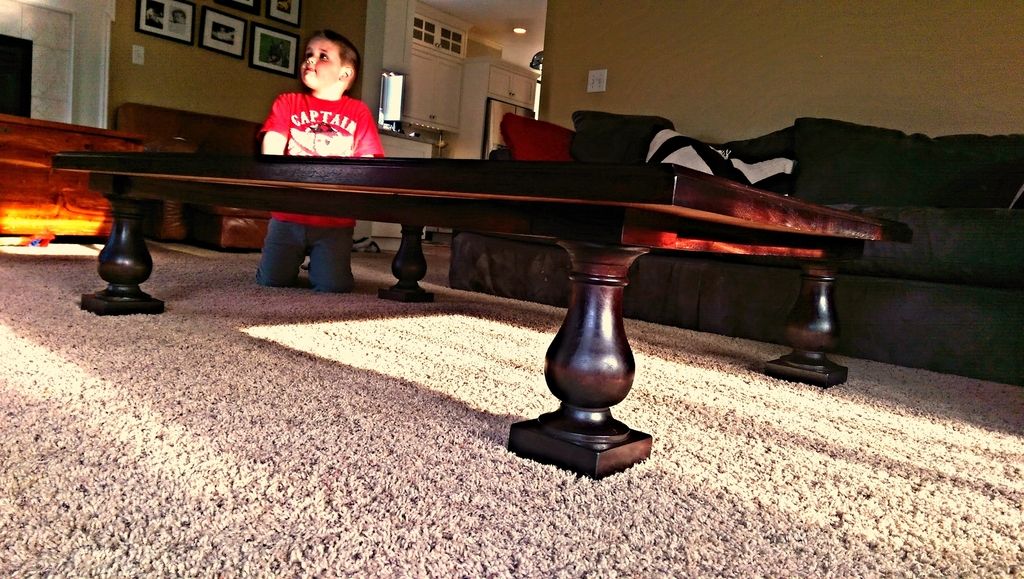
    Thanks Prashun, I can try to take this route. I could potentially use my carving knife to slide in from the underside and score the bottom portion of the glue bond. Following that and the other steps you mentioned, I could apply the final few coats of Arm R Seal. I've found that it does a great job of filling subtle gaps which I thought I may have to get to with a wax pencil or wood putty. Before I put the final coat on, if I need to I would indeed use one of those to over any obvious areas. I will try to get to this today and let you know how it goes! Btw, here is a pic after the 2nd coat of Arm R Seal Gloss. Loving this stuff.


  2. #17
    Join Date
    Aug 2013
    Location
    Princeton, NJ
    Posts
    7,294
    Blog Entries
    7
    Travis,

    Nice work!

    To address some of your questions;

    Locking across the grain is bad and will cause many issues. Best case it cracks the glue bond since this is an end-grain only glue bond (if I am not mistaken). I would take Prashun's advise and see if you can crack the bond proactively and regroup on your design.

    I would not cut through the side board, it will look a bit ridiculous and people will (rightfully) ask you the purpose of doing so.

    Regroup, redesign, then come back to the finishing when you are again prepared.

    I made this mistake on an early project (cabinet), everyone learns it once. I did a cabinet top and wanted a flush look, fit everything precisely and glued it solid where it should have floated. It cracked straight down the center and basically trashed a beautifully bookmatched rosewood panel....live and learn.
    Bumbling forward into the unknown.

  3. #18
    Quote Originally Posted by Brian Holcombe View Post
    Travis,

    Nice work!

    To address some of your questions;

    Locking across the grain is bad and will cause many issues. Best case it cracks the glue bond since this is an end-grain only glue bond (if I am not mistaken). I would take Prashun's advise and see if you can crack the bond proactively and regroup on your design.

    I would not cut through the side board, it will look a bit ridiculous and people will (rightfully) ask you the purpose of doing so.

    Regroup, redesign, then come back to the finishing when you are again prepared.

    I made this mistake on an early project (cabinet), everyone learns it once. I did a cabinet top and wanted a flush look, fit everything precisely and glued it solid where it should have floated. It cracked straight down the center and basically trashed a beautifully bookmatched rosewood panel....live and learn.
    Thanks for the kind words and feedback. I took a brief break from work and decided to give it a try. On both sides, I was able to loosen the glue bond which was visible from the top of the counter. It didn't fully detach but certainly separated and I'm hopeful that it was enough. The bond was quite strong though so to give myself an even better chance, I went ahead and made one kerf on each side right in the middle. I used my Flexcut cutting knife to mark the line then the dozuki to make the cut. I lightly sanded it and applied a bit of dye to the open areas. I'm going to hit it with a quick spray of shellac and then do the 2 final coats of Arm R Seal.

    I don't actually mind the look, and there's a reason why I don't think it will stand out as an obvious afterthought. When adding the built edges, it was Sunday and the only lumber source open was Rockler and they didn't have any 10+ foot boards. So, the front is actually made up of 2 pieces which join together in the middle with a butt joint. Not truly elegant woodworking but it's barely noticeable after being sanded down and finished. Since it's in the middle, and these cuts are now in the middle of the side pieces, it almost looks intended. As mentioned its certainly not a showpiece, its for myself, and most importantly it's a learning experience that was an awesome excuse to buy more tools and dive deeper into what I now know will be a lifelong passion! Btw, I almost decided to make the most of that and do a front facing butterfly key but I thought I should exercise at least some restraint here. Here is a pic of the kerf on one of the sides


    I can also try using wax or putty to hide some of it if you all think that makes sense. I wont ask for much more of your time on this and will aim to update you once it's finally complete and installed. I'm going to do the steps mentioned above and then do some final sanding. If there are any tricks to getting a nice smooth glossy finish with the Arm R Seal I'm certainly all ears though!

  4. #19
    Join Date
    May 2004
    Location
    Tyler, Texas
    Posts
    2,041
    It's too late now but in the future, consider making the top a few inches long then using the excess length for a mitered end. Not only will the seasonal movement be the same as the top but the grain will be continuous. I'm in the process of replacing my tile kitchen countertops with Walnut (LOML's directive) and they look great.
    Cody


    Logmaster LM-1 sawmill, 30 hp Kioti tractor w/ FEL, Stihl 290 chainsaw, 300 bf cap. Solar Kiln

  5. #20
    Hi all, I wanted to give a quick response. I've been travelling extensively from work which has delayed things a bit. I was recently in Austin for a very cool event, SXSW and am writing this from Silicon Valley now.

    I was able to do a few things. One of which was finally attaching the counter!


    A bad picture but shows the general area.


    A little crown detail


    As a last minute addition, I thought that furniture feet would add a bit of nice detail. Here's a test fit


    And here's an installed a painted pic. I still need to sand and recoat but am happy with the paint match.


    And I also added a little "Art" :-)


    Since then I've also added another coat of varnish and will add one more before I do a final buffing. I promise to get better pics

  6. #21
    Join Date
    Jan 2010
    Location
    Saturna Island, B.C.
    Posts
    327
    the cut does not solve the movement problem!
    ron

  7. #22
    Join Date
    Apr 2015
    Location
    Northern Delaware
    Posts
    111
    Hey all,

    A quick question about the movement problem. I think I get it, but in case I don't, please explain this to me like I'm five in case I don't. I see a kitchen-table build in my future, after all.

    The problem is that OP has encased the entire top, both it's long grain and its end grain, with a mitered frame that's glued and screwed at the ends, yea? This move is opposed to a breadboard—using either a tongue-and-groove joint or M&T with a slightly oversize mortise—to conceal the top's end grain, which allows (with either joinery) for movement, yea?

    OP, to your project, it looks aesthetically great. I'm a fan of splines, and the colors and lines in that room come together beautifully. I hope it all works out great for you.

  8. #23
    Quote Originally Posted by Barry Dima View Post
    Hey all,

    A quick question about the movement problem. I think I get it, but in case I don't, please explain this to me like I'm five in case I don't. I see a kitchen-table build in my future, after all.

    The problem is that OP has encased the entire top, both it's long grain and its end grain, with a mitered frame that's glued and screwed at the ends, yea? This move is opposed to a breadboard—using either a tongue-and-groove joint or M&T with a slightly oversize mortise—to conceal the top's end grain, which allows (with either joinery) for movement, yea?

    OP, to your project, it looks aesthetically great. I'm a fan of splines, and the colors and lines in that room come together beautifully. I hope it all works out great for you.

    Thanks Barry, appreciate the kind words. The countertop is still perfect but it really hasn't been very long at all since finishing, so we shall see. I've in fact learned my lesson. I just completed a large coffee table made from Sipo and didn't conceal the end grain at all. You guys will be proud of me, I even used figure 8 fasteners to secure it to the base!


    Routed Edge

    Finished Top

    And only pic I have of it all together, and with my son enjoying it

  9. #24
    Join Date
    Dec 2010
    Location
    WNY
    Posts
    9,712
    You've got it. You can't rigidly attach long grain to end grain, like the OP did, w/o bad things happening when the RH changes and causes the end grain to swell/shrink. Breadboard ends allow you to mechanically attach long grain to end grain in such a way that the end grain can still expand/contract without being constrained. Simple as that.

    John

  10. #25
    Join Date
    Apr 2009
    Location
    Mandalay Shores, CA
    Posts
    2,690
    Blog Entries
    26
    Travis, very ambitious for a first project. It turned out well. You'll learn from the wood movement experience and apply it to subsequent work. Good job!
    Shawn

    "no trees were harmed in the creation of this message, however some electrons were temporarily inconvenienced."

    "I resent having to use my brain to do your thinking"

  11. #26
    <p>
    I thought I&#39;d chime in here and provide an update. This was my first big project and haha, it didn&#39;t get the response I was hoping for! But it was a learning experience and ai appreciated all of the support! It&#39;s now been almost two years and to date there has been no major issues with wood movement. I say major because after a few months the topcoat (Arm-r-Seal) felt like there were some ridges in it in various places where boards met. My guess is that perhaps there was a small amount of movement, enough at least to cause this. What do you think?&nbsp; &nbsp;I&#39;ve since sanded down those areas and matched the dye where I was a bit aggressive with it. I&#39;ve honestly been insanely busy with work and it&#39;s sat like that for a while so I&#39;ll be applying a new topcoat in the near term. Winter is for woodworking right? Do you think that movement could have been the cause of this? The raised lines of the finish were barely noticeable but I&#39;m a tad anal. Here are a few pics of the project I&#39;ve moved over from photobucket .</p>
    <p>
    </p>
    <p>
    </p>
    <p>
    And the kerf I made as a pathetic attempt to mitigate movement</p>
    <p>
    </p>

  12. #27
    Join Date
    Mar 2003
    Location
    SE PA - Central Bucks County
    Posts
    65,842
    Wood movement is real and edge banding on the ends like that is prone to failure because of the cross-grain relationship it has with the wood that makes up the majority of the slab. There are almost none of us who haven't done that at least once, so don't fret about it! Consider it "character" and move on. Nature of the beast!
    --

    The most expensive tool is the one you buy "cheaply" and often...

  13. #28
    Join Date
    Jun 2008
    Location
    So Cal
    Posts
    3,765
    Yes it's wood movement what else could it be ?
    Aj

  14. #29
    I was looking over these old posts and for posterity wanted to give an update. The bartop is still perfect and wood movement has not been an issue since. I think it's probably because of the consistent low humidity in the basement, and hopefully the kerfs and breaking of the glue helped at least a bit. When I talk about getting into woodworking I always tell this story about how i was so so proud of my work when posting, only to learn that I essentially made the cardinal sin of woodworking hahaha. Hope you're all doing well!

  15. #30
    Join Date
    May 2018
    Location
    Lancaster, Ohio
    Posts
    1,364
    Thank you for the updates over the years
    Ron

Posting Permissions

  • You may not post new threads
  • You may not post replies
  • You may not post attachments
  • You may not edit your posts
  •