Page 1 of 2 12 LastLast
Results 1 to 15 of 23

Thread: Basket illusion platter

  1. #1
    Join Date
    Dec 2005
    Location
    Texas Hill Country, USA
    Posts
    1,967

    Basket illusion platter

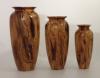
    This is a 12" piece of maple that has been turned, beaded, burned, and inked. The back matches the front. It has been finished with danish oil. It was turned as a gift for a special day, 2/23.

    This is a technique that I learned watching a video by Harvey Meyer. It uses the same concepts as Jim Adkins, but the burn lines are laid out in a very precise pattern and the design inked in later. It is kind of like turning a bowl and turning a vase. It is the same thing, but not really the same thing.

    C and C are welcome. Thanks for looking.


    front.jpg

    back.jpg

    side.jpg
    Last edited by Robert McGowen; 02-22-2015 at 9:18 PM.

  2. #2
    Nice work! Reminds me more of Nittman's work than Jim Adkins.

  3. #3
    Join Date
    Mar 2011
    Location
    Pendleton, KY
    Posts
    803
    Very nicely done. What did you use for the colors?

  4. #4
    I always enjoy pieces like this..and I'm always amazed at the skills involved. Super piece.
    Be the kind of woman that when your feet hit the ground each morning, the devil says, "oh crap she's up!"


    Tolerance is giving every other human being every right that you claim for yourself.

    "What is man without the beasts? If all the beasts are gone, men would die from great loneliness of spirit. For whatever happens to the beasts will happen to man. All things are connected. " Chief Seattle Duwamish Tribe

  5. Beautiful piece Robert! Was the video you watched on Youtube or did you purchase a video by Harvey? Thank you for sharing!

  6. #6
    That's a whole lot of precision work! It's a joy to look at. I am really impressed that the pattern on the back is the same as the front, adding to the illusion that the pattern is weaved in. Great job Robert!

  7. #7
    Join Date
    Oct 2009
    Location
    McMinnville, Tennessee
    Posts
    1,040
    A big wow factor going for this one. I love it!!!
    Sid Matheny
    McMinnville, TN

  8. #8
    Stunning! I was just down in Charleston, SC walking through the Market and admiring the many woven baskets. This is even more impressive.

  9. #9
    Join Date
    Oct 2011
    Location
    Colorado Springs
    Posts
    982
    Top notch! Robert, it makes me tired to think of the work that went into this. It must be a pretty special day today. Ditto on the Charleston baskets, John.
    "Never try to teach a pig to sing. It wastes your time and annoys the pig." Robert Heinlein

    "[H]e had at home a lathe, and amused himself by turning napkin rings, with which he filled up his house, with the jealousy of an artist and the egotism of a bourgeois."
    Gustave Flaubert, Madame Bovary

  10. #10
    Join Date
    Apr 2009
    Location
    Sioux City ,Iowa
    Posts
    229
    Robert , that is just over the top ,you must have some time in that, with all the detail in it . very nice job .

  11. #11
    Join Date
    Dec 2005
    Location
    Texas Hill Country, USA
    Posts
    1,967
    To answer a couple of questions:

    I used Copic .too markers to dye the pattern.

    The Meyer video is on Youtube. It is quite long.

    This is a fairly simple pattern. The key to things turning out correctly is about 80% turning the platter. A poorly turned platter will never look good, no matter how good the dye job is.

  12. #12
    Join Date
    Jan 2004
    Location
    Lewiston, Idaho
    Posts
    28,549
    Robert....that is beautiful!
    Ken

    So much to learn, so little time.....

  13. #13
    Robert, I see from looking through some of your older threads that you attended a class with Jim Adkins. Compared to Harvey, does Adkins color in his patterns first and then add the burn lines afterwards? Also, the Copic pens you use, are they the Multiliner or the Multiliner SP or some other model?

    Thanks!

  14. #14
    Join Date
    Feb 2003
    Location
    Atlanta, GA
    Posts
    66
    I think I should weigh in here since you're talking about me. First of all, the YouTube video wasn't planned. I demo'd for the Gwinnett WW Assoc and they asked me if they could put the video on their YouTube channel. What you see in that video is Basket Illusion 101. It's what I can do in a 90 minute demo. What I really do is quite a bit more than that - sometimes. In the video, I turn, bead, index, burn, then color. I also do that when I'm in my shop. But sometimes, I also do what Jim Adkins does, where majority of the burning is done after the dying. There are several other basket illusionists out there and they also do a combination of both methods. I have spoken to Jim Adkins as well as several other basket illusionists. There's no right way or wrong way. Either method gets you a piece that looks like a basket. However, in my opinion, after doing basket illusion for more than 3 years, I have to say that Jim Adkins's method gives you a more authentic looking piece. It looks like the piece has a very tight weave and the closely spaced burn lines provide a more consistent looking weave throughout the piece. The downside is it takes many hours longer than the other way. I do more hollow vessels than platters, and on a hollow vessel, I prefer the index, burn, then dye method, but I index to a big number and my spaces are very small. If I indexed to a smaller number and had larger spaces, then I would use Jim's method. Also as I said, there are others who do this and they also have a few different methods. In the end, it still takes a long time to create one of these and it's not for everyone. It takes patience, steady hands, more patience, good eyesight (or magnification), more patience, and a commitment to the piece.

    Regarding dyes, Jim Adkins uses Copic original markers. Others use Prismacolor and some even make their own markers. I use India ink markers from Faber Castell. They are truly archival quality and light fast. However, I am limited to three colors. The pens come in many colors, but only 3 have the appropriate nib sizes for this type of work.

    Lastly, if anyone is thinking about trying this, it is virtually impossible to get the Detail Master 9C pen for burning the lines. The company is unresponsive to its vendors and customers. A substitute for Detail Master might be Razertip Bead Maker pens, but I haven't tried it.

    That's all for now and I hope I didn't hijack Robert's thread. Nice piece Robert - keep doing them.

  15. #15
    Thanks much, Harvey!

Posting Permissions

  • You may not post new threads
  • You may not post replies
  • You may not post attachments
  • You may not edit your posts
  •