Page 19 of 19 FirstFirst ... 91516171819
Results 271 to 280 of 280

Thread: Cabinet build

  1. #271
    Join Date
    Aug 2012
    Location
    Missouri
    Posts
    2,151
    Brian That is a fine piece of work. Your write up is also an excellent work. Well done. I would really like to see a "lessons learned" on this too. That's asking a lot I know. I am sure there are others that would be interested as well. Thank you so very much for sharing.
    Jim

  2. #272
    Join Date
    Aug 2013
    Location
    Princeton, NJ
    Posts
    7,293
    Blog Entries
    7
    Thanks Gents!

    Patrick, thanks for picking up on that. I read an article about a temple carpenter, the basis of it was that the carpenters would leave their mark-out to show how the building was constructed, I thought that was pretty need so, for the most part I did the same.

    James, thank you. I have a couple things I would change about how I built the piece. I'll detail them shortly
    Bumbling forward into the unknown.

  3. #273
    Join Date
    Sep 2008
    Location
    N. Idaho
    Posts
    1,621
    Fabulous. And just under a year to complete--quite an accomplishment especially given your other activities this year.

    Would also enjoy hearing your reflections and am curious if you know how much wood you started with as a reference point.

    Best,
    C
    "You can observe a lot just by watching."
    --Yogi Berra

  4. #274
    Join Date
    Feb 2013
    Location
    BC. Canada
    Posts
    4
    Very nicely done.

  5. #275
    Join Date
    Aug 2013
    Location
    Princeton, NJ
    Posts
    7,293
    Blog Entries
    7
    Thanks Gents!

    The major change I would make is in how I did the case sides. I resawed and book matched a slab of 8/4, ending up with 5/8 sides, I then rabbeted the back of the case and cut blind sliding dovetails to hold the web frames. To bump the sides in and allow room for the drawers to clear the doors without them being fully open I then made a series of panels and capped them off near the drawer fronts with a simple molding.

    Next go-round I would like to start with heavier material, so that I could wind up at about 1" thick or 1.25" thick, then rabbet grooves around the perimeter of the panels, for doors, back and top joinery. That would allow me to cut full width sliding dovetails and taper them. That would reduce the time spent on the case internals considerably.

    The maple stretchers that I put into the bottom of the case to support the base. I would like to have put those in the top as well, I have some corner supports in the top (one looks like a molding) but being that I keep actual glued joints to a minimum it would have been a worthwhile addition to the top.

    Christopher, I started with about 10' of 8/4 walnut that was about 14" wide. That took care of most everything walnut less the base uprights which I made out of 8/4 but maybe 2-3 BF. I used some 8/4 maple on the stretchers, 5/4 red oak on the internal paneling (milled to 7/16"), sapele mahogany on the web frames and 4/4 maple on the drawers (milled to 1/2") The drawers took a good deal of material like 10BF or so.

    Some of this material I used because I had it around. If I can get really nice softwoods I'm going to use those on case internals, drawer sides and bottoms next go around.

    Also plywood for the drawer bottoms, case back and doors. I used 1/2 veneer core Baltic birch ply for the doors and caseback, then I used 1/4" for the drawer bottoms. Next time around will use solid wood for the drawer bottoms.
    Bumbling forward into the unknown.

  6. #276
    Join Date
    Aug 2010
    Location
    USA
    Posts
    5,582
    Quote Originally Posted by Brian Holcombe View Post

    Cheers!
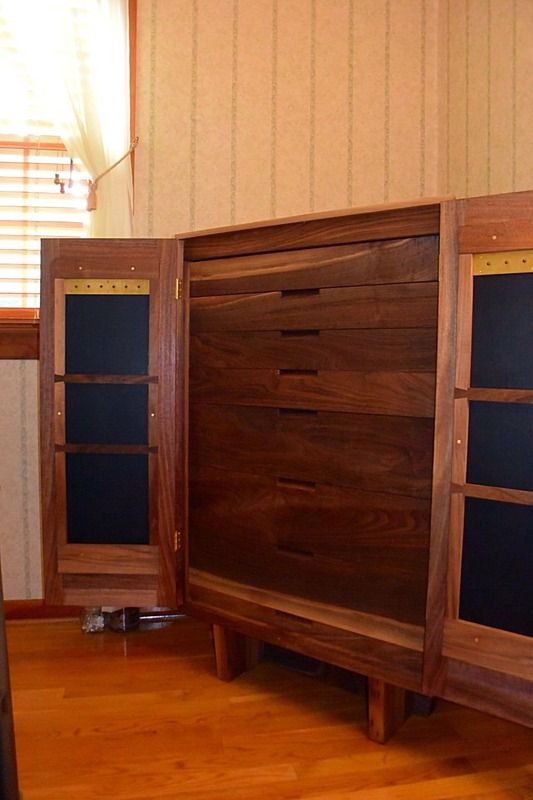
    Hi Brian, The door panel veneer is stunning and really sets this piece off as special at first sight. There is also much more going inside the doors than expected. it looks like there is a brass plate at the top inside of each door panel. Is the black panel inside the backside of the front veneered panel? Why the brass pieces? Just curious

  7. #277
    Join Date
    Aug 2013
    Location
    Princeton, NJ
    Posts
    7,293
    Blog Entries
    7
    Hi Pat,

    Thank you! The black panel is inside of the same panel. The black is actually leather.

    The brass pieces are there to hold thin necklaces, and the battens are set in by about 5/16" to allow for those necklaces. It's a little narrow, but specifically made for very thin necklaces that will otherwise tangle.

    I also decided to use brass screws to hold the inside structure on the doors, incase the leather needs to be replaced at some point in the future, it can be done without destroying the frame.
    Bumbling forward into the unknown.

  8. #278
    Join Date
    Aug 2010
    Location
    USA
    Posts
    5,582
    Quote Originally Posted by Brian Holcombe View Post
    Hi Pat,

    Thank you! The black panel is inside of the same panel. The black is actually leather.

    The brass pieces are there to hold thin necklaces, and the battens are set in by about 5/16" to allow for those necklaces. It's a little narrow, but specifically made for very thin necklaces that will otherwise tangle.

    I also decided to use brass screws to hold the inside structure on the doors, incase the leather needs to be replaced at some point in the future, it can be done without destroying the frame.
    I see. That makes good sense. Thanks

  9. #279
    Join Date
    Dec 2014
    Location
    Washington, DC
    Posts
    66
    Brian, what stunning, beautiful work. A lovely design, lovingly executed. I think for my next walnut piece "own the sapwood' will be my mantra.
    David B. Morris

    "Holz ist heilig."

  10. #280
    Join Date
    Aug 2013
    Location
    Princeton, NJ
    Posts
    7,293
    Blog Entries
    7
    Thanks David!
    Bumbling forward into the unknown.

Posting Permissions

  • You may not post new threads
  • You may not post replies
  • You may not post attachments
  • You may not edit your posts
  •