Templates. Doesn't sound particular exciting, but time consuming and necessary.
http://www.inthewoodshop.com/Furnitu...Templates.html
Regards from Perth
Derek


 [OP]
Contributor
[OP]
Contributor
Templates. Doesn't sound particular exciting, but time consuming and necessary.
http://www.inthewoodshop.com/Furnitu...Templates.html
Regards from Perth
Derek
 Member
Jeez Derek! Way to steal my thunder. I'm literally in the process of posting templating pics for my current build.Originally Posted by Derek Cohen

I guess mines a little different at least as it involves hammering nails into my bench top (GASP) and bending strips of wood around them.
Woodworking is terrific for keeping in shape, but it's also a deadly serious killing system...
[OP]
Contributor
You have to be quicker, Chris!
I am reading along with your build. It's looking like a bench.
Regards from Perth
Derek
 Contributor
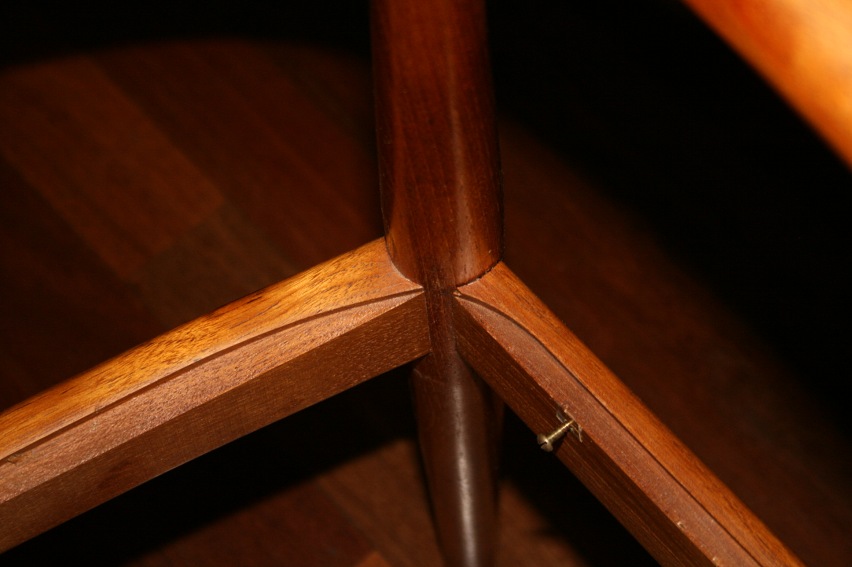
I can't wait to see how you manage to cope the parts to match the turned curves of the legs. That will be very interesting. I don't see any easy way to accomplish that task. Good luck!
Member
Looking forward to seeing this come together.
Woodworking is terrific for keeping in shape, but it's also a deadly serious killing system...
[OP]
Contributor
Next chapter: http://www.inthewoodshop.com/Furnitu...tretchers.html
A question for all: how would you go about coping the tenon shoulders?
Regards from Perth
Derek
 Member
I would just use an in cannel gouge for the ends,and carefully cut the wood beside the tenon with a chisel. I have enough of those gouges I probably have one that would match that curve pretty closely. If not,nibble away.
Moderator
In the spirit of considering all options: how about a floating tenon? Whether you coped before or after the stretcher mortises, it seems it'd be much easier than coping tenon shoulders for a tight fit. Is that cheating?
 Member
Is this portion of the leg a cylinder or does it taper in both directions over its length?
Member
I do not like floating tenons. They simply cannot be as strong as a solid one.
 Member
I would use a gouge from the top and bottom, and a fret saw from the sides close to the line. Nibble away with a bent gouge, and you're there.
Really nice work so far.
Jeff
Jeff
Contributor
I can see the potential for this being the case, however, I don't think it has to be that way. for example, the floating tenon could be even stronger if the wood for it is properly chosen. We always say the glue joint is stronger than the wood so the floating tenon has more glue so it should be stronger. Personally I agree that the floating tenon is the simplest solution. I was just curious if you would choose that path or a seemingly much more difficult path of scribing the joint with a fixed tenon.
Member
Yeah, nibbling is usually the answer to something like this. I agree, Jeff.
If you wanted some more templates, I have an idea for how to make them: Fashion a piece of a friendly turning wood the exact thickness of the stretchers and a few inches longer than the stretcher's depth; use paper layers and glue waste blocks to each side; turn this to match the mating section of the leg; split at the paper seam and cross cut at the points where the leg would meet the short edges of the stretcher and you have templates to help mark out the shoulders. In marking I would give myself a bit of meat to remove to achieve a perfected final fit and allow for slight variability in each turned leg.
 Member
Hrm - I would almost be tempted to sink the rails in a shoulder rather than cope them. Otherwise, I'd follow George's advice, if for no other reason than I love an opportunity to use an incannel gouge.
If you're using floating tenons, maybe a (*gasp*!) spindle sander . . .
" Be willing to make mistakes in your basements, garages, apartments and palaces. I have made many. Your first attempts may be poor. They will not be futile. " - M.S. Bickford, Mouldings In Practice
Member
Nice! I'm envious of your compass plane!
Woodworking is terrific for keeping in shape, but it's also a deadly serious killing system...
 Posting Permissions

 Reply With Quote