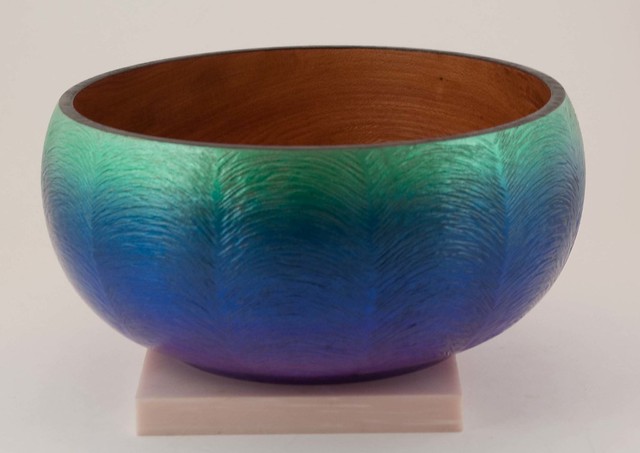
Textured Elm Bowl with ebonized rim and Candy Metal Flake fade on exterior. Around 8" (20 cm) across. Finished exterior with waterborne lacquer, interior with polyurethane.
Textured Elm Bowl 01 by Eric Holmquist, on Flickr


 [OP]
Member
[OP]
Member
Textured Elm Bowl with ebonized rim and Candy Metal Flake fade on exterior. Around 8" (20 cm) across. Finished exterior with waterborne lacquer, interior with polyurethane.
Textured Elm Bowl 01 by Eric Holmquist, on Flickr
Eric Holmquist
C&C Always Welcome
Member
The form, texture, and color all work. The total is more than the sum.
 Member
Super nice piece love the texture, If you would what did you use for the texturing.
Comments and Constructive Criticism Welcome
Haste in every craft or business brings failures. Herodotus,450 B.C.
[OP]
Member
Thanks
I used a diamond cutoff wheel that I got in a 5 pack including a mandrel from HF and used a electric rotary tool to drive itOriginally Posted by Harry Robinette

Eric Holmquist
C&C Always Welcome
 Member
Beautiful bowl Eric! The form is great, and the dye and texture are awesome!
"If it is wood, I will turn it."
vor-tex: any activity, situation, or way of life regarded as irresistibly engulfing.
 Member
total eye-grabber..love the graceful texture & the colors look great
Be the kind of woman that when your feet hit the ground each morning, the devil says, "oh crap she's up!"
Tolerance is giving every other human being every right that you claim for yourself.
"What is man without the beasts? If all the beasts are gone, men would die from great loneliness of spirit. For whatever happens to the beasts will happen to man. All things are connected. " Chief Seattle Duwamish Tribe
 Member
Yep, another winner. I like the idea of poly on the inside. I'm assuming the poly was applied by hand since spraying the inside makes it tough to get good results.
I need to get some of those candy metal flake colors, I like the look.
 Contributor
That is a beauty. I like the texture and color.
Bernie
Never put off until tomorrow what you can do the day after tomorrow.
To succeed in life, you need three things: a wishbone, a backbone and a funnybone.
 Contributor
Eric, the texturing is sublime! It is so evenly done, with uniform arcs, that it almost looks like a jig would be required. Did you free-hand it by just pivoting your hand? I happen to have one of those little 5-packs, and will have to try this.
David
[OP]
Member
Thanks everyone
Yes, poly was applied by hand on the inside with a paper towel. I use Autoair colors
The arcs are done free-hand by pivoting the hand as you describe.
I do employ some reference marks however. I use the indexing feature of the lathe to lay out 12 sections, then use a 2" sanding disk as a template to draw a few arcs on each section. With those as a reference, I can follow those lines on each section.
Eric Holmquist
C&C Always Welcome
 Posting Permissions

 Reply With Quote