That is an amazing piece of furniture! I thought it was small until I saw it on the floor next to the steps. Wowziers! That is a really sweet piece!


 Member
That is an amazing piece of furniture! I thought it was small until I saw it on the floor next to the steps. Wowziers! That is a really sweet piece!
Have a Nice Day!
 Member
Holy Moly! That thing is gorgeous. Nicely done.
 Contributor
Oh man what a beauty! Love it.
Sid
Sid Matheny
McMinnville, TN
 [OP]
Member
[OP]
Member
Thanks for the positive comments!Eric, I built a hollowing bar similar in design to one Steve Sinner makes and sells through The Sanding Glove.Originally Posted by Eric Gourieux

Faust, I guess she thought the couple of rosebuds I had turned out of a couple of holly scraps, dyed and stuck on the end of an oak dowel were lacking.So she pulled these out of a small bucket someone had given her a while ago. Low Budget.
Thanks Mike. I will give that a try.
Jerry, I turned the tenon down to about 1/2" then cut it off with a coping saw. Cleaned that up with a carving gouge.
Guest
Did you use a steady rest while turning down the tenon???? And, how did you mount it into/onto the headstock???? Doing research. That's why so many questions....... Jerry (in Tucson)
 Member
Really cool.
The only problem is that to the non-turner they might not appreciate what went in to it and how even completing it is impressive. They might not appreciate the WOW factor that is so evident to us here. Although it is really pretty on its own and stands on its own in that way.
The sapwood contrast is cool and the irregular shape makes it so awesome, had the sapwood been uniform and only around at the shoulder it would be technically awesome, but wouldn't have the same "Bam!"
All the previous kudos are well deserved on this...
Last edited by John Keeton; 06-05-2013 at 7:17 AM.
 Member
This is me bowing to your excellent accomplishment. Beautiful.
If I had a boring bar and steady rest system like that I could use it on my big lathe if I had a big lathe.
Nah, I'd still have to learn how to make it work!
Great job.
Veni Vidi Vendi Vente! I came, I saw, I bought a large coffee!
[OP]
Member
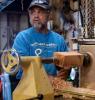
Here are a few sequence pictures Jerry. Sorry the spacing is poor. Sometimes my computer return key doesn't seem to want to cooperate when doing this. The pictures are needed since my memory is often lacking! It went on the lathe at about 150#.3 Walnut & Hoist.jpg After shaping the outside, the lift was used again to install the steady rest4 Walnut and Steady Rest.jpg to be able to hollow.15.jpg With the hollowing done, I turned a plug to use in the mouth so I could remove the steady rest.23.jpgWith the plug supporting the top end, I was able to turn the neck down a little thinner from the outside26.jpgand reduce the tenon to about 3/4"" in diameter at the bottom.25.jpgI then used a coping saw to cut the tenon off and left it about 3/4's of an inch long. I didn't take any more pictures so I hope I am remembering the rest correctly. After drying for a couple months, I grabbed the tenon with pin jaws and used a chuck adaptor and live center in the tail stock end. I used the plug again in a chuck to hold the mouth at the headstock end. The steadyrest was installed about 1/2 way down just for insurance. Using light tail stock pressure I was able to flatten the bottom and reduce the little tenon down to about 1/4". Carved off the rest. Hope that helps a bit.
 Member
Beautiful wood and workmanship--very impressive. The hollowing is mind boggling in its length and time involved. Can you tell us what cutter you used and an idea how long the hollowing alone took to accomplish. Also how did you dry the thing and how do you extract chips. Sorry but this piece deserves educating us ignorant and unwashed. I do vases and such and can understand how difficult this was. Nice.
 Member
Baxter, this is a real beauty!
When all is said and done--more is usually said than done.
Guest
Baxter, thanks for the info, and judging from mine and Robert's questions, you might as well just sit down and start writing that book on how you did this. Seeing the log really put the piece into perspective. Now I can fully appreciate the effort you put into making the vaaase......... Jerry (in Tucson) I'm sending you a pm so look for it
[OP]
Member
Thanks again for all the positive feedback. Its appreciated.Robert, I used a Rolly Munro cutter mounted in the end of the boring bar for the majority. 22.jpg Some homemade handheld scrapers were used for the shoulder area. I spent a day hollowing to 5/8" over the entire piece before quitting for the night. Another half day was spent taking it down to final thickness. Some wire for raking out chips and a shop vac with a narrow hose helped clean it out. Ace Hardware carries some paper large double layer leaf bags. They come in handy for large hollow forms and bowls that are turned thin and I don't want to anchorseal. Hope that helps.
 Contributor
Another inspiration! Well done!!!
A few hours south of Steve Schlumpf
Contributor
I read a lot of threads about what chuck to use for large pieces. It is interesting to note for all who worry a small chuck may not hold a large piece that Baxter used a talon for quite a large project. It also shows Baxter has a great touch. Thanks for the pix, Bax. Great project.
faust
Member
Thanks for the feedback--again nice piece.
 Posting Permissions


 Reply With Quote