Results 1 to 13 of 13

Thread: Attaching Base to Slab Table Top

  1. #1
    Join Date
    Jul 2012
    Location
    San Luis Obispo, CA
    Posts
    15

    Attaching Base to Slab Table Top

    Hi all,

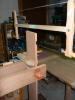
    I'm building a walnut slab coffee table as my first-ever project (taking a woodworking night class). I've got the base more/less squared away, but I'm unsure of the best way to attach it to the top. The unfinished project is below (base hasn't been glued yet):

    IMAG0317.jpg

    From what I've researched I figured I would try the following:

    - Attach the table legs at each end of the table with pocket screws - 1 drilled on each side of each table leg, opposing each other (2 per leg).

    - Attach the width-wise legs with buttons to account for seasonal slab movement - 1 on each side (though I'm concerned the fit will be very shallow, the legs are only 1&3/4" thick)

    Is there a better/easier way to attach the base in this case? Any and all guidance greatly appreciated!

    Cheers,
    Eugene

  2. #2
    Join Date
    Mar 2003
    Location
    San Francisco, CA
    Posts
    10,329
    For the width-wise legs, a couple of figure eight clips would work well. http://www.leevalley.com/US/hardware...06,41312,50311 The long axis of the clip runs in the long axis of the table. Seasonal movement of the top will make the figure eight clip rotate just a tad.

  3. #3
    Join Date
    Jun 2008
    Location
    So Cal
    Posts
    3,786
    Nice looking table Eugene,I agree with Jamie figure 8 fastener are a good choice.They do sell them at rockler if you have one near by.

  4. #4
    Jammie knows a lot more about it then me but I like using the Table Top Fasteners that are kind of z shapped.
    http://www.woodcraft.com/product/200...fasteners.aspx

    To me that are much easier to install, put one on each of the center legs on the sides and one on the inside of the end legs. The wood is going to get wider not longer.

  5. #5
    Join Date
    Nov 2009
    Location
    Peoria, IL
    Posts
    4,570
    I'm no fan of pocket screws on artistic looking furniture. It shouts cheap construction to me. If the top is flat, just put a bead of glue down the long stretcher and clamp. Figure 8's on the width if you really have to, but since you don't have anything on the other end of the slab, you won't be controlling cupping. If you really must use screws, deep counterbore through the stretcher from below. Screw through a piece of scrap the same thickness as the top as a test of your drilling. Nothing ruins a guys day/year like shooting a screw up through a table top.

  6. #6
    Join Date
    Jan 2012
    Location
    mid-coast Maine and deep space
    Posts
    2,656
    Sorry Eugene but it is not obvious to me - do you intend the base to attach to the underside of the table in the orientation as you show in the photo or are you flipping it over?

    If as it is shown I would plan on attaching 4 felt tacks or other type of little feet to 4 points of contact otherwise you will very likely have a difficult time getting the table to sit flat on the floor with all that contact surface.

    As for attaching the base to the top my answer would depend on your answer to my question, but in short the figure 8 fasteners are OK. You may have figured out that such details are better considered as part of the design process than as an after thought - like knowing what kind of hinges you will hang your doors with. Not being critical - we've all been through this process and have the scars from all the dope slaps we have given ourselves .

    You've made a spectacular table and as your "first-ever project". Be proud!
    "... for when we become in heart completely poor, we at once are the treasurers & disbursers of enormous riches."
    WQJudge

  7. #7
    Looks great! Can you flip and take a pic of the top?

    Figure 8's are decent here. I agree with Sam that you might consider routing reliefs in the lower stretchers or putting them on leveling feet. Over time it will probably rock; I made a similar table and a floor-level stretcher and it happened to me.

    In fact, pocket screws are probably the best structural option for this kind of 'leg-to-top' table. The fig 8 fasteners will require you to screw into the top of the end grain of the leg, which won't have a lot of holding power over time. To compensate, I use a longer screw going into the leg; just beware of splitting.

    Another option is to make dowels thru the top into the legs.

  8. #8
    Join Date
    May 2008
    Location
    MA
    Posts
    2,263
    Quote Originally Posted by Prashun Patel View Post

    Another option is to make dowels thru the top into the legs.
    I was thinking some relatively fat, non through dowels. You have to match when boring. Or recess it into a groove and glue it.

    On the bottom edge definitely I would want floor contact only at 4 (3?) places - either footies or undercut so it only touches on the ends of the legs to the floor.

    Im not a big pocket screw fan. I would counterbore all the way through (with a stepped shoulder) and put a small lag bolt up through and into the top. This would be hidden very deep - but you would still see a hole on the underside of the stretcher. (whoops, sorry - I mean, after ADDING a stretcher). Ok so this might not be what you want.

  9. #9
    One add'l method:

    Use blocks. The nice about blocks is you can make face/face connections with screws and or glue.

  10. #10
    Join Date
    Jul 2012
    Location
    San Luis Obispo, CA
    Posts
    15
    Hi all,

    Thank you for the super helpful feedback! I went ahead an ordered some figure 8 fasteners, sounds a heck of a lot easier than the button method I had in mind. Sorry I didn't clarify earlier, but the base will be attached as in the photo, so the stretchers will be the point of contact with the ground. I'll also go ahead and pick up 4 "feet" to make sure it sits flat, never even considered that...

    As for the legs attached to the long stretcher - if not pocket screws, can I also just fasten those with figure 8's?

    @Prashun - can you clarify what an attachment via a block would look like? I haven't come across these before. I haven't glued the base together yet, the pieces are just test-fitted in that photo, so I was a little hesitant to flip the table over.

  11. #11
    Join Date
    Nov 2009
    Location
    Peoria, IL
    Posts
    4,570
    Why not add a 2x2 between the leg tops, just like the base that touches the floor? You would have to lay on the floor to see it. Makes fastening a breeze.

  12. #12
    Join Date
    Dec 2010
    Location
    South Coastal Massachusetts
    Posts
    6,824
    In this video of Gary Know Bennett building an "Un-Trestle" table, he is shown installing blocks on the top.
    http://www.finewoodworking.com/Skill....aspx?id=34053

    It starts at about :20 in the video.

    Blocks with a waxed surface facing the crosspieces are angled to match the crosspiece so that they wedge tighter, if the top is lifted.
    It's a modified dovetail joint designed to allow seasonal movement across the grain.

    If your legs are as shown, running down the center line of the top plank movement due to humidity changes isn't your primary structural challenge -
    it's torsional loads on the unsupported end. If it was my table, I would run a dado to accept both the "spine" and crossarms of the legs.

    Glue the spine in place with dowels and allow the crossarms to float as described.

    http://www.finewoodworking.com/Skill....aspx?id=34053

  13. #13
    Join Date
    May 2008
    Location
    MA
    Posts
    2,263
    I came back to this thread after thinking on it a bit and coming up with something similar to what Jim has since posted. I was thinking just a couple dovetail runners, running sideways. You could cut a cross notch, dovetails, in each of your legs. Could screw straight up into the top, and by futzing a bit could make the fit smooth enough to allow expansion across the top.

Tags for this Thread

Posting Permissions

  • You may not post new threads
  • You may not post replies
  • You may not post attachments
  • You may not edit your posts
  •