Page 1 of 2 12 LastLast
Results 1 to 15 of 20

Thread: Simple drawer construction

  1. #1
    Join Date
    Mar 2011
    Location
    Tallahassee
    Posts
    4

    Simple drawer construction

    I am building drawers for my shop. I wanted to find a simple method that used Kreg pocket screws. The method found on the following link was used.

    http://www.lowescreativeideas.com/Co...3-7ab76699c136

    The details are on my blog: http://workshopprojects.blogspot.com...struction.html

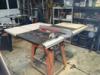
    I used a table saw, a miter saw and a Kreg jig and I did not need a router to make slots and lock joints. The only slow part is waiting for the glue to set and having enough mini clamps.

    Now I know that this is not the way drawers have always been build, but with modern materials, i.e., plywood and glues what is wrong with this method. Would you ever expect the drawer to come apart or the bottom fall out?

  2. #2
    Join Date
    May 2005
    Location
    walnut creek, california
    Posts
    2,347
    that method will work although i prefer to dado the drawer bottom in to the sides and skip the glue step. you can also speed up construction even more if you use a brad nailer to tack the parts together instead of using the clamps as long as you don't mind seeing small brad holes on the sides.
    Last edited by frank shic; 03-28-2012 at 12:56 PM.

  3. #3
    Join Date
    Oct 2008
    Location
    Seattle, WA
    Posts
    220
    That's basically the construction that Danny Proulx advocates in his books. His method uses mdf or melamine and confirmat screws, but the idea is the same. I've built several shop cabinets that way and have no problems with durability. Not pretty, but very solid and quite acceptable for shop cabinets.

  4. #4
    Join Date
    May 2005
    Location
    walnut creek, california
    Posts
    2,347
    if you use epoxy drawer slides, they'll cover the drawer bottom.

  5. #5
    Join Date
    Mar 2011
    Location
    Tallahassee
    Posts
    4
    I am using both Euro side mounted drawer slides and ball bearing type full extension. I have a system for doing this which seems to work well. Bottom corner euro slides have a problem with the screws interfering with the bottom. Here are some examples.

    IMG_0159S.jpg

    IMG_0161S.jpg


    IMG_0158X.jpg
    Attached Images Attached Images

  6. #6
    Join Date
    Apr 2008
    Location
    Edmonton, Canada
    Posts
    2,479
    I'm in the process of building some drawers (for my shop) and given that I have little shop time these days I've decided to use BB 1/2" ply for all parts (sides and bottom)
    and glue+brad nail all pieces including the bottom to sides, i.e. no dado for bottom, no box joints, nothing, just build the bottom the exact size of the drawer box and glue+nail it.
    I am thinking the glue is strong enough (plus a few brads) to hold things together. I don't care about the look. It's a shop item that things get thrown at.
    I might be proved wrong later on though...

  7. #7
    Join Date
    Nov 2007
    Location
    NW Indiana
    Posts
    3,093
    I built 32 drawers for my shop cabinets last summer and built the sides with Kreg screws and used 3/4" ply. I did run a dado in the sides to put the drawer bottoms. I put heavy stuff in the drawers and did not want to worry about the bottom pulling out.

    I cut all the sides at one time and then finished the sides and bottom pieces and then put them together. It was much easier to finish the parts than the assembled drawers. The drawers were installed with full extension drawer slides and a front face from solid wood put on.

  8. #8
    Join Date
    Mar 2011
    Location
    Tallahassee
    Posts
    4
    I built several shop drawers with 3/4" sides and 1/2" bottoms made as described above. Full extension ball bearing slides were used. Note that the open drawer is loaded with nails. The drawers are 29 1/2" x 16" x 7 1/2". If you are worried about the bottom add a few screws.

    IMG_0100S.jpgIMG_0101S.jpg

  9. #9
    Join Date
    Aug 2011
    Location
    PALM BAY FL
    Posts
    515
    I’ve used ¾ ply and biscuits for most drawers over the years with 0 problems. It’s fast, adjustable, more than strong enough, and using a simple squaring jig, extremely accurate. The following video shows how:
    Drawermaking

    - Beachside Hank

  10. #10
    I am currently making my first ever three drawers on my router table build. The plans call for three small drawers in a middle cabinet that joins the two side tower cabinets together. This has been a serious learning experience for me having never done anything like this before. It has been fun as well. I used some old Oak that I had from a waterbed frame that my mother owned. It was all 1 1/4" thick so i had to mill what I used down to the size I needed. The plans call for the drawer sides and ends to be made of hard wood so i used the Oak. They have you cut a 1/4" X 1/4" rabbet in the ends and a 1/4" X 1/4" dado in the sides with a 1/4" dado around all pieces for the bottom. I used my new Amana Prestige Dado blade to do all of the cuts and it worked pretty well but the Oak is somewhat brittle as it is 30+ years old so I got a lot of chipout when cutting across the grain. I am thinking that maybe using my router instead to cut the rabbets and dados might have worked better.

    Where I screwed up was milling the parts to thickness. I milled them 5 thou too thick so i had to run them all through the planer again last night to fix that. Thankfully it worked out fine and the parts all seem to still fit together perfect and once glued should be fine. I have to remake one end part because my planer DRO (Wixey) somehow was off by a large margin so when i ran the first part through to get it to thickness I took off way too much material. So I had to recalibrate the Wixey again and all was well. I did notice that there was a mistake in the plans. The plans call for the 1/4" hardboard bottoms to be 10 1/2" X 12 1/2" but the finished drawer is 10 1/2" wide with the cabinet carcass being 11 1/2" wide which leaves 1/2" on either side for the drawer slides. So I had to cut the bottoms to 10" in order for everything to fit perfectly. My only worry is that the tolerance on the sides of the carcass is quite tight for fitting the slides in? I suppose I can mill the sides of the drawers a little more to get some wiggle room for the slides but I will wait until I get the slides before i do anything else. I cut a couple of 1/2" wide pieces of hard wood to slide into the sides of the drawers as I put them into the carcass and they fit but it is a pretty snug fit.

    My big question is how do you setup to install the drawer glides? The plan calls for an 1/8" gap between the drawer tops and bottoms which I think I can make a couple of shims to locate the drawers vertically but once that is done how do I line up the glides and get them mounted level etc.?

  11. #11
    Join Date
    May 2005
    Location
    walnut creek, california
    Posts
    2,347
    what kind of drawer slides are you using? metal or wood? metal drawer slides like the common epoxy coated ones that you see on almost everyone's drawers are pretty easy to install. just attach the drawer slides to the bottom of the drawer and the other half to the cabinet and you're set!

  12. #12
    I'd be more concerned about the bottom falling out than the sides coming apart. If you're using metal slides, unless you're using the drawer frequently and/or loading it up with very heavy items, there's really not a lot of force placed on the drawer front when you open it. For a hobby shop drawer that isn't used very often, they'll probably last quite a long time. In truth, a simple lock joint can be made on the table saw without too much extra effort, will certainly last longer, and is good practice for furniture projects.

  13. #13
    Join Date
    May 2005
    Location
    walnut creek, california
    Posts
    2,347
    if you want real simple, blum metaboxes go together in about 5 minutes and the bottom will likely never fail.

  14. #14
    Join Date
    Mar 2011
    Location
    Tallahassee
    Posts
    4
    Michael, take a look at my blog. There is a detailed section on mounting full extension drawer slides.

    http://workshopprojects.blogspot.com...extension.html

  15. #15
    Here's a picture of some pine drawers I finished this week using a porter cable 4210. The glides are old KV full extension slides I got from a going out of business sale.

    I stained the white pine with some minwax red mahogany and then followed up later with a satin urethane varnish. They turned out great for a shop drawer. Now I just have to finish the fronts.

    DT drawer.jpgdrawer ext.jpg
    Last edited by Chris Tsutsui; 03-29-2012 at 5:18 PM.

Tags for this Thread

Posting Permissions

  • You may not post new threads
  • You may not post replies
  • You may not post attachments
  • You may not edit your posts
  •