Page 1 of 3 123 LastLast
Results 1 to 15 of 34

Thread: small table build

  1. #1
    Join Date
    Sep 2008
    Location
    Agusta, GA
    Posts
    397

    small table build

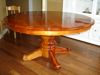
    Here's a few pictures I took along the way while building this small table. The table's made from Honduran Mahogany. This was by far my most hand-tool intensive build I've done to date.

    As they say, great things from small beginnings, so here we go!

    First off, I made the legs. I started with some 12/4 blanks. I marked the off-cuts to be used with their matching leg later on.

    These are just your basic cabriole legs, layed out and band-sawed to rough shape. If you look closely, I cut a table saw kerf on two sides to define the top of the knee and create the rabbet for the aprons.
    Attached Images Attached Images
    Last edited by Brett Robson; 12-20-2011 at 1:21 PM. Reason: spelling

  2. #2
    Join Date
    Sep 2008
    Location
    Agusta, GA
    Posts
    397
    Next comes the hard part - carving the ball and claw. I'm by no means a pro at this so my feet look somewhat amateurish in comparison to many I've seen pictures of before.

    I'd guess I took about a week to make the four feet. I probably could have done it faster but I found hunching over the bench for hours was killing my back, so I had to work in shorter sessions.
    Attached Images Attached Images

  3. #3
    Join Date
    Sep 2008
    Location
    Agusta, GA
    Posts
    397
    Next I prepped the stock for the top. I picked this as my next step because I wanted time for the stock to move and cup after resawing. I started with a chunk of 16/4 which I split on the bandsaw.

    My lowly little Ridgid saw was screaming for mercy when cutting this board, but she made it through! When I reached the end of the board I had to pull it through from the rear as it was too heavy and long to try to hold from the front. I couldn't see my cut line from the back because the guides were in the way (all the way up) so I had to blindly cut the last foot or so.

    As a result, the board deviated from my cut line by about 3/16" on the last foot. It wasn't a big deal, just more for me to plane off later.

    I took the bulk off with my LAJ, then used my old No. 7 to flatten it.
    Attached Images Attached Images

  4. #4
    Join Date
    Sep 2008
    Location
    Agusta, GA
    Posts
    397
    After I had the two boards for the top flattened, I set them aside for later and moved on to the aprons.

    The aprons are a glue up of two 4/4 pieces. I used a glue up here mainly because I had a bunch of 4/4 on hand and it was convienent. Don't panic! The finish hides the glue lines! I used Titebond's hide glue for this step.

    I apparently didn't take any pictures of the glue up process, but I'm sure you guys are pretty familiar with the steps involved without photo documentation!

    Here they are bandsawed and smoothed. Here again, I had 5 minutes on the saw followed by many hours at the bench with planes, chisels, files and scrapers.

    The aprons are mitered around the leg blocks to make a continuous grain wrap without them terminating at the legs with a mortise and tenon.
    Attached Images Attached Images

  5. #5
    Join Date
    Sep 2008
    Location
    Agusta, GA
    Posts
    397
    Here you can see it's taking shape. The aprons are glued & screwed from the back, then I planed the leg blocks to a snug fit into the square hole. In effect, the aprons and legs create about a 5 inch mortise and tenon.

    The darn thing's rock solid!
    Attached Images Attached Images

  6. #6
    Join Date
    Sep 2008
    Location
    Agusta, GA
    Posts
    397
    Here I retrieved my leg blank cut-offs to make the transition blocks. I numbered them when I cut them so I could match'um with their leg at this step.

    This step goes pretty fast. I think the glue takes longer to dry than it does to pare the blocks flush with the knees. I usually enjoy this part as I'm all about instant gratification!
    Attached Images Attached Images

  7. #7
    Join Date
    Sep 2008
    Location
    Agusta, GA
    Posts
    397
    Now back to the top. This was where all progress came to a screeching halt.

    After several days of waiting, hand planing then power planing the top to rough thickness, Mr. Murphy showed up with his law.

    I cut the top too short.

    Yes. I measured three times and cut once just to be sure I had it right. I had to add an inch and a half to the overall length of the table's aprons. Somehow despite measuring three stinkin' times I managed to not add the 1 1/2" to my measurement and cut the top to the exact size of the aprons!!!!! AGHHHH!!!!!!! I just unplugged everything and stormed out of the shop. I hate woodworking.

    So anyways, days later after ordering more stock and repeating the whole resaw, wait, hand plane and power plane process, I had a glued up top again.

    First step was to make the partial cuts to define the end corners. Next I routed the large rabbet to rough depth then planed it to final size with my #10.

    Flipping the base over and setting it into it's rabbet, I used a washer to trace the outline of the aprons onto the top.
    Attached Images Attached Images

  8. #8
    Join Date
    Sep 2008
    Location
    Agusta, GA
    Posts
    397
    After marking, I sawed the top to shape then sanded/filed/scraped the contours smooth.

    Next I routed an ogee onto the underside of the table. A few minutes with a small gouge and a sawblade made scraper shaped the corners to a point.

    After the handwork, I drew the profile onto the top 1" from the edge with a compass.
    Attached Images Attached Images

  9. #9
    Join Date
    Sep 2008
    Location
    Agusta, GA
    Posts
    397
    Here's where it gets interesting.

    I made a quick jig to suspend my router over the top and allow it to traverse the entire width. Making two 1/4" passes, I removed the bulk of the center material being careful to stay proud of my pencil line.

    This was fun although it made an ungodly mess in my shop. Even with the vacuum attached the darn router flung dust everywhere.

    Using some basic chisels and my #78, I cleaned up the edges and flushed them to the line.

    After sanding the top smooth I again used by sawblade scraper to scratch a line 1/4" in from the edge. I used a small V-gouge to bring the line around the corners were the scratch couldn't reach.
    Attached Images Attached Images

  10. #10
    Join Date
    Sep 2008
    Location
    Agusta, GA
    Posts
    397
    After scratching the line, I used my trim router to remove the stock up to the line to a depth of about 1/16". You could use a router plane here if you prefer.

    Next I ran a line about 3/16" up from the bottom and in from the edge to define the top and bottom of the cove, which I carved into the edge with a 7/20 gouge.

    Next I rounded over the bottom edge with a back bent gouge before scraping and sanding the profile smooth.

    The strips of Poplar you see under the top are screwed to the bottom and stick out past the top to allow me to clamp it to the bench.
    Attached Images Attached Images

  11. #11
    Join Date
    Sep 2008
    Location
    Agusta, GA
    Posts
    397
    Almost there guys! One last piece of molding to be made.

    Using some 1/8" stock, mitered and traced with the apron profile, I sawed and scraped the edges to a small bullnose shape.

    The molding is attached with a little glue and a few pins, and that's that. Here's the top in place over the molding.
    Attached Images Attached Images

  12. #12
    Join Date
    Sep 2008
    Location
    Agusta, GA
    Posts
    397
    The finishing is still underway, but here's a preview. It doesn't have any topcoat finish on it in these pictures, just the stains. I used some Minwax mahogany stain, followed by a coat of Sealcoat shellac, then a light glaze of Zar Antique Mahogany.

    It'll be coated with Waterlox original when all's said and done.

    Thanks for taking the time to read through all of this and I hope you enjoyed it!
    Attached Images Attached Images
    Last edited by Brett Robson; 12-20-2011 at 10:32 AM. Reason: dangling participle and split infinitive deleted.

  13. #13
    Join Date
    Jan 2006
    Location
    Grand Forks, ND
    Posts
    2,336
    Brett, that is superb!!!! Your work is very nice to say the least. Beutiful work and an outstanding table.
    A bus station is where a bus stops. A train station is where a train stops. My desk is a work station.

  14. #14
    Great work. Thank you for the wonderful write up, too.

  15. #15
    Join Date
    Mar 2006
    Location
    North Carolina
    Posts
    167
    Brett,

    I would call that a Masterpiece. Thanks for showing us.

Posting Permissions

  • You may not post new threads
  • You may not post replies
  • You may not post attachments
  • You may not edit your posts
  •