I turned these about a week ago and have just been waiting until I had the photo tent up to take some pics.
The first one is black limba with an african blackwood knob and icicle. It was dyes with a turquoise/blue dye but with the yellow in the wood, it went more towards a turquoise/green.
The 2nd one is Maple (I think, kinda lost track of which woods I used for which pieces) with a maple knob and icicle. The globe was dyed with a royal blue dye and the knob and finial were treated with silver leaf rub n buff. I was hoping the silver would look more like silver, but it looks more like aluminum. I'm wondering if maybe a coat of lacquer wouldn't help it? Ren wax is a no go, tried it on the knob and it just kind of melts the silver off.
Anyway, I like how the blue turned out and I've got another in the process of finishing that's been dyed red with a similar pattern of light and dark. I also got some of the gold leaf rub n buff and might try it on the knob and icicle for the red ornament.
Both globes are finished with spray on lacquer.
PICT0009.JPGPICT0010.JPG
Thanks for looking!
Comments and critiques are welcome.

 Reply With Quote
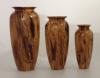


 .
.