Was just wondering if anyone had made any modifications or personal enhancements to their Keller jigs?
I'm a fan of the system but am always looking for a way to improve speed and efficiency.
Any suggestions out there?


 [OP]
Member
[OP]
Member
Was just wondering if anyone had made any modifications or personal enhancements to their Keller jigs?
I'm a fan of the system but am always looking for a way to improve speed and efficiency.
Any suggestions out there?
Guest
I've converted mine to (primarily) router table use.
First, instead of a 2-1/4" thick board, I used a 1-1/4" thick board and faced it with two 1/2" thick removable/reversible/rotatable sacrificial MDF "fences." The fences are held by 1/4" furniture cap nuts, washers, and 1-3/4" long 1/4-20 studs.
The next thing I did was routed a t-slot into the top of my 1-1/4" thick board and added a shop-made stop. The stop guarantees perfect alignment between all the tail boards and all the pin boards.
To use the stop, I first align it for cutting the tails and cut two boards with tails, keeping each board against the stop.
Next, I use one of the tails boards I just cut to align the stop for cutting the pins. Now I just cut my two boards with pins by keeping them against the stop.
When I assemble my box my edges are all nicely flushed-up.
Hope that makes sense.
I can post pics if you need. Probably not until tomorrow, the good camera is at work.
Last edited by Phil Thien; 12-01-2011 at 10:28 PM.
Member
I would like to see the pics. Always looking for simpler ways.
Contributor
Me too, please.
Rick P
Member
I too would like to see those photos. I recently purchased the Peachtree version of Keller jig. I got the impresion that Keller patent expired and his technology is now fair game. I bought the PT version at a woodworking show last year........(2) 15 inch combs, 6 bits and 2 backing boards for about $250 but hvaen't used it yet.
I bought it with the idea of making keepsake boxes for family.....still need to source reasonably priced half inch harwoods for box stock. I do not have planer or jointer or bandsaw
[OP]
Member
Tom, interesting that you chose the peachtree version is it made of the same material as the keller. The keller version is ~$260, I think, and I've been impressed with how well the templates are milled.
Phil, the thinner backer and sacrificial fences are a great idea. I'm going to look at leevalley to buy some t-channel and probably incorporate some of the mods. I've put a fixed block on the far left end of my tail board to serve as a reference point when I do production pieces.
Guest
I haven't forgotten. I'll get the pictures posted this morning.
Guest
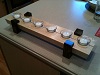
Okay, so here is my Keller jig adapted to router table use.
I just got the jig last week. After seeing I was to use a tails board to mark the pins board with a knife, and then align that by eye, I thought, "my back is never going to take that, I need a simpler way." This is what I've come up with. If something is unclear and seems like it shouldn't work, please ask. If you have a better or simpler way, or if I'm doing something wrong, please post.
The wood components are all 18" wide by 3-1/2" tall. The center board is a walnut drop that I planed to 1-1/4" thick. The faces are 1/2" MDF.
First, I drilled the walnut with 1/4" through holes. These holes are centered on the 3-1/2" dimension, one is centered on the 18" dimension, and two are located 1-1/2" from the ends.
Then I used a 3/8" drill bit on all three holes (on both sides) to expand the 1/4" holes to 3/8" for about the first 1/4" of depth. The 3/8" provides some clearance for the cap nuts, which extend slightly into the 1-1/4" center block.
I used my walnut center block and a 1/4" brad-point bit to mark the holes on the MDF faces. I simply spring-clamped the faces (one at a time) to the center block and pushed the 1/4" bit through the walnut block and used the brad point to make a small mark in the MDF. I used this mark to make 7/8" diameter, 1/8" (approx.) deep flat-bottom counterbores for the cap nuts and washers. I used the dimple left by the center of my Forster bit to align a 3/8" drill bit to make the through-hole in the MDF faces.
Finally, I used my 3/8" straight and t-slot router bits to cut a t-slot in the top of the walnut board, and made a little stop with bar that keeps it perpendicular to the slot.
The hardware that holds the faces to the center block are: (6) Furniture cap nuts. These are 1/4-20 threaded. (6) 3/8" flat washers that fit in my 7/8" counterbore. (3) 1/4-20 1-3/4" long studs I cut from brass threaded rod.
The way the jigs works is as follows:
(1) Place a board that will get tails on the jig and center it as you'd like the tails to cut. Clamp the board in place, and now slide the stop over to the edge of the board and tighten the knob.
(2) Cut the tails.
(3) Now rotate the board 180-degrees. You want to keep the same face of the board towards you. So if you marked a big "A" on the face of the board that was facing you in step #1, you still want to see the "A," you just want the other end of the board on the jig. Now, cut those tails.
(4) Repeat steps 1, 2, and 3 for the second TAILS board.
(5) Now, install the flush bit in the router, and turn the jig around, we're going to cut the pins.
(6) To align the stop, use on the TAILS board you cut and place the tails on the router table, between the fingers for the PINS side of the jig. Push it back, towards the jig, until it is snug. The top of the board should be touching the top of the jig, and a triangular gap is visible between the board and the face of the jig. Move the stop over to the edge of the board, and tighten it.
(7) Now install a board that needs pins on the jig and clamp it so that the edge of the board is aligned with the stop.
(8) Cut the pins.
(9) Flip the board 180-degrees, align the edge to the stop, clamp the board, and cut the pins on that end.
(10) Cut the pins in the second pins board.
Now when you assemble everything, it should come together with perfectly flush edges.
Last edited by Phil Thien; 12-03-2011 at 1:01 PM.
 Contributor
Phil, you are a master with your setups.
Member
Thanks for that post. That is really interesting. Is the Keller the Journeyman? It appears that the Keller bits are quite expensive. Can you get them someplace for less?
Thanks
G Nagen
Guest
Yep, it is the Journeyman 1500. The bits that come with my unit were made in the USA. I've was told they were made by Whiteside but don't know that for sure. I think the unit I got was NOS as I got it from a hardware store and I think it was sitting on the shelf for a long time, so I don't know if new units ship w/ the same USA-made bits.Originally Posted by Galen Nagen

Nonetheless, yes, replacement bits from Keller are a bit pricey, but there are other sources. I believe there are at least a half dozen outfits selling the bits.
The bits do have bearings on them, which probably adds a bit to their cost whether they they are sold by Keller and made in the USA, or whether they are sold by ABC and made in China. Other dovetail jigs use collets on the router's base.
Member
phil
thanks for photos and your enhancements which I will try and replicate. Is there anything majic about the 1 1/4 thick backer board and (2) 1/2 inch sacrificial mdf fences? Would a 2x4 with 3/4" mdf work just as well. I do not have access to a planer
Guest
On the Keller jig, joints are cut using both sides, thus the sacrificial fences on both sides of the 1-1/4" thick board. If you went with two-by and 3/4" MDF, it would work, but you'd have only one sacrificial fence.
 Member
I know this is a really old post, but I am building the base for my new Peachtree Dovetail template (Just like the Keller 1500 journeyman only aluminum) I can't open Phil's photos and I would really like to see them! Any Help????
Contributor
Hank, you need to be a contributor at $6/yr level or above to see photos on the Creek.
 Posting Permissions

 Reply With Quote