Page 1 of 3 123 LastLast
Results 1 to 15 of 39

Thread: Honing Jointer Blades

  1. #1
    Join Date
    Dec 2009
    Location
    Florida Panhandle
    Posts
    513

    Honing Jointer Blades

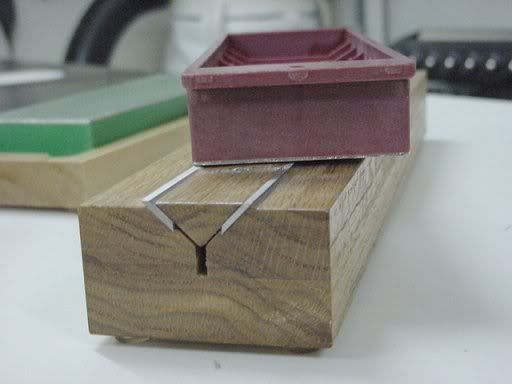
    Has anyone here tried honing your own jointer blades? I want to share my experience with this. I first tried this doing it by hand with sandpaper on glass honing down to only 1000 grit. Holy smoke! the results were phenomenal: I could surface boards with the most difficult grain with hardly any tear out. There was some because my honing wasn't perfect but I found that the blade bevel is wide enough to do a pretty fair job, far better than a commercially sharpened blade and its not difficult with an 8" jointer knife. Ten inch might be a little "iffy".

    A month ago I bought the Veritas honing jig and the results were far better. Now I can run bird's eye through without tearing out a single eye after buying some 3M micro paper. Never again will I have to send out jointer knives for sharpening. What a boon!

  2. #2
    Join Date
    Feb 2003
    Location
    Eagle River, Alaska
    Posts
    731
    I have no personal experience with this jig, but have read reports it works well.

    Rich
    ALASKANS FOR GLOBAL WARMING

    Eagle River Alaska

  3. #3
    Join Date
    Feb 2011
    Location
    Central WI
    Posts
    5,666
    I think Bobby at Woodworkers Tool Works will sharpen and put the secondary bevel on if you ask. The old jointers and planers with grinders had a jointing stone attachment. After each knife was ground, you turned the machine on and lowered the stone until it kissed the blades. Ran the stone along the knives. Served two purposes, secondary bevel and putting all blades at exactly the same height. I have done it and it is pretty scary the first few times. The guys who are really good at in place grinding argue the finish is second to none- including tersa and shelix.

  4. #4
    Join Date
    Dec 2010
    Location
    WNY
    Posts
    9,715
    I sent my planer blades out once, and they looked worse when I got them back. That motivated me to learn how to sharpen them myself, and I use a jig on the same theme as the one posted above, with japanese waterstones, 800 then 1200. Then I hone a micro bevel using a 4000 grit stone which produces a mirror surface. They sure do cut well after that. Lately I've gotten a little lazy and found that I can sharpen blades very well with my Grizzly Universal Knife grinder in just a couple of minutes and they are equally straight and still cut about as well. My widest blades are 12-1/2", but I see no reason why either technique wouldn't work on knives of any length.

  5. #5
    Join Date
    Dec 2007
    Location
    Hillsboro, OR
    Posts
    1,415
    Blog Entries
    3
    I have a DIY system like Rich posted (except it holds 3 knives @ once) and it works very well. I use DMT diamond stones (the big ones) for sharpening the blades. I have not seen advantages of adding a micro bevel onto my blades.

  6. #6
    Join Date
    Dec 2009
    Location
    Florida Panhandle
    Posts
    513
    The jig Richard posted looks like the way to go for planer or wide jointer knives.

    Anyone think its worth the effort to do portable planer blades which are supposed to be one-time use?

  7. #7
    Join Date
    Dec 2010
    Location
    WNY
    Posts
    9,715
    Quote Originally Posted by Harvey Rabbett View Post
    The jig Richard posted looks like the way to go for planer or wide jointer knives.

    Anyone think its worth the effort to do portable planer blades which are supposed to be one-time use?
    I don't know how much they cost, but I regularly sharpen blades for my razor knife. Yes, I'm cheap. A blade is a blade and most all of them can be sharpened. I would bet that those disposible blades can be sharpened a whole bunch of times.

  8. #8

    Arrow

    Quote Originally Posted by John TenEyck View Post
    I don't know how much they cost, but I regularly sharpen blades for my razor knife. Yes, I'm cheap. A blade is a blade and most all of them can be sharpened. I would bet that those disposible blades can be sharpened a whole bunch of times.
    The problem with sharpening disposable blades is that they are keyed and can't be adjusted to compensate for material lost in the sharpening process. They are also usually very thin and flexy. I imagine a precise edge would be hard to achieve without some type of sophisticated setup. I would love to get a couple of extra honing out of my 20" J/P blades. At $160 a set, it really hurts to toss them in the scrap metal bucket after one go round.

  9. #9
    Join Date
    Nov 2007
    Location
    Mid Missouri (Brazito/Henley)
    Posts
    2,769
    I have sharpened jointer and planer knives for over 20 years in-shop. They can be honed with a diamond-grit sharpener for a touchup. But, to remove nicks, or when the knife has considerable wear, grinding is needed. I made a hard maple block to hold blades at the exact angle for passing under a white, friable cup wheel in the drill press. Lo-Tech, but it works. After a brand new edge is achieved, the wire edge is honed off on a fine-grit Norton stone.
    [/SIGPIC]Necessisity is the Mother of Invention, But If it Ain't Broke don't Fix It !!

  10. #10
    Join Date
    Dec 2009
    Location
    Florida Panhandle
    Posts
    513
    Quote Originally Posted by johnny means View Post
    The problem with sharpening disposable blades is that they are keyed and can't be adjusted to compensate for material lost in the sharpening process. They are also usually very thin and flexy. I imagine a precise edge would be hard to achieve without some type of sophisticated setup. I would love to get a couple of extra honing out of my 20" J/P blades. At $160 a set, it really hurts to toss them in the scrap metal bucket after one go round.
    Hadn't thought of that. Sheesh, $160 a set? Bet you don't run any dirty wood thru that machine! I've found that rough sawn is usually full of dirt and the fastest way to dull blades. Thus I always buy my stock s2s and let the supplier dull his blades.

  11. #11
    Join Date
    May 2008
    Location
    MA
    Posts
    2,258
    I was inspired by Chip, and purchased a friable wheel and ground ALL my blades in a setup on the table saw. Chips method is on the drill press - I would prefer the drill press (less grit in the tablesaw, slower speeds, etc) but couldnt find the right wheel for it.

    I think the wheel I got was ~$20. The finished sharpness was as good as having them sent out for grinding (might not be as good as a 1200 grit honing, but plenty sharp and as noted here the rough cut lumber can dull or nick a blade pretty easily)

    An afternoon and everything was sharp - hollow ground. Two sets of 15" planer blades, two sets of 8" jointer blades, all my handplanes, some chisels, etc etc.

  12. #12
    Join Date
    Sep 2006
    Location
    Tacoma, WA
    Posts
    731
    Deulen both sm.jpg
    I bought the Deulen jig in Atlanta because it was a good idea, very well made and I really liked the Deulens.

    These are really nice brass and Rosewood jigs. You put your blades in and then fasten them in with set screws. This holds the blades in place while you turn the jig upside down and sharpen the blades on sandpaper over glass.

    The base model has the blades held in with set screws that require an Allen wrench. The thumbscrews are easier to use because they don't need a wrench. However they tend to get in the way when you turn the fixture over to sharpen the blades.

    Thanks,
    Tom
    Last edited by Keith Outten; 07-10-2011 at 6:55 AM.
    I'm a Creeker, yes I m.
    I fries my bacon in a wooden pan.

  13. #13
    Join Date
    Jan 2011
    Location
    Laurel, MS
    Posts
    26
    Awesome, Tom! I have a 12" Dewalt planer and a 6" Craftsman jointer. Both could use a good sharpening. I have suitable stones and sandpaper but just no good way to fixture them at the moment. If it is possible to use the 12" jig to do both, that would be wonderful.
    Last edited by Keith Outten; 07-10-2011 at 6:58 AM. Reason: typo (I'd love to have a 6ft jointer but a 6in will have to do).

  14. #14
    Join Date
    May 2009
    Location
    Atlanta, GA
    Posts
    52
    I finally had a chance to try out the Deulen jig that Tom Walz sent me pursuant to his offer above, and I have to say that I was pretty impressed with it. I had thought about making my own version of this jig in the past, but never got around to it. This jig has a nice fit and finish, is easy to hold and use, and works great. I tested the 12 inch jig because I thought it would be helpful for sharpening both jointer and planer blades. Since the 12" version works equally well for both types of blades, I can't really see much purpose for offering a 6" jig, except maybe for people who don't have a planer and never intend to buy one.

    The jig itself is well made. The wood itself is nice and tactile, and has a distinctive, almost oily aroma (not bad...just distinctive). The brass guides hold the blades in place at a fixed angle so that you can sharpen and hone them using the Scary Sharp method or, in my case, using DMT diamond stones. The blade is held in place with any of several types of screw fasteners that are included with the kit. I would have thought at first that I would prefer the enclosed thumb screws, but I found that their large size got in the way when operating the jig. Instead, I prefer the pre-installed set screws, which are easily tightened and loosened with an Allen wrench, included with the jig. Several screws hold each blade firmly to the jig.

    The most difficult part of sharpening my blades (all of which were knicked and very dull) was flattening the back side. No jig needed for that part. I'm not sure if flattening the back is necessary for sharpening jointer and planer blades in the same way as it is for chisels and plane irons. However, I figured it wouldn't hurt, and I wanted to do the job right, so I spent quite a while on each blade flattening the back side against 500-grit sandpaper, then with my fine (red) DMT stone, then with my extra-fine (green) DMT stone. It would have taken forever to perfectly flatten the backs, so I gave up after I was "close enough."

    Once the blade backs were flattened, I installed the blades in the jig. To use the jig, I simply rubbed the blade bevels over the sandpaper and stones. This part was super easy, and the jig's wooden contours fit easily in your hand. The blades are fixed in the jig at an angle that is slightly more than the natural blade bevel, so the jig creates new bevels. By the time I was finished removing all of the many knicks in my blades, this new bevel about a millimeter wide. I sharpened the blades on the sandpaper and stones, honed them with some honing compound on mdf, and then removed whatever burr was left with a leather strop.

    The resulting blades are very sharp. My right arm is missing quite a bit of hair now that I've tested the sharpness of two sets of jointer blades and one set of planer blades. In operation, the blades work like new. My conclusion is that the jig does what it was designed to do and is easy to use. I did notice a couple of disadvantages, however.

    First, the jig requires you to sharpen two blades at a time. Most jointers and planers use 3 blade sets. It's not a problem to sharpen two blades first, remove one, and then replace it with a dull blade, but it "feels" like you're oversharpening the remaining blade. I couldn't notice any difference in the results, so it must not be a real issue. And, you can always sharpen two sets of blades at once to solve the problem.

    Second, my guess is that the next time I need to sharpen these blades, it will require a lot more effort to remove knicks. It is easy to remove knicks in the first sharpening because you're creating a new bevel, quickly removing material on the blade edge. However, the second time around, the bevel will remain the same and will probably take a lot more effort to remove the necessary material.

    In any case, the jig works great and is easy to use. Thanks for letting me try it out, Tom!

  15. #15
    Join Date
    Dec 2010
    Location
    Bristol and Pound Virginia
    Posts
    237
    I have been hanging a new door in my oldest girls bedroom. It was a TINY bit tight and I thought "...hmmm one pass over the jointer and this thing would be perfect" BAD idea, well, not checking for staples was the bad idea! Anyway, I nicked the knifes so out they came. I made a jig with an old router bit bearing to help hold the angle. Some spray glue on wet/dry paper and a piece of plate glass for "stones" I swear they are better than new. I found this method online somewhere. maybe youtube?

    It's needed a new set since these are several months old and I do alot of cabinet work in red oak and maple, read HARD air dried for years wood. I've sharpened 3 sets for the jointer and going to do 2-3 sets for the 13 inch planer after I finnish with the girls door. I'm not sure it will work with the long knifes as it might tip to one side.

Posting Permissions

  • You may not post new threads
  • You may not post replies
  • You may not post attachments
  • You may not edit your posts
  •