Page 2 of 2 FirstFirst 12
Results 16 to 26 of 26

Thread: Guitarnut- Stratocaster Build

  1. #16
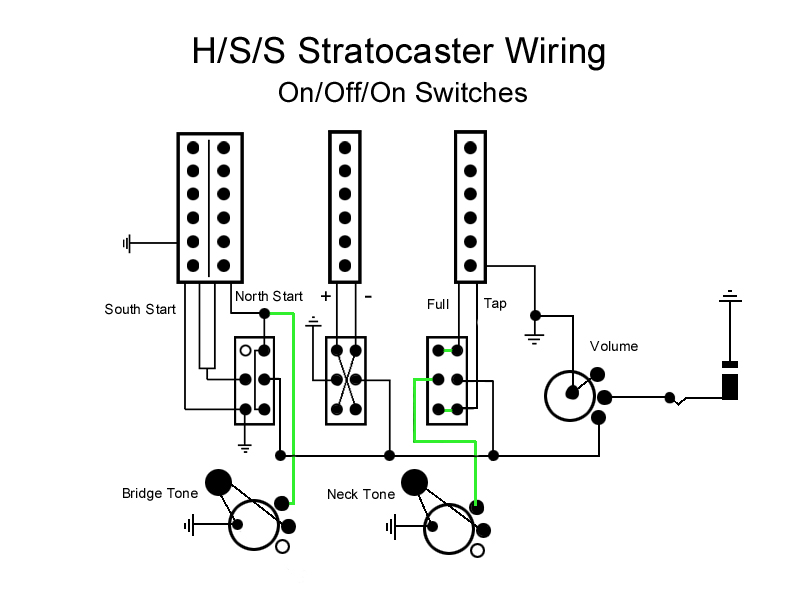
    After posting my control layout over in the Project Guitar Electronics forum, Ripthorn was good enough to confirm my suspicions about how I was feeding the tone controls.

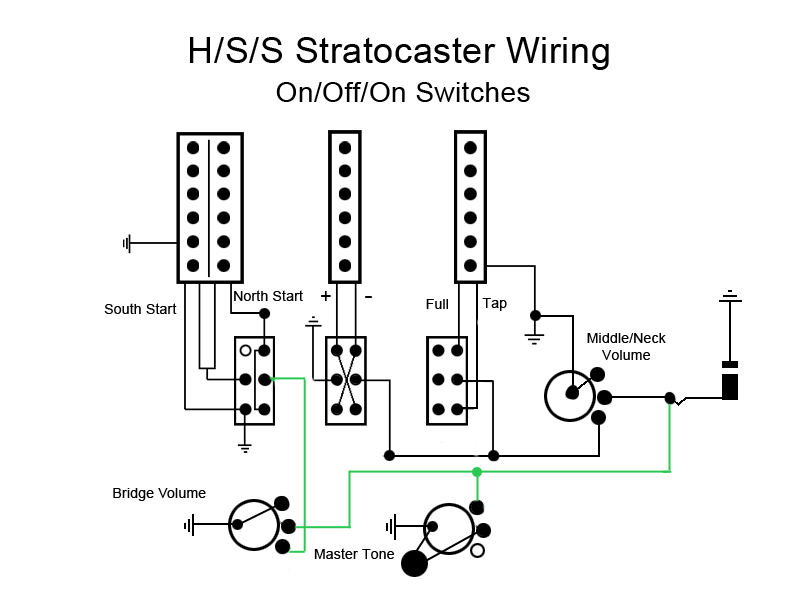
    Feeding them from the output side of the switches placed the 2 circuits in parallel which meant they would combine their results, as well as affect all pickups...not good.

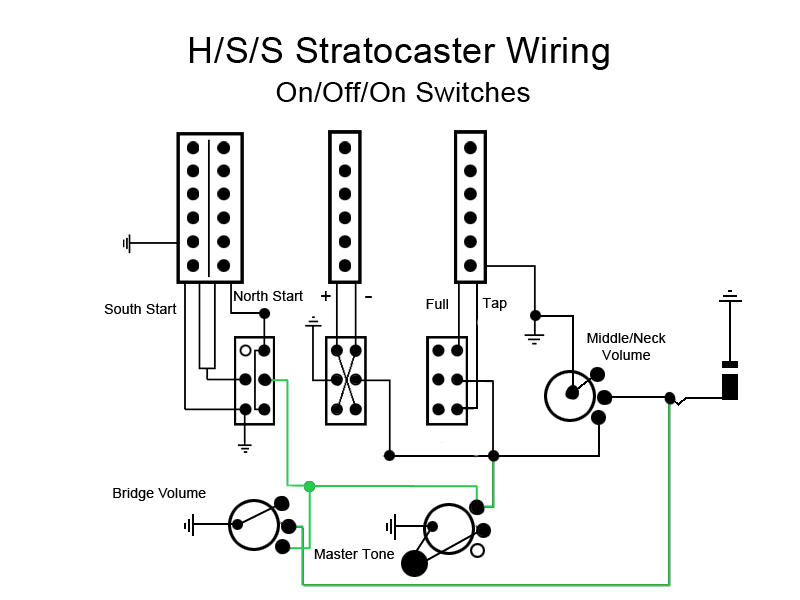
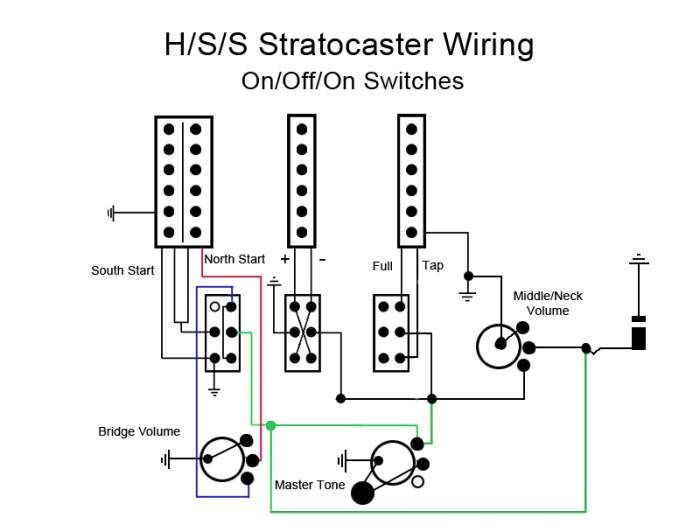
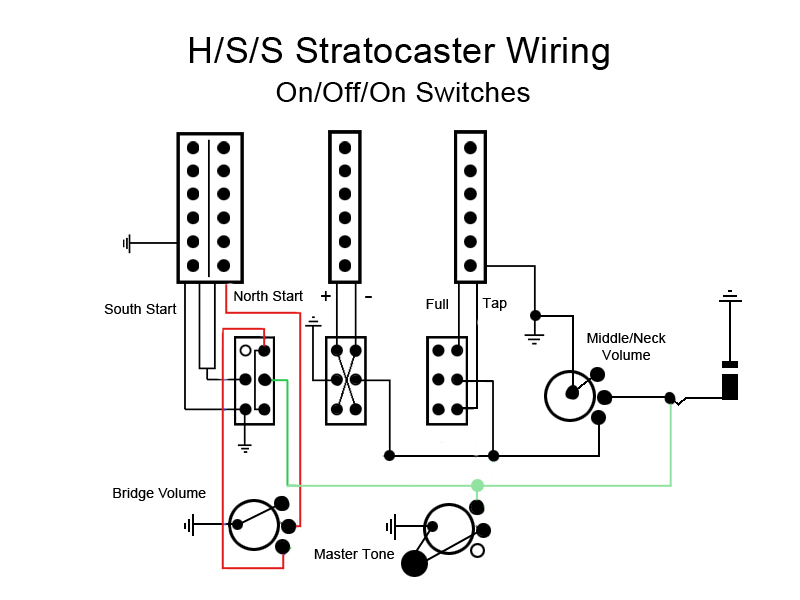
    So, I created paths from the input side (green traces) of the respective switch to feed each tone circuit independent of the other. If I understand it correctly, this is how it's done with a 5-way blade switch which has 2 banks, each with 3 inputs and 1 output. The output feeds the vol control but the tone feeds are taken from the input side thru internal connections in the switch.

    So, applying this to my setup...The North coil of the bridge PU is always in play when the bridge PU is being used, so I took a path from the input side of it's switch location. The second pole on the coil tap switch of the neck PU was unused so I jumped each state of the PU across and used the output of the switch to feed the tone circuit. I think I'm on the right path here...comments and corrections welcome.

    "Thought that is no longer limited brings experience that is no longer limited" Marianne Williamson.

  2. #17
    re: neck pocket templates
    I gave up on using templates a long time ago, even ones that I make myself. Instead, I build the neck however I wish and then use the neck itself to build a template in place on the guitar. I use straight pieces of wood clamped to the neck, and then clamped to the body. Unclamp the neck and viola, you have a custom template clamped in place on the body which will perfectly fit whatever neck you happen to have, tapered vs square, etc.

    David Myka has posted on his website a technique to do this using a jig that will set a neck angle as well. I've used it and it works well, though these days I've started incorporating the neck angle into the heal of the guitar, not the body. I did that for aesthetic reasons. My neck pocket is angled, so a neck angle incorporated into the pocket gives a tapered look that makes everything look crooked, but now that I'm angling the heal it is SOOOO much easier IMHO.

    I can't wait to see this one finished...should be hot.

  3. #18
    Hi John. Thanks!

    I've used that technique on my first bound neck. With the addition of the bindings, I miscalculated the width of everything and ended up with a neck that was wider than normal by .060". The technique worked quite well for a glue in neck but I'm not sure that tight a joint would work between two finished surfaces. You ever use it on a bolt on neck?

    I've never put an angle in a neck pocket. I've always angled the heel. Like you said, it just looks better and it's easier to accomplish.

    Thanks for the input!
    "Thought that is no longer limited brings experience that is no longer limited" Marianne Williamson.

  4. #19
    Quote Originally Posted by Mark Crenshaw View Post
    Hi John. Thanks!

    I've used that technique on my first bound neck. With the addition of the bindings, I miscalculated the width of everything and ended up with a neck that was wider than normal by .060". The technique worked quite well for a glue in neck but I'm not sure that tight a joint would work between two finished surfaces. You ever use it on a bolt on neck?

    I've never put an angle in a neck pocket. I've always angled the heel. Like you said, it just looks better and it's easier to accomplish.

    Thanks for the input!
    I usually don't finish at the neck joint...maybe oil on the neck. That said, there is a simple solution. Take a piece or two of masking tape and place it on the neck before clamping the straight edges. That will give you the width of the tape as clearance. Often time, I do the opposite...I put a layer of tape on the side of the jig, giving me a layer of tape interference fit. Sometimes I don't glue the neck until a couple of weeks later, so that lets me fine tune it for environmental changes, finish sanding, etc.

  5. #20
    Brilliant! Thanks!
    "Thought that is no longer limited brings experience that is no longer limited" Marianne Williamson.

  6. #21
    Next thing was to mount the bridge and drill the string thru holes.

    After drilling the tuner holes in the neck, I started by installing the E string tuners and setting up a simple jig that lets me put tension on the strings while I slide the bridge into place. The piece of MDF is drilled at Strat string spacing if you continued the lines past the bridge, and countersunk on one side to keep the string balls from digging into the top.

    The neck is clamped into the pocket. I line it up so it looks best visually to start. If all works from there, then I know I'm good later on without having to wiggle the neck around in the pocket to line things up.


    After locating the bridge, I remove the jig and drill the mounting holes for the bridge. Before screwing it down, I open up the string holes to make sure I can get an 1/8" bit thru them. Then screw the bridge down.


    At the drill press I can use the bridge as a drill guide and drill the thru holes half way thru the body.


    "Thought that is no longer limited brings experience that is no longer limited" Marianne Williamson.

  7. #22
    I used the pin register method of lining up front to back. I always place tape over the mounting holes to keep the pin from settling in one of them by mistake.


    Still using the pin in the front holes, I widened the back for the ferrules.


    I also took care of the HB screw issue by cutting 2 pockets under the screws with a Forstner bit. You can see them in the last pic below.


    I also drilled paths for the output wiring and bridge ground wire.

    "Thought that is no longer limited brings experience that is no longer limited" Marianne Williamson.

  8. #23
    I have the rough carve of the neck done. This one's getting close to prep for finish.


    "Thought that is no longer limited brings experience that is no longer limited" Marianne Williamson.

  9. #24

    Update.

    Not much to report on this one but it's ready for finish prep. I have made some changes to the electronics design. With the help of some very knowledgeable folks, I've corrected some major design flaws.

    First, I decided there would be functionality in 2 volumes and a master tone. So, I have a volume on the bridge PU and a shared volume for the mid/neck PUs.
    Here's the first revision of this approach.

    The biggest issue I had was the 2 volume pots were inteacting to the point that if one was turned all the way down, the other would be at zero also...not good...guitars are supposed to make noise.


    Second revision... The bridge volume pot was placed before the switch to eliminate the interaction with the other pot.


    Next issue: the way the tone is connected, it was shorting the volume pots together. So, the tone is now fed from the output jack which is after both volume pots.

    Other than the possible addition of a treble bleed on the HB, I think this is the final revision...Of course, now that I said that, I'll get some bad news. Fingers crossed.

    "Thought that is no longer limited brings experience that is no longer limited" Marianne Williamson.

  10. #25
    I decided to simplify the wiring. It now has a 2 volume setup similar to a Les Paul where the 2 controls interact when 2 or more PUs are on. Either of the 2 controls will silence the guitar which is good for volume swells...tough to do with 2 separate controls.


    I installed the frets and applied the first few coats of Tru-Oil. I love the color that TO gives to maple...and it makes the flame pop! Isee the camera caught some scratches on the HS face that need attentions. Oops.


    Mark
    "Thought that is no longer limited brings experience that is no longer limited" Marianne Williamson.

  11. #26

    Update

    The heat has been a bear lately and the shop has uninhabitable so I have made any progress on finishing. I've been able to spend a few hours in the mornings working on getting all my builds ready for finish. Here's the state of things. This build and the others are ready for grain filling (as needed) and finish.


    More soon.
    Mark
    "Thought that is no longer limited brings experience that is no longer limited" Marianne Williamson.

Posting Permissions

  • You may not post new threads
  • You may not post replies
  • You may not post attachments
  • You may not edit your posts
  •