Any chance you can post some photos of this project? Seriously, very nice write up and documentation.


 Member
Any chance you can post some photos of this project? Seriously, very nice write up and documentation.
 Member
All I can think of to say is "Your Bench Is Beautiful" and "Thank You". Your documentation of your building process will be quite helpful when I make my bench.
 Contributor
Michael,
Congratulations on the completion of a fine bench. Very nicely done.
Thanks for sharing it with us.
PHM
Contributor
Really, a fantastic post and a beautiful bench. Your writeup is among the most informative I have read, along with great photos. Thank you for taking the time to share.
Member
Thankyou for taking the time to make this thread. Great job!
Glad its my shop I am responsible for - I only have to make me happy.
 Member
Beautiful job on the bench Michael. And great job on the thread. thanks for taking the time for posting it...
Member
Nice job, beautiful bench, super documentation. I admire your dedication to precision! You have a bit of $$$ in the Benchcrafted hardware!!! I agree with all your assessments.
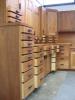
When it came to dogs, I took the easy route and just drilled 3/4" holes for Veritas dogs and pups and Gramercy holdfasts, but I spent a lot of time on the layout so no holes would interfere with the legs or vise hardware.
If you build another bench, I have a suggestion how to attach the endcaps so the bolts don't show. Drill holes up from the bottom of the endcap for cross dowels, drill oversized holes (for seasonal movement) through the tenon and the bench like you did, then drill and chisel out enlarge access holes in the underside of the bench so you can insert a length of all thead, a washer, a nut, and use a low profile wrench to tighten the nuts. It holds just as well, can be re-tightened if necessary, and leaves you with a smooth endcap with no visible counter bores or bolt heads.

Contributor
I am speechless! Great craftsmanship....
Contributor
Michael,
Outstanding thread. Thanks for taking the time to document.
Member
Michael
Wow! Nice job!!!
Your writeup and pics will be invaluable for my own Roubo project that will start soon.
Steve
Member
Thanks so much for the great posts. I had to be up in the middle of the night with a crying baby, and this made it just about bearable! The bench looks amazing, and I know you'll enjoy using it tremendously.
 Contributor
I used to call myself a hobbyist too. Now I don't know what to call myself after seeing that unbelievable piece of artwork. Maybe I'm a tinkerer in wood. Certainly not your level. Thanks for sharing and the writeup.
 Member
Thanks for the great review on the build.
I am lucky enough to live just a few miles from the Popular Woodworking shop here in Cincinnati. Been in the shop and meet Chris Schwarz. Fun to see the benches featured in the books and magazine. Got him to personal autograph my workbench book.
"Remember back in the day, when things were made by hand, and people took pride in their work?"
- Rick Dale
Member
Wow - nicely done!
I feel like I just paid some serious cash for a one-on-one woodworking class. Thank you for the pictures and write-up. Submit that to a magazine.
PS: This writeup was so good, and I enjoyed it so much that I felt guilty for being a freeloader on this website so I just sent in a few bucks to become a contributor. Thanks Michael and to everyone else who shares their knowledge and learning experiences here.
Last edited by Joshua Culp; 04-03-2011 at 4:55 PM.
Contributor
Best ever build thread. That was better than I've seen in books and magazines.
You seem to have ended up with a few more tools than you started withI do like how you made use of whatever tools you had on hand for a particular step and then finished it up with hand tools. That's a good lesson for everyone.
Fantastic bench! It will serve you a lifetime and then a few more. That's something to be proud of.
 Posting Permissions

 Reply With Quote