Page 1 of 5 12345 LastLast
Results 1 to 15 of 70

Thread: Start to finish… "Parfait" step by step.

  1. #1

    Start to finish… "Parfait" step by step.

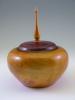
    I have seen this form done so well by so many incredibly good turners that all I can hope for is to manage a decent interpretation of it. But the rosewood burl is calling so off I go.

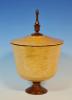
    I'm doing this one "John Keeton" style in that I am designing it first, working out the basic lines, dimensions and form beforehand. I'm still playing with the pedestal design but the drawn version is "pretty close" to what I want. I'm still ambivalent about the finial. I know there will be a finial and I know it be a "multi piece" construction. But there are still some decisions to be made there. Also, I'm still not sure about whether or not to leave a natural edge on the cup. On my last one I took the NE off and I really like the way it works with a crisp edge. This one is still in question. I'll make that call as the work progresses.

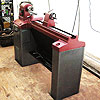
    Here is my drawing and a pic of the roughed out blank on the lathe.

    parfait_1.gif

    parfait_1.jpg

    I'll post in process pics as this turning takes shape. Feel free to offer any critiques, criticisms, or hails of derisive laughter as your fancy strikes….
    Last edited by David DeCristoforo; 03-25-2011 at 3:56 PM. Reason: New attachment
    David DeCristoforo

  2. #2
    Join Date
    Mar 2005
    Location
    Spokane, Washington
    Posts
    4,021
    Ooooo, this is going to be good! That burl looks very promising.

    Dan
    Eternity is an awfully long time, especially toward the end.

    -Woody Allen-

    Critiques on works posted are always welcome

  3. #3
    Join Date
    Nov 2010
    Location
    Littleton, Colorado
    Posts
    1,320
    Cool looking piece of wood David, looking forward to seeing what comes out of it.

  4. #4
    JK just gave me a heads up that the drawing did not upload. Sorry.....
    David DeCristoforo

  5. #5
    Join Date
    Sep 2009
    Location
    Enid, Oklahoma
    Posts
    6,741
    Looks like a promising design. I tend to favor the natural edge when it's attractive and adds something, but I did like the sharp edge of the last form you posted. I'm not one for planning my pieces, but I'll have to admit that my finials are better when I at least rough sketch something prior to beginning them. Looking forward to seeing the progess.

  6. #6
    David, this is going to be a highly refined piece!! I love the drawing, though I would consider perhaps just a bit less flare where the pedestal stem sits on the base. It would create a continous curve were it pulled in just a hair.

    I think the NE on this piece of burl would easily work with this piece and the cream sapwood might make for some interesting color accent depending on what you intend to do. What about turning your finial insert with the burl, leaving a little of the sapwood, and "fake" the dark NE on it? Now, that would be sharp!!

  7. David,

    If you pull off the drawing on the actual wood, you will have created a beautiful form for sure. For my $.02, I like the finial on the form in the drawing because it replicates the form itself in the finial, and I think enhances the technical difficulties of pulling this together.

    Your drawing is certainly inspirational, and if accomplished on the actual wood, then you will have made a very fine and well conceived work. Very elegant indeed, and worthy of some considerable display.

    I am pullin' for you on the execution of this concept.........good luck!
    Remember, in a moments time, everything can change!

    Vision - not just seeing what is, but seeing what can be!


  8. #8
    I agree about the pedestal. I've been looking at it and thinking, as you mentioned, that there might be too much mass at the flair. Also, the transition curve into the stem needs refinement. This is the nice thing about planning. It's way easier to change the drawing than the actual piece! I'm loving Adobe Illustrator!

    My thinking is that for the lid, I want to use a small piece of the burl that has sapwood at the "bottom" and then a transition back to heartwood at the top. If I use a small "insert" on the finial to replicate the main form, I want to have the same effect there as well. The finial is still undecided. I have some time yet to "click" on something.
    David DeCristoforo

  9. #9

    Step one (or is that two?)

    Had a bit of time to get some turning done today.

    parfait_2_.jpg

    I can tell you this much... these things sure look different in 3D than they do on paper! Anyway, I came pretty close to my target shape:

    parfait_matchup.jpg

    Still undecided about the edge but tomorrow I'll start working on the inside and then I'll decide. I have to make up my mind before I get too deep into the inside or else I'll be faced with the dreaded "go back and work on the rim" scenario.
    David DeCristoforo

  10. #10
    Join Date
    Nov 2010
    Location
    Littleton, Colorado
    Posts
    1,320
    David what did you do the drawing with? Looks good so far, I really like the drawing you did.

  11. #11
    David, you got darn close on the form/sketch comparison!! The concave at the rim is always the toughest part for me. It seems to be deep enough - until you put the template to it. That wood is just beautiful - makes me want to cut into one of the burls I ended up with.

    I think the inverted burl would work for the lid. It appears that your ledge for the lid will be well within the sapwood, and your idea would give you a nice transition area.

    I have not used Illustrator, but it sure did a great job for you here! Is that what you used for furniture design?

  12. #12
    "...what did you do the drawing with?..."

    "I have not used Illustrator...Is that what you used for furniture design?"


    I have used Illustrator for many years. Mostly for these types of line drawings that are going to be posted on the web. "Power users" can get some pretty amazing results with it but I'm no power user! And, really, for this kind of stuff, CAD is much better. But I'm too cheap and lazy to get into CAD.

    "The concave at the rim is always the toughest part for me..."

    Yup... me too! In looking at the overlay, I still have some touching up to do at the rim to sweeten up the curve. I have to do that before I start on the inside.
    David DeCristoforo

  13. #13
    Join Date
    Oct 2006
    Location
    Harvey, Michigan
    Posts
    20,804

    A few ideas...

    David - really like the design but the more I looked at it.... the more I started to play with the elements.

    I modified your original to point out ideas. Please use or disregard as you see fit.
    parfait.jpg

    Sure is some pretty wood and I am confident that whatever final form you create will be stunning! Looking forward to seeing it!
    Steve

    “You never know what you got til it's gone!”
    Please don’t let that happen!
    Become a financial Contributor today!

  14. #14
    Steve, thanx for the suggestions. The only part I'm totally committed to at this point is the shape of the main form. I'm still playing with the pedestal and finial details. I currently have about six variations of each! The part I am most unsure of is the embellishment in the finial. It might be just one too many details and I'm afraid it will look too contrived. I guess I can just make it and then see how it works before gluing the pieces together. If it's not a "fit" I can always put it next to my colossal rosewood hollow form!
    David DeCristoforo

  15. #15
    Join Date
    Oct 2006
    Location
    Harvey, Michigan
    Posts
    20,804
    David - I am not an expert on anything - let alone design - but in my opinion, a finial is either designed as the main focus of the turning (ornate) or as an simple element used to add height to the piece. Decide what it is you want as the main focus and simply everything else. Just my take on things...
    Steve

    “You never know what you got til it's gone!”
    Please don’t let that happen!
    Become a financial Contributor today!

Posting Permissions

  • You may not post new threads
  • You may not post replies
  • You may not post attachments
  • You may not edit your posts
  •