Page 2 of 2 FirstFirst 12
Results 16 to 24 of 24

Thread: 1st Attempt at Stained Oak

  1. #16
    Join Date
    Mar 2009
    Location
    Missouri
    Posts
    939
    Quote Originally Posted by Peter Elliott View Post
    great job! I like the tones so don't kid your self.

    Doing a lot of ebony look on flat work, I would use the steel wool trick.. especially on an open pore wood like oak.

    Next time try ink pen, waterbased.. come in little 3oz bottles. most of our office supplies have them.. Darker you want it, just keep adding coatss. In larger work, I use General Finishes Ebony Dye Stain.. Really good stuff and you again just keep adding coats. Wear gloves and cut up a car wash sponge to apply, soak for a bit and wipe. Just remember when it's dry to not freak out because the color is more of a grey haze.. it will be fine with a top coat. I highly suggest doing a sample for your first time so you can get an idea how many coats. On hard maple, I tend to apply 2 coats and it's very dark. Oak would prob need 3 and I don't believe you will get it get black unless you filled the pores. The open pores will reflect the grey/off tones, which I like but not jet black.

    Great job on the project
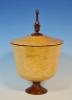
    Peter, thanks for the comments. I would have thought the ebonizing solution would turn the oak a nice black all around, but the side grain left a lot to be desired. The dye I used came from a CL ad. It's a leather/fabric dye called "Blacker than Black", and only cost $0.50 for 16 oz. when bought by the case of 12 bottles!! He had other colors and a case could be of mixed colors, so a good deal for certain. Perhaps several coats of the ebonizing solution might have done the trick, but 1 coat of dye worked fine. Thanks again.

  2. #17
    Join Date
    Jan 2009
    Location
    sLower Delaware
    Posts
    5,464
    Great job. Both the finial and the oak are very striking!

  3. Richard..............this one has a lot of WOW factor! Great finial, and the grain treatment is just way cool! Very creative conceptually, and you pulled off a unique and well done form!
    Remember, in a moments time, everything can change!

    Vision - not just seeing what is, but seeing what can be!


  4. #19
    Join Date
    Mar 2009
    Location
    Missouri
    Posts
    939
    Quote Originally Posted by Mark Hubl View Post
    Very nice Richard. This is my favorite so far. The white finial looks very good with the piece. Your liming looks good. You did a nice job on the top and the foot. Nice work.
    I gave up looking for white paste shoe polish! Know what you mean about setting up to take pictures. I leave my tent up until my wife says something!
    Thanks for the comments, Mark. When I was searching for the white shoe polish I did notice on Amazon it was like $0.99 a can. Of course, no idea what shipping would cost, but if included with an order for other stuff it might be worthwhile. I just didn't want to wait.

  5. #20
    Join Date
    Dec 2010
    Location
    Dexter, MO
    Posts
    199
    Creekers....on Richards recent visit he brought this piece for me to see. He un-wrapped it, sit it on the table & installed the finial and it immediately started uttering words.......like, "Pick Me
    Up, Fondle Me". So I did. what a nice piece of work Richard. Thanks for sharing.
    Jim A.
    If at first you don't succeed, Skydiving is probably not for you

    Life is not about waiting for the storm to pass,
    But rather learning to dance in the rain

  6. #21
    Join Date
    Mar 2010
    Location
    Vestal, NY
    Posts
    908
    I like it a lot - especially the finial!

  7. #22
    Join Date
    Oct 2008
    Location
    Fresno, Ca
    Posts
    4,032
    Richard..first, always the best finials!!! The spiral is phenomenal!!. I can't really grab the shape, but I think a "vase" taper would be cool. Could you go into detail about the entire finishing process? I grabbed some liming wax a while back, and your piece is right where I want to go
    Your Respiratory Therapist wears combat boots

  8. #23
    Join Date
    Mar 2009
    Location
    Missouri
    Posts
    939
    Quote Originally Posted by Jim Burr View Post
    Richard..first, always the best finials!!! The spiral is phenomenal!!. I can't really grab the shape, but I think a "vase" taper would be cool. Could you go into detail about the entire finishing process? I grabbed some liming wax a while back, and your piece is right where I want to go
    Jim, after the dye had dried I used a brass bristle brush to open the pores, then 4 coats of gloss WOP to seal the wood. Following the advice of Curt and Bill the white polish was applied to a small area at a time with a small piece of rag, then buffed by hand with some velour type cloth. Doing a small area is pretty important because the polish dries quick making buffing harder. That's about it. Thanks for your comments.

  9. #24
    Join Date
    Mar 2009
    Location
    Missouri
    Posts
    939
    Quote Originally Posted by Jim Adkins View Post
    Creekers....on Richards recent visit he brought this piece for me to see. He un-wrapped it, sit it on the table & installed the finial and it immediately started uttering words.......like, "Pick Me
    Up, Fondle Me". So I did. what a nice piece of work Richard. Thanks for sharing.
    Jim A.
    Thanks, Jim. I need to confess something though. While you were looking at this piece I was trying to get that really cool antique workbench of yours out the door and in my truck. I couldn't get your dog to hold the door open so I gave up.

Posting Permissions

  • You may not post new threads
  • You may not post replies
  • You may not post attachments
  • You may not edit your posts
  •