Results 1 to 15 of 15

Thread: Refurbished 1967 Rockwell 14" Bandsaw

  1. #1
    Join Date
    Jul 2009
    Location
    Portland, Oregon
    Posts
    178

    Refurbished 1967 Rockwell 14" Bandsaw

    It has taken me 6 months to get to this point with the refurb but at least now I've got a working machine. My first big problem was the upper wheel bearings and bearing races being all messed up. I posted to get some ideas 6 months ago. Ended up using JB weld and a home made jig to line things up. While not perfect it works well enough and almost no added vibration. We'll see how long it lasts. Link to bearing thread http://www.sawmillcreek.org/showthre...ngs&highlight=

    Major costs to the refurb: one tube of JB weld, new tension spring, new upper bearings (from skate board shop for $2 each), new thrust bearings top and bottom, new tires, new switch, link belt, some dust collection modification, guide blocks made from Lignum Vitea, new wiring and a home made base with mobile castors from Woodcraft. All in all about $120 or so in parts. while not keeping it original it is, and or will be much safer to operate once I get the belt guard on. Still need the belt guard and a few panels for safety but now at least usable.

    Re-sawed some lumber for the first time and forgot to tension the saw. Not bad cuts bot not great either. That made me add the chain to the switch lockout. So when removed it indicates that I need to re-tension the saw prior to use.

    A little history on the saw: Purchased from Olie, a 92 year old wood turner who finally had to give up the big equipment as he was moving out of his house. He was the original owner and gave me all of the original manuals. The saw was heavily used and showed a lot of wear however these things are built like tanks and it should see another 20 or 30 years of use.

    The base was built from reclaimed doug fir, with Mortis and tenon draw bored joinery. Finished with a couple of coats of BLO and a final coat of Amber Shellac.
    Attached Images Attached Images
    Last edited by Randy Bonella; 03-16-2011 at 2:32 AM. Reason: Pictures not attached,

  2. #2
    The stand is very handsome. Looks like you got the draw bore dowels on the hairy edge of just deep enough into the stiles.

  3. #3
    Join Date
    Dec 2006
    Location
    Porter,TX
    Posts
    1,532
    Nice job Randy and way to go on improvising the bearings issue.Like you I also love old american made tools,new tools of today will not survive.Good Job----Carroll

  4. #4
    Wonderful restoration Randy- 
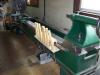
I keep trying to convince others to look at this fine Quality American made machinery - and as you can attest to- there is no comparison on what is being offered new today . Great Job Randy...- You would appreciate this... what a surprise I had when I got this....but it was well worth it.... http://www.sawmillcreek.org/showthre...-quot-Band-saw

    Kudos....

    B,

  5. #5
    Awesome saw! I have one very similar, but without that gorgeous wooden stand!

    Slight hijack... Anybody got an easy source for paint for the wheel covers? Mine are in significantly worse shape than the OP's.

    You used skateboard bearings... What brand? Did you have to add bushings? I used to skate and would love a cheap alternative to factory bearings.

  6. #6
    Join Date
    Jul 2009
    Location
    Portland, Oregon
    Posts
    178
    Thanks for all the kind words. I think the best part about old tools is their history. Being able to keep a machine running for another generation or two, with the history that it has, gives you that emotional attachment that makes woodworking so enjoyable to talk about. I'm mostly a hand tool guy but I do use power tools and having a vintage band saw, to go along with my Type 11 stanley hand plans, will vastly speed up some of my work.

    As for the bearings: I googled the bearing number and found this skate shop in Florida that carried them. I'll do some digging in my files to get the url for their web site. Shipping was ~$10 so I ordered 2 or 3 sets including the thrust bearings. 3 sets cost me about $27 when all said and done including shipping where if I would have purchased from an automotive store each bearing was $24 so overall pretty decent trade. Also the bearings were the same type and number that were already on the saw so no special shimming needed. I think If I need to do anything to the upper wheel again I'll have the bearing races machined out and a liner sleeve installed. Shouldn't cost any more than a new wheel but well cross that bridge at a later date. And WOW 32" Bandsaw... I'd never get that in my shop and if I did I wouldn't fit....

    I'll post final pictures when I get the belt guard and panels on. Probably will use a contrasting veneer, most likely a Black Walnut burl. Again need the practice

  7. #7
    Join Date
    Feb 2003
    Location
    In the foothills of the NM Sandia Mountains
    Posts
    16,651
    Nice job! Except for the cool lamp and stand it looks identical right down to the fence to one I used to have. I think mine was a '82 vintage.
    Please help support the Creek.


    "It's paradoxical that the idea of living a long life appeals to everyone, but the idea of getting old doesn't appeal to anyone."
    Andy Rooney


  8. #8
    Join Date
    Feb 2009
    Location
    League City, Texas
    Posts
    1,643
    Nice restore. I wish you luck with that JB Weld fix. I have never been able to get that stuff to do what they say it does! If it fails, take that wheel to a machine shop, and get the bore for the bearing overbored, and sleeved. That is a great old American saw, and it deserves to be well repaired...

    That stand came out really sharp too!
    Trying to follow the example of the master...

  9. #9
    Join Date
    Jan 2009
    Location
    Williamsburg,Va.
    Posts
    12,402
    That lamp is original. One like it sold for $80.00 on Ebay a few months ago.

  10. #10
    Join Date
    Nov 2007
    Location
    Mid Missouri (Brazito/Henley)
    Posts
    2,769
    Quote Originally Posted by Bruce Page View Post
    Nice job! Except for the cool lamp and stand it looks identical right down to the fence to one I used to have. I think mine was a '82 vintage.
    By '82, Rockwell/Delta probably no longer provided the "retirement lamp". They were a standard OEM accessory for 14" BSs since the late '30s or early '40s, IIRC. Although the work lights look like the cheapies found in bargain bins everywhere, those reflectors are cast aluminum!

    "Retirement lamp" is not the official Delta part name for that lamp, but comes from the fact that if you were lucky enough to have several to sell on eBay to restorers of Delta BSs, you could "retire" comfortably! lol
    [/SIGPIC]Necessisity is the Mother of Invention, But If it Ain't Broke don't Fix It !!

  11. #11
    Join Date
    Feb 2003
    Location
    In the foothills of the NM Sandia Mountains
    Posts
    16,651
    Mine had a functional lamp, that's about all I can say for it.
    In hindsight I wish I still had that bandsaw. As you can see, it had been hot-rodded a little.
    Attached Images Attached Images
    Please help support the Creek.


    "It's paradoxical that the idea of living a long life appeals to everyone, but the idea of getting old doesn't appeal to anyone."
    Andy Rooney


  12. #12
    Join Date
    Nov 2007
    Location
    Mid Missouri (Brazito/Henley)
    Posts
    2,769
    I would rather have yours Bruce. In fact I DO! It's gooseneck is adjustable in all directions; those "retirement lamps", not-so-much:

    retirement-lamp-delta-work-lite-vintage.jpg
    [/SIGPIC]Necessisity is the Mother of Invention, But If it Ain't Broke don't Fix It !!

  13. Quote Originally Posted by Chip Lindley View Post
    By '82, Rockwell/Delta probably no longer provided the "retirement lamp".
    True. Unfortunate, but true. Mine is an '81 and it is lampless.

  14. #14
    Join Date
    Jan 2010
    Location
    Northern Colorado
    Posts
    1,884
    It's beautiful. Really great work !

  15. #15
    Join Date
    Jul 2009
    Location
    Portland, Oregon
    Posts
    178
    Lol... "Retirement Lamp" I like it!!!

    Well I supposed I should tell the lamp story that goes along with this. So $80 for the lamp alone almost would be what I paid for the saw in the first place. Back to the lamp story.... I rewired the saw, eliminating the switch that was on the motor which was broken and with the new design wouldn't have been usable any way. So wired in a new switch and replaced the lamp cord that had several nicks in it right down to the wires got it all hooked up and blam... kept blowing out the GFI. Took a while to figure out that the lamp socket had lost the insulator that usually surrounds the socket head which when missing means that the neutral was touching ground causing the fault. Once I got that taped up it works like a charm. At first I thought I'd done something when I modified the switch assembly which wasn't designed for this purpose to begin with. I took a Woodcraft switch, drilled some additional holes to add the lamp cord and motor feed line with cable restraints.

    I used the saw for the first time doing real work today and I wish I would have fixed it earlier. Amazing how much faster and cleaner some of the work is when you have the right tool.

    Thanks for all the input!

    Randy...

Posting Permissions

  • You may not post new threads
  • You may not post replies
  • You may not post attachments
  • You may not edit your posts
  •