Page 2 of 5 FirstFirst 12345 LastLast
Results 16 to 30 of 70

Thread: CastCNC Alum carriages for my machine coming in 2011

  1. #16
    Join Date
    Apr 2009
    Location
    Florence, KY
    Posts
    78
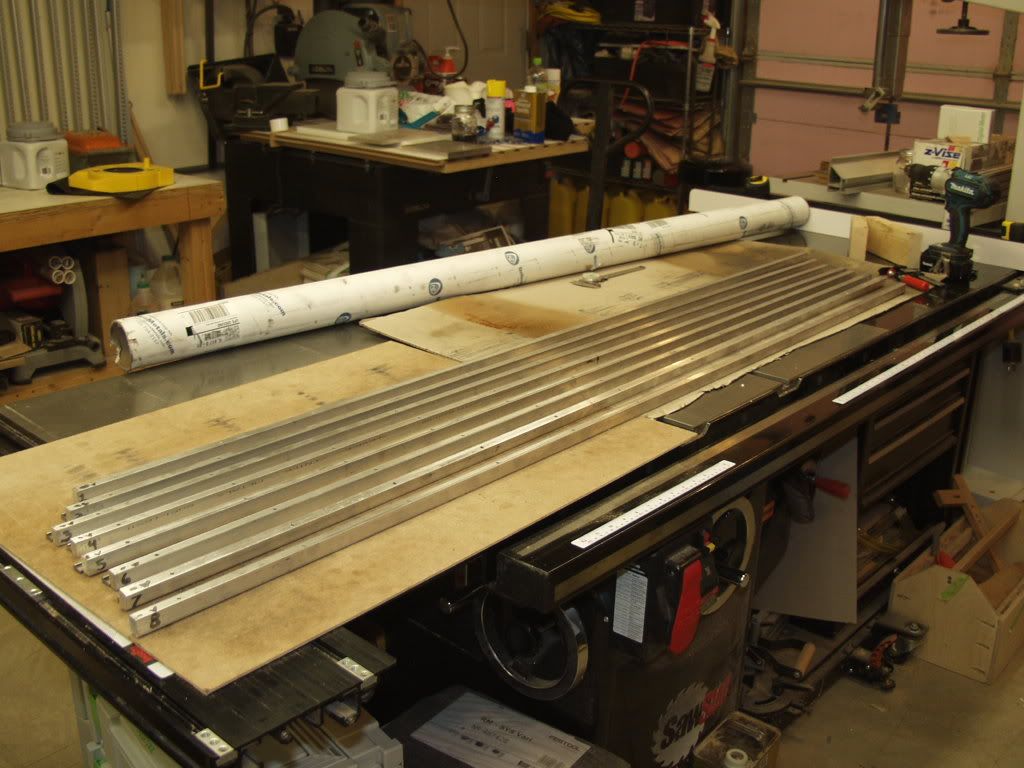
    I've received my rail for the X axis, (going to reuse the lead screws for the Y axis 1/2-8 8 start) just received notification that the K2 has shipped. Ordered the 8020 last week, should see it sometime this week. So if all goes well, and Harry has my order completed on-time I should have all the parts needed to start the upgrade by the end of February or first of March.

    Dave
    Epilog mini 24, 4x4 hybrid CNC, Aspire, Cut 3D, and lots of wood working equipment.

  2. #17
    Join Date
    Oct 2006
    Location
    Bloomington, IL
    Posts
    6,009
    Any thoughts of going hardened vrail while you have it disassembled? I am considering it. Thinking of just bolting it to my existing angle iron like I did my Z.
    Glad its my shop I am responsible for - I only have to make me happy.

  3. #18
    Join Date
    Apr 2009
    Location
    Florence, KY
    Posts
    78
    I was going to but the rails are expensive and I don't believe there is that much of a benefit to justify the cost so I'm going to hold off for now and apply that money to purchase a spindle with VFD, water cooled. The angle iron that I used has broken in very well and the carriages run smooth.

    Dave
    Epilog mini 24, 4x4 hybrid CNC, Aspire, Cut 3D, and lots of wood working equipment.

  4. #19
    Join Date
    Oct 2006
    Location
    Bloomington, IL
    Posts
    6,009
    Found the hardened V rails at superior bearing for about $40 ea in 72" length. Paul and Harry and Gary and a few others recommended them. I am going to add them as well. I really liked how they worked out on my Z. Rick at superior seems like a great guy.

    Online metals had $10 72" lengths of 1/2"X3/4" alum bar so I will use that too. registering with them and then using the holiday coupon code saved 20% and then another 10% - I added a piece of plate alum too to put me over the $100 mark.
    Glad its my shop I am responsible for - I only have to make me happy.

  5. #20
    Join Date
    Apr 2009
    Location
    Florence, KY
    Posts
    78
    You going with the T2 drilled?

    Dave
    Epilog mini 24, 4x4 hybrid CNC, Aspire, Cut 3D, and lots of wood working equipment.

  6. #21
    Join Date
    Oct 2006
    Location
    Bloomington, IL
    Posts
    6,009
    No, The T2 undrilled is $40.86 ea for 72" So $354 shipped to IL. He said 50% more for drilled. I figure I can drill it for $175 more. Plus I can drill it how I want vs ever 3" of the predrilled.
    Glad its my shop I am responsible for - I only have to make me happy.

  7. #22
    Join Date
    Oct 2006
    Location
    Bloomington, IL
    Posts
    6,009
    First box of cast parts arrived today. USPS sent my two boxes two different routes. Expecting box two tomorrow.

    Glad its my shop I am responsible for - I only have to make me happy.

  8. #23
    Join Date
    Jun 2005
    Location
    Pahrump, NV
    Posts
    119
    They look very nice! When you say 'cast' are you implying that some post clean-up is necessary? Also, will you powder coat them? Just curious...
    Carol in NV

  9. #24
    Join Date
    Oct 2006
    Location
    Bloomington, IL
    Posts
    6,009
    Harry casts all the parts and there is some cleanup work to do for sure. I have not decided how they will be finished yet.
    Glad its my shop I am responsible for - I only have to make me happy.

  10. #25
    do they come with out milling holes, is that an option?

  11. #26
    Join Date
    Oct 2006
    Location
    Bloomington, IL
    Posts
    6,009
    James, are you asking if they come without me having to mill the holes myself? I do not think so. Pretty much a DIY job of cleaning them up and drilling and tapping them.

    For those wondering, Price is $590 for just the 23 rough cast parts if you already have bought the Joes 4X4 Hybrid plans and own a K2 Z axis or $690 if not as you buy the plans and access to the forum for that extra $100. The 8" K2 is $335 direct from K2 invoiced from Harry or you can do it yourself with Ron at K2. either way you pay K2 for their Z.

    I got my second of two boxes of parts today from harry so I have all 23 cast parts. Tonight I ground off all the tabs from the casting, all except two anyway. Used a set of hand files and a 6X48 belt sander.

    Tomorrow I am going to fit my Y carriage bearing slides into the trucks.

    Need to study teh edrawings tonight some more.

    Also got my 2nd of four shipments from enco - they are worse than amazon with their seperate shipments for the same order. Darn weather is causing delays for the other two. Really could use that can of blue Dykem.
    Glad its my shop I am responsible for - I only have to make me happy.

  12. #27
    Join Date
    Oct 2006
    Location
    Bloomington, IL
    Posts
    6,009


    VRail is drilled and the Alum has been drilled with a #21 bit in preparation for tapping it for the 10-32 screws. I drilled it 2" from ends and 6" spacing throughout. Man that is a lot of drilling. Can't wait to start tapping it :shock: :shock: :shock: LOL.

    The First picture is the slot board I made for the drill press. Cut teh slots for the three steps in drilling the rails - 1st Vrail (edge of router table), middle - alum with vrail for #21 bit, third slot will be to drill through for the 8020 T-nuts and 1/4-20 screws.
    Last edited by Mike Heidrick; 02-11-2011 at 2:07 AM.
    Glad its my shop I am responsible for - I only have to make me happy.

  13. #28
    Join Date
    Oct 2006
    Location
    Bloomington, IL
    Posts
    6,009
    Pics from today. All 96 holes tapped for vrail.


    Glad its my shop I am responsible for - I only have to make me happy.

  14. #29
    Join Date
    Oct 2006
    Location
    Bloomington, IL
    Posts
    6,009
    Tonights accomplishments"
    Remounted Vrail to alum bar stock after completeing all the through holes and countersink. The Vrail alum rails are now done.
    Drilled the two cast Y trucks and the front and back cast X truck with 3/16" through holes using templates cut from Harrys DXF file - templates were used to mark the face holes and then they were drilled through on the drill press (only drilled the face - not the edge holes yet)
    Drilled the holes in those trucks that will be 1/4"-20 tapped with a #7 drill bit
    Drilled the 1/8 holes for the bearing adjustment slots and then step drilled the slots with a 3/8" bit and then used a file on the slots
    After clamping them to teh trucks, I drilled the Cast CNC lower bearing slide covers with 3/16 and then through 1/4" holes


    Glad its my shop I am responsible for - I only have to make me happy.

  15. #30
    Join Date
    Jun 2005
    Location
    Pahrump, NV
    Posts
    119
    Looks like you were having a 'hole' lot of fun!

    Keep the pictures coming. You keep me inspired.
    Carol in NV

Posting Permissions

  • You may not post new threads
  • You may not post replies
  • You may not post attachments
  • You may not edit your posts
  •