Page 1 of 2 12 LastLast
Results 1 to 15 of 24

Thread: Walnut Desk/Bookcase

  1. #1
    Join Date
    Apr 2009
    Location
    Durham, NC
    Posts
    84

    Walnut Desk/Bookcase

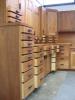
    Coming down the final stretch on a project I posted earlier. Here are some photos. I will post the final shots in a week or so. I need to fit the center escutcheons for the drawer locks.


    Lou Sansone posted a desk he did in curly maple earlier this year. This is one along the same lines in walnut/crotch walnut.


    Will post more photos if there is any interest.

    dan
    Attached Images Attached Images

  2. #2
    Join Date
    Feb 2010
    Location
    Raleigh, NC
    Posts
    50
    Very nice!

  3. #3
    It's beautiful Dan, and the wood you used for the lid and for the drawer fronts is amazing. I love walnut.

    I would enjoy seeing more photos, and am also interested in how you finished it.

    Did you make it for yourself, or is it for a customer?

    Outstanding!

  4. #4
    Join Date
    Mar 2007
    Location
    Stony Plain, Alberta
    Posts
    2,702
    She's a beauty Dan.. Great work.
    I for one would like to see a few more pics.

  5. #5
    just beautiful Dan....

    I would really enjoy to see more pics..., the more the better.

    thanks for posting this.

    Howie

  6. #6
    Hey Dan, looks like a great project. Beautiful work.
    Best Regards,

    Gordon

  7. #7
    Join Date
    Apr 2009
    Location
    Durham, NC
    Posts
    84

    Desk and bookcase photos 2

    Here are a few more photos to look at. If you want to see the building process/evolution, you can look at some play by play stuff here:

    http://www.ncwoodworker.net/pp/showg...00&ppuser=1777

    If you go to the photo gallery I am danmart77. The Penn. Desk is full of photos and the gallery/desk is photographed in stages.

    The piece is finished in shellac applied with a brush and a soft cloth. I chose not to french polish this time. After applying multiple coats and rubbing it out, I applied more coats(thinner and thinner) to level and check. Something I did a little differently this time was to add sandarac to the mix. Folks have said the sandarac softens the film but I can not tell rubbing it. I am certain that it adds more shine to the body of the film.

    I tried lots of samples and compared the results. I like the sandarac. Why do that? I've been looking at violin "spirit varnishes" and decided to do some tests. Its been fun and the learning curve is going up for me. Years ago I used the sandarac and mastics with good results but found others who were saying the shellac was enough and the sandarac was just snake oil. Go figure?? I am going to try more in the future and I'll post some of my hands on findings.

    The desk: gallery is mostly walnut but I got whimsical and made the serpentine drawers out of curly maple. I had lots of short pieces of curly left in the corner for years after making lots of longrifles. Getting the curly maple to blend in with the walnut was a challenge but in the end it wasn't that tough.

    The color of the entire piece was determined by the desk lid and the desk drawer veneer. I only applied dye to the lid and drawers after it appeared too red. I did not want the piece to cross over to a red tone. In came the green dye. Once a light brown was established, I covered the entire project with a strong yellow base dye(a bit ugly). This warms the walnut in the end.

    I filled the pores with what I think is the best grain filler made by Sherwin Williams. Its a natural color so you have to adjust it with oil based colors. In my case I like to use artists oil paints(burnt umber and burnt sienna mixed) with naptha and the filler. This gave the walnut some depth, uniformity and warmth ... by my eye. I then sealed it with clear shellac and evaluated the surface variations.

    Each layer of shellac had some color added to the mix to get the surfaces to come together and build a little film. Slow but not too tough. Shellac is just soooooooooooooooooo forgiving even I can make it work.

    If you have questions, just send them along and I will get back to you ever so slowly. Things are crazy but being busy is good.

    dan

    Here are few photos of the desk not covered in the opening shots:
    Attached Images Attached Images
    Last edited by Dan O'Sullivan; 10-16-2010 at 6:48 PM.

  8. #8
    Join Date
    Feb 2003
    Location
    In the foothills of the Sandia Mountains
    Posts
    16,641
    Dan, you do exceptional work.
    Please help support the Creek.


    "It's paradoxical that the idea of living a long life appeals to everyone, but the idea of getting old doesn't appeal to anyone."
    Andy Rooney


  9. #9
    Join Date
    Feb 2003
    Location
    Granbury, TX
    Posts
    1,458
    Fantastic desk...

    Did you work from published plans? Or your own?

    My dream is to someday be good enough to build something like this.

    Thanks for the inspiration.
    Martin, Granbury, TX
    Student of the Shaker style

  10. #10
    Join Date
    Feb 2007
    Location
    Harrison Arkansas USA
    Posts
    279
    Dan, that is on beautiful piece of work.

  11. #11
    Join Date
    Mar 2006
    Location
    SoCal
    Posts
    22,510
    Blog Entries
    1
    That is some beautiful work. Love the interior details.
    "A hen is only an egg's way of making another egg".


    – Samuel Butler

  12. #12
    Join Date
    Apr 2009
    Location
    Durham, NC
    Posts
    84

    Desk Plan

    Did you work from published plans? Or your own?

    My dream is to someday be good enough to build something like this.

    Thanks for the inspiration.

    I used a plan presented in FWW 154-6 by Lonnie Bird as a starting point. I changed the dimensions(width, depth and height ever so slightly) to be a little closer to an original I measured years ago. Additionally, I made the desk drawers with the walnut crotch a little bigger than Lonnie. I put a lip around the top and bottom of each drawer to make them look a little bigger and feature the figured wood a little more. Just a design choice.

    Again, this is a second effort. The first was about the same but it had a broken arched top(bonnet like) but the desk was the same. At the end of the commission, I was "stuck" with a flat top bookcase. Solution: build another desk and put the bookcase to work.

    The flat top is a more sensible way to go if you are:
    1. Building without a commission -you need to be sure the owner has tall ceilings and plans to stay that way. The flat-top desk in the photos above will fit nicely in an 8' ceiling house. The arch top will not go.

    2. The flat top is easier to make. The mouldings for a gooseneck form takes a bit more head scratching and some carving. Its fun but the clock is running if the kids need shoes.


    Here is a picture of an arch-top built in cherry by another joiner. I did mine in walnut. I would send along a picture of mine but the laptop that I stored all of the photos crashed and all was lost. Lesson learned. Really all of the steps for the desk are the same flat or arched but I had a couple shots of the mouldings being shaped that would have been nice for questions.

    I am not taking any more requests for big projects for a while. I have several longrifles and a bunch of windsor chairs needing to be completed and pushed out the door.

    A project like this desk/bookcase takes up space. When you spread this out, its all over the place.
    Here are some photos:
    1. Cherry desk built by another man that is very similar to the one I built in walnut. If I get lucky and the technician can restore the hard drive, I will post mine or get the owner to re shoot the piece.

    2. Rifle stuff and windsor junk.

    Its that time of the year here in NC. I do all my steam bending in the Fall when it cools down a bit. I'm done for the winter with 50 bends completed. Joy.

    Hope this sheds some light on your question.
    Attached Images Attached Images

  13. #13
    Join Date
    Mar 2007
    Location
    Stony Plain, Alberta
    Posts
    2,702
    Thanks for the extra pics Dan.
    That is one fine example of a heirloom. Very well done again..

  14. #14
    Join Date
    Jan 2010
    Location
    LA & SC neither one is Cali
    Posts
    9,447
    Absolutely gorgeous work!!!

  15. #15
    Join Date
    Mar 2003
    Location
    SE PA - Central Bucks County
    Posts
    65,850
    Nice work!
    --

    The most expensive tool is the one you buy "cheaply" and often...

Posting Permissions

  • You may not post new threads
  • You may not post replies
  • You may not post attachments
  • You may not edit your posts
  •