Results 1 to 12 of 12

Thread: Color fills

  1. #1

    Post Color fills

    I've been reading through some of the past and present threads, many of which talk about color filling various materials (plastic, metal, wood, etc).

    1) What are some of the color fill materials do you use (be specific)?
    2) On what material?
    3) How are you applying them?
    4) Any hints, tricks, comments or suggestions?

  2. #2
    Join Date
    Feb 2007
    Location
    Shohola, PA Pocono Mountains
    Posts
    1,336
    That is a Great Question !!!!

    A Tip I picked up from Mike at Laser Bits over 10 Years ago at a ARA Show was to use a old Phone Book to wipe off the fill..... Quick and Easy....

    Good Luck,

    AL
    1 Laser, 4 CarveWrights, Star 912 Rotary, CLTT, Sublimation, FC7000 Vinyl, 911 Signs, Street Signs, Tourist Products and more.
    Home of the Fire Department "Epoxy Dome Accountability Tag and Accountability Boards".

  3. #3
    Quote Originally Posted by AL Ursich View Post
    use a old Phone Book to wipe off the fill
    You mean use the phone book like a disposable squeege?

  4. #4
    Join Date
    Nov 2007
    Location
    Glenelg, MD
    Posts
    12,256
    Blog Entries
    1
    One page at a time, mind you, not the entire tome... more flexible that way
    Hi-Tec Designs, LLC -- Owner (and self-proclaimed LED guru )

    Trotec 80W Speedy 300 laser w/everything
    CAMaster Stinger CNC (25" x 36" x 5")
    USCutter 24" LaserPoint Vinyl Cutter
    Jet JWBS-18QT-3 18", 3HP bandsaw
    Robust Beauty 25"x52" wood lathe w/everything
    Jet BD-920W 9"x20" metal lathe
    Delta 18-900L 18" drill press

    Flame Polisher (ooooh, FIRE!)
    Freeware: InkScape, Paint.NET, DoubleCAD XT
    Paidware: Wacom Intuos4 (Large), CorelDRAW X5

  5. #5
    for reverse-engraving acrylic, i've been using valspar's plastic spraypaint. bonds to plastic very well. spray one side of the acrylic, let it dry (may need 2 coats), engrave something in mirror-form, spray paint the engraving in a different color, and it looks GORGEOUS.

    havn't tried glass, but logic would say you'd need something that sticks pretty well and won't flake off.

    on wood, it depends if you wood is finished or unfinished, and how open the grain is. with "wet" fills (paint, shoe polish etc) you risk the fill bleeding into the woodgrain.

    i've been doing some bamboo plaques with a powder coat paint.

    I spent a long time going aound Omaha trying to find a supplier, after about 7th place ("we don't have any, try...") I found a place that did powder coat painting for cars. they usualy don't keep any powder paint on hand (they special order it) but they found an old "sample" canister in a back room that they just gave me for free. It was a MASSIVE 4 pound cannister! i'm set for a LONG time on black color fill!

    it's Sherwin Williams "Powdura" brand. works well, but I have to bake it since it's "set" temperature is pretty high. i've heard that some powder coat paints cure by themselves with the oils in certain wood, but that's not the case with my bamboo and Powdura.

  6. #6
    Quote Originally Posted by Pete Bejmuk View Post
    for reverse-engraving acrylic, i've been using valspar's plastic spraypaint. bonds to plastic very well. spray one side of the acrylic, let it dry (may need 2 coats), engrave something in mirror-form, spray paint the engraving in a different color, and it looks GORGEOUS.

    Hi Pete,

    I think I'm going to give that a try once I'm completely setup

    Do you have any sample photos of the results you could share?


    Quote Originally Posted by Pete Bejmuk View Post
    i've been doing some bamboo plaques with a powder coat paint.

    I spent a long time going aound Omaha trying to find a supplier...

    This thread talks about using powder coating paint from Harbor Freight for $5 (quoted below):

    http://www.sawmillcreek.org/showpost...9&postcount=14

    Powder Paint from Harbor Freight - $4.95 for a quart size container which is more paint than I will likely ever use. It comes in Black, Yellow, White, & Red. I still need to find a supplier for Blue.
    I've heard of people here using toner, with mixed results - some good, some bad.

    My Powder Paint technique is:
    1. Seal the wood (makes clean-up easier)
    2. Laser
    3. Apply Powder Paint with an artist paint brush
    4. Take a straight-edge over the area several times to force it into the lasered area and level it off.
    5. Laser again at low power: 100sp/11pw (too high of power will evaporate the paint).
    5.5 If it's a big area or deep repeat steps 3-5
    6. Vacuum with a shop-vac
    7. Gently clean the non-Powder Paint areas.
    8. Apply sealer/top coat/polyurethane/shellac - what-ever your finish sealer of choice.

  7. #7
    I have yet to discover any redeeming virtue in powder coat paint for our typical applications. All powder coat paint that I have experience with needs to be baked and the laser does not, in my experience, simulate that.

    Color filling on acrylic can be done with acrylic paint, both spray cans and hobby store paints--my favorite when doing other than black or white. (dna is a solvent for acrylic paints)

    Usually a colorfill on acrylic must be done on the front as filling from the back tends to diffuse the color. (interestingly, black shows through perfectly)

    Most varieties of wood, especially light colored woods, need to be sealed before color filling to prevent bleeding. Long ago Nancy Laird suggested using wax as a sealer, I use liquid floor wax with good results.

    For certain things I use wax shoe polish as a darkener, sometimes a liquid shoe polish, though not often. (mineral spirits is a solvent for wax shoe polish)

    After applying the sealer I apply the color fill. This is not my favorite job and I charge extra for it as well as avoiding it when possible.
    Last edited by Mike Null; 09-22-2010 at 7:42 AM.
    Mike Null

    St. Louis Laser, Inc.

    Trotec Speedy 300, 80 watt
    Gravograph IS400
    Woodworking shop CLTT and Laser Sublimation
    Dye Sublimation
    CorelDraw X5, X7

  8. #8
    acrylic: white background with various color-fills:

    by making the engraving deep, you literally get a 3D effect.

    my powder coat paint does need baking. I can either engrave the entire thing at high speed and low power (which takes a while on a large plaque). I decided to buy a little toaster oven and just literally bake the plaque for 5 minutes. It took some time to find the right temperature and bake time, since occasionally the finish on the plaque would bubble.
    I got a lot of weird looks walking down the aisle at an appliance store, sticking a plaque in each toaster oven to see which one fit
    -Pete B
    ULS PS-50; Epilog 32 (30 watt); Epilog Radus (100 watt); Epilog Legend 24TT (30 watt).

  9. #9
    Thanks for your tips I'll definitely have to look into that powder paint theme - I've been engraving/cutting some bamboo wood with real good results. I can imganine that it will be pretty decent in combination with powder coat. Can you use it for any surface ?

    Andrea
    _______________________________
    LaserPro Spirit 40 W
    OKI ES9431

    Who wants to hear the bells must pull the rope
    Wer die Glocken hören will muss am Seil ziehen

  10. #10
    i've used it on a lot of woods, but you have to make sure that the non-engraved surfaces are sealed. any little pits in the wood (such as the "tubules" in Paduak (can't think of the proper term)) will catch the powder.
    -Pete B
    ULS PS-50; Epilog 32 (30 watt); Epilog Radus (100 watt); Epilog Legend 24TT (30 watt).

  11. #11
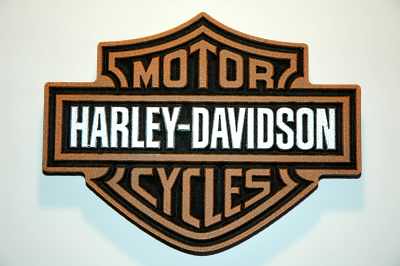
    I carved this in MDF on a CNC router, spray painted it black, then used hobby/craft store 2oz bottle paints and applied them with one of those 3" foam paint rollers they commonly use for painting trim around a room.

    It allowed me only to paint the top surface, without getting into the the carved areas. I just used a piece of cardboard to cover the orange areas before painting the silver.

    If you're real lazy and have time to kill. roller all of the surface in silver, let it dry, then roller on the orange =)

    Last edited by Robert Walters; 09-22-2010 at 8:48 PM.

  12. #12
    I cut the wood square to rough size, sanded it, spray a coat of semi-gloss PU (polyurethane), carved and cut out the oval, applied wood stain using a old cut up cotton tshirt, then applied another two coats of PU.

    If you notice the border on the right side of the K's, you'll see what happens when you get in too much of a hurry to apply enough coats - the stain bleed into the grain of wood that had a single coat of PU.


Posting Permissions

  • You may not post new threads
  • You may not post replies
  • You may not post attachments
  • You may not edit your posts
  •