Thanks Dave. African mahogany. Not my favorite material and I have used almost all that I had on this. Makes room for more walnut. I'll be using ebony for the plugs.


 [OP]
Contributor
[OP]
Contributor
Thanks Dave. African mahogany. Not my favorite material and I have used almost all that I had on this. Makes room for more walnut
"A hen is only an egg's way of making another egg".
Samuel Butler
Hi Glenn,
Terrific design and your usual excellent pics and thread.
I enjoyed watching this bookshelf unfold, and can't wait to see
what you're up to with this dresser build.
Thanks for the peek,
Walt
ps sounds like you've got walnut fever?
hmm
There are no shortcuts to anywhere worth going! WCC
Be who you are and say what you feel, because those who mind don't matter and those who matter don't mind - Dr. Seuss
Crohn's takes guts. WCC
[OP]
Contributor
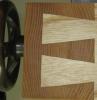
The hand shaping and detail work seem to take sooo long. I enjoy it but, the forward motion becomes very hard to detect. 40 plugs on this piece in 1/4", 5/16" and 3/8". Just finished the last dozen:
ebony-plugs 001.jpg
Once they're set in I will final sand and start the finishing regime.
ebony-plugs 006.jpg
One more gratuitous "almost there" shot
GnG-BC-B4-finish-009.jpg
2760
Last edited by glenn bradley; 10-21-2010 at 10:39 PM.
"A hen is only an egg's way of making another egg".
Samuel Butler
 Member
Looks great Glenn. What technique did you use to make the plugs? Did you round them over and then cut to depth using a band saw? Look forward to seeing the finish.
[OP]
Contributor
Correct. Create the blanks (sticks) to square and precise dimensions, round the ends working through grits and ending up on a buffing wheel. Bandsaw cut to length (depth).Originally Posted by Eric McCune

"A hen is only an egg's way of making another egg".
Samuel Butler
[OP]
Contributor
And now the steps that really test my patience; finishing. I use the first coat to get the color I'm after and correct any boo-boos that suddenly make themselves known. The piece is finished mostly disassembled. This is a wipe on, leave and then wipe off method with a 24hour wait after the first coat as seen here:
GnG-BC-first-coats-top-trim.jpg
The second coat evens things out and after a wait, it too gets wiped off as if I've changed my mind. There is not much film built up yet but I have an idea of where I'm headed.
GnG-BC-first-coats-top-fram.jpgGnG-BC-first-coats-bot-fram.jpg
The second coat cures for 48 hours and then I repeat this sequence for 5 or 6 coats. This should have me finished up sometime next weekend. After that there is a long cure period of 10 days to "who knows", depending on the weather. Once cured I can assemble the parts and give it a nice wax job. I've got a stack of books in the corner waiting for a home.
"A hen is only an egg's way of making another egg".
Samuel Butler
Member
It looks great Glenn, I can't believe you have only a couple coats wiped on. My wipe on finish doesn't look even for the first few coats. What is your finish and procedure?
I don't much enjoy finishing either (it always worries me), but I'm trying to be more systamatic in my finishing these days.
[OP]
Contributor
It's an oil varnish blend that I mix up as required. This batch has a bit of TransTint Mahogany Brown in it as I often find mahogany too orange for my taste. On walnut and others I don't add any color.
Amen to that. I always say there are only two stages that can really ruin your efforts; the glue-up and the finishing. A goof on either one results in a lot of recovery work.I don't much enjoy finishing either (it always worries me),
I too am trying to be even more diligent as to my mixes, surface preparation and application protocol. Not surprisingly the more I do this and the more careful I am about recording what I am doing, the more predictable things get ;-)but I'm trying to be more systamatic in my finishing these days
Last edited by glenn bradley; 10-26-2010 at 12:01 PM.
"A hen is only an egg's way of making another egg".
Samuel Butler
 Member
[OP]
Contributor
Member
[OP]
Contributor
So its just under two months (good thing I don't do this for a living) and the main parts are cured enough to assemble and move into the house. My usual level of photographic skill should not be held against the poor little bookcase.
An overall shot, approximate dimensions are 33"H x 32"W x 14"D:
A-GnG-BC-pre-wax-overall.jpg
Shots of the base, shelf trim and top frame/trim details:
B-GnG-BC-pre-wax-base-detai.jpgC-GnG-BC-pre-wax-shelf-trim.jpgD-GnG-BC-pre-wax-top-detial.jpg
The top panel floats in the top trim which sets on the top frame:
E-GnG-BC-pre-wax-top-relief.jpg
The top and base frame joinery to the legs provides the bulk of the strength in this piece:
F-GnG-BC-pre-wax-top-elev.jpg
Here's a shot of the base piercings, straps and base panel elevation hopefully all working together:
G-GnG-BC-pre-wax-piercing-d.jpg
After a couple weeks I'll buff it out and wax it to get that satin sheen that I am currently drawn to. Thanks for tagging along.
3784
Last edited by glenn bradley; 11-11-2010 at 9:10 PM.
"A hen is only an egg's way of making another egg".
Samuel Butler
Member
very nice joinery
Member
Digging through the vaults and saw this - very nicely done and thanks for sharing.
Do you have any pictures of the finished piece in its natural habitat?
Contributor
That looks awesome. I can't wait to see the project all finished.
[OP]
Contributor
Thanks for the compliments all. It is taking up a random spot in the living room waiting on me to re-do my office
P.s. Please ignore the ducks. They're waiting for somewhere to go to
"A hen is only an egg's way of making another egg".
Samuel Butler
Member
Nice work!
I'd guess you familiar with Darrell Peart work?
 Posting Permissions

 Reply With Quote

