Results 1 to 7 of 7

Thread: Gloat & handsaw rehab project/s

  1. #1
    Join Date
    Jan 2009
    Location
    Espoo, Finland
    Posts
    46

    Gloat & handsaw rehab project/s

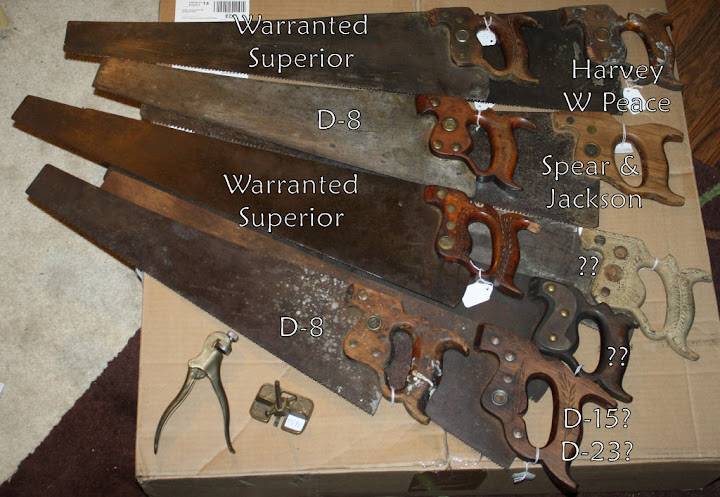
    I've been hunting high and low for some big handsaws for a long time now, and just recently scored bigtime on ebay. Here's the gloat part: I scored 9 saws for $20:


    Even after shipping to me here in Finland I paid less than $8 a saw. I'm pretty pleased with that - locally the best I've found scouring flea markets is 20€ for a saw that was doing a great impression of a pretzel!

    So now the big rehab project begins. I've never done it before, so I thought I'd ask for some advice. I've read a ton of great articles on the topic, but faced with so many options here I'm a bit lost with where to start!

    I've got here:

    Disston D-8 - skewback 22", ~8.5PPI cross-cut. Pretty decent condition, bit curved. Medallion says "Disston Phila" so I guess sometime between 1917 & 1940.

    Disston D-8 - skewback 22", 12PPI cross-cut. Excellent condition - sawplate just needs a light scrub with steel wool and teeth a sharpen and it'll be a great saw. Etch is faint but visible, medallion reads "H Disston & sons Philada", so 1896-1917.

    Disston D-15 or D-23 - straightback 26", ~7PPI cross-cut. Kinked near the tip. Medallion reads "Disston USA" and is nickel with a brass center. Nickel plated screws.

    "Warranted superior" - skewback ~24.5", ~5.5 PPI rip. Very good condition and sharp - took this one straight out and ripped some pine with it. Sawplate needs a good clean, but it seems to be a great user.

    "Warranted superior" - straightback ~26.5" with nib, 10PPI cross-cut. It has about 6.5" of plate depth measured in front of the handle - looks like a very nice saw.

    Harvey Peace, straightback ~26.5" with snapped nib, ~7.5PPI cross-cut. Front toe corner of the plate is snapped off, and needs the teeth completely re-cut. There is 6.8" of plate left though so plenty of space to retooth. Medallion reads "Harvey W Peace Brooklyn NY"

    "??"- straightback 26", ~7.5PPI cross-cut. This one has a big kink and a crack in the plate about 8" from the tip. No identifying marks that I could see, but the handle is reinforced with a metal plate on both sides.

    "??" - skewback 26", ~6.5PPI rip. This one has evidently been in the wars - the sawplate is down to 5.1" at the handle and 1.4" at the tip, the medallion and all but two nuts are missing, blade has two kinks in it and evidently the entire thing has been dipped in paint at some point. The chipcarved handle looks a lot like a Disston to me.

    Spear & Jackson - straightback 26" with nib, 5.5PPI cross-cut. The plate has a gradual curve to it and a small kink & crack in the toothline towards the tip. about 6.7" of plate depth left. Handle is in terrible condition, and rather club-like.


    I'm looking to sort myself out with a nice array of PPI & cut types suited for a good range of activities, all the way down from resawing by hand.
    So where should I start? I was thinking of maybe starting with the Spear & Jackson - de-rusting, straightening the plate, jointing the teeth away, re-toothing as a heavy rip strategically to waste away the crack, and a new handle. Or should I start with one of the simpler cases before I go the whole hog?

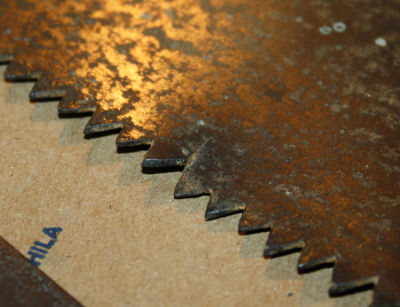
    Here's the crack and kink in the S&J:


    And here's the big crack in the unknown reinforced saw's plate:


    Is there anything I can do about this crack, or should I just cut the end off and make it into a panel saw?

  2. #2
    That's a great deal. Kudos on the Peace saw. Unfortunately, when a saw plate is torn or has cracks in it, there's not a lot to be done about the crack. If the crack is near the toe you can grind/snip/snap/file away that part and use the rest of the saw with the understanding that it's no longer full size.

    I'd recommend that you start with the rip (5.5 tpi) saw because they're easier to sharpen and it's a good way to gain confidence when starting out. Plus, if you mess up it's the one with the cracks in it so it would be no great loss. I would stay well away from steel wool because it introduces scratches that go against the grain of the original grinding, and because it will obscure the etching. Here's my basic cleaning setup.


    A couple of cheap scrapers for initial cleaning, then 120 grit sandpaper in this handy-dandy holder. The holder really helps. I keep mineral spirits in a plastic squeeze bottle so it doesn't fall and break, and I can dribble a little here and there in controlled spurts. It lifts the broken-off rust and sawdust and old tree tar much like water from a water stone or oil from an oilstone. And lots of rags to wipe the rust and gunk away. Not shown here is some fine 400 grit sandpaper. I like to shine up the plate, dry, with that.

    You have to be really careful around the etch. I'm not sure if I read about this elsewhere, but using this technique seems to work for me. I use about 400 grit sandpaper, folded sharply, around the edge of a plane blade, as illustrated here. Sand the etch carefully, with the sandpaper right on that plane edge. The idea is that the etch is just below the surface of the rest of the saw plate. If you use steel wool, you will go right into that recess and scrub the etching off the plate. If you stay above the etching layer, it will be preserved. Every four or five strokes, refold the sandpaper and use that new crease. Sand carefully until the etch starts to come out and sand it until as much of it is legible as possible, and no more. One or two strokes too many, and it will start to smudge and disappear. Don't ask how I know!


    I haven't discovered the secret to getting kinks out of blades, but on this link you'll see how I seal saws with paraffin wax and take a bow or bend out of a saw plate. I have some saw plates from last summer, when I started doing this treatment, that look like the day I cleaned them.

  3. #3
    Join Date
    Sep 2007
    Location
    Longview WA
    Posts
    27,437
    Blog Entries
    1
    locally the best I've found scouring flea markets is 20€ for a saw that was doing a great impression of a pretzel!
    Those impressionist saws always command higher prices.

    Looks like a good haul. On the blades that need to be shortened, even the cut off metal can be used. Mine have been used for scrapers and marking knives so far.

    Plan to make some scribes or inlay tools in the near future.

    jim
    "A pessimist sees the difficulty in every opportunity; an optimist sees the opportunity in every difficulty."
    - Sir Winston Churchill (1874-1965)

  4. #4
    Join Date
    Jan 2009
    Location
    Espoo, Finland
    Posts
    46
    Cheers for the tips guys

    Spent a few hours with some sandpaper on the bottom left D-8 from the group picture and that reinforced handle saw:


    The D-8 turned up real nice, the etch is still faintly visible even. The other one has some significant pitting, however..

  5. #5
    Join Date
    Jan 2009
    Location
    Williamsburg,Va.
    Posts
    12,402

    Red face

    As cheap as you got them,you could just cut up the bad saws for scrapers. Just use a sheet metal shear. The saw steel cracks ahead of the shear blade,and does not harm it. We cut MANY .042" sheets of saw steel up on the 10' shear near our shop without hurting it. The maintenance blacksmiths nearly hurt it though. They stalled the shear out trying to cut a 1/4" steel plate 8' long in it!!!

    If you had access to a saw toother and wanted some bow saw blades,you could cut the blade off above the cracks,tooth the edge,and set the teeth,sharpen the saw,and then cut a toothed strip off of the blade to make a bow saw blade.

    We had to make those,too,for the Williamsburg trades shops. Good ones were getting hard to get.

    One authentic bow saw blade type we had to make was about 3/16" wide on 1 end,and 3/8" wide on the other end. The wider end is where the handle would have been,had it been a regular saw. It was ground across its width to be a full .042" at the cutting edge,to less than 1/32" at the back edge. I had to just freehand grind the taper on those blades. The taper made setting the teeth un necessary,and the blades would turn extra tight turns,too.

    You could just take advantage of the existing teeth and cut a bow saw blade off of the old edge. The picture of the lower saw just above looks like you'd get a plenty long enough blade. If you made your bow saw blade,and cut the old blade just above the crack,you could go ahead and re tooth the blade and still have a good usable handsaw blade,+ a bow saw blade. Actually,that seems like an excellent option.
    Last edited by george wilson; 09-02-2010 at 6:23 PM.

  6. #6
    Join Date
    Jan 2009
    Location
    Espoo, Finland
    Posts
    46
    Quote Originally Posted by george wilson View Post
    You could just take advantage of the existing teeth and cut a bow saw blade off of the old edge. The picture of the lower saw just above looks like you'd get a plenty long enough blade. If you made your bow saw blade,and cut the old blade just above the crack,you could go ahead and re tooth the blade and still have a good usable handsaw blade,+ a bow saw blade. Actually,that seems like an excellent option.
    Great idea George! I've been meaning to make a bow saw..

    Sadly I have no access to a sheet metal shear. Any ideas of other ways to get it cut and still have a usable temper on the toothline after? I don't suppose tin snips would do the trick? I measured the plate at 0.038" thick.

  7. #7
    Join Date
    Jan 2009
    Location
    Williamsburg,Va.
    Posts
    12,402
    I would definitely not try tin snips. Don't you live somewhere near a sheet metal shop? Tin snips will distort the heck out of the blade,and you'll never get it straight again. So could sheet metal shear,but only a little,which you could tension out of the blade.

    Actually,I can't recall any curving in the bow saw blades we made as described above. Probably depends on the condition of the shear.

Tags for this Thread

Posting Permissions

  • You may not post new threads
  • You may not post replies
  • You may not post attachments
  • You may not edit your posts
  •