Page 2 of 2 FirstFirst 12
Results 16 to 21 of 21

Thread: Introduction

  1. #16
    Join Date
    Oct 2007
    Location
    Englewood, CO
    Posts
    483
    Jim,
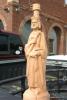
    I created the 3-d image in Enroute and then sliced it into 3" thick slices that I could manage on my table. I then glued the slices together and finished with some hand tools. I wish I had a taller gantry for doing thicker material, mine is only 6.5". The trade off though is that the taller you go the more you lose rigidity and accuracy, at least according to MultiCam.
    Paul
    Universal PLS 6.120D 75 watt
    MutiCam Apex CNC 4'x8' w 6 bit TC.
    EnrRoute 6 Pro 3d software.
    Vision 2550 Rotary Engraver.


  2. #17
    welcome paul, here is a vid of my first venture into "slicing"

    http://www.youtube.com/user/cabnet63.../0/tCrEJ2Ud5YU

    jim

  3. #18
    Join Date
    Oct 2007
    Location
    Englewood, CO
    Posts
    483
    Thanks Jim,
    That's very some very nice work you have done. Did you create the 3d files yourself and if so what program did you use?
    Paul
    Universal PLS 6.120D 75 watt
    MutiCam Apex CNC 4'x8' w 6 bit TC.
    EnrRoute 6 Pro 3d software.
    Vision 2550 Rotary Engraver.


  4. #19
    we had Guy Mathews scan the chess players and the rest was done with aspire, a scanner is next on my list!

  5. #20
    I haven't taken a look at Mr. McGrew's vid yet, so he may have answered the question there...

    I understand the slicing concept to create larger than Router clearance capacity reliefs.

    What I don't understand is, as your slices got closer to the middle of your spheroid object, how you carved the edges?

  6. #21

    slicing

    one object (model) software "slices" sections to accomodate the material thickness or capacity, then each slice is machined separatly.

    jim
    Attached Images Attached Images

Posting Permissions

  • You may not post new threads
  • You may not post replies
  • You may not post attachments
  • You may not edit your posts
  •