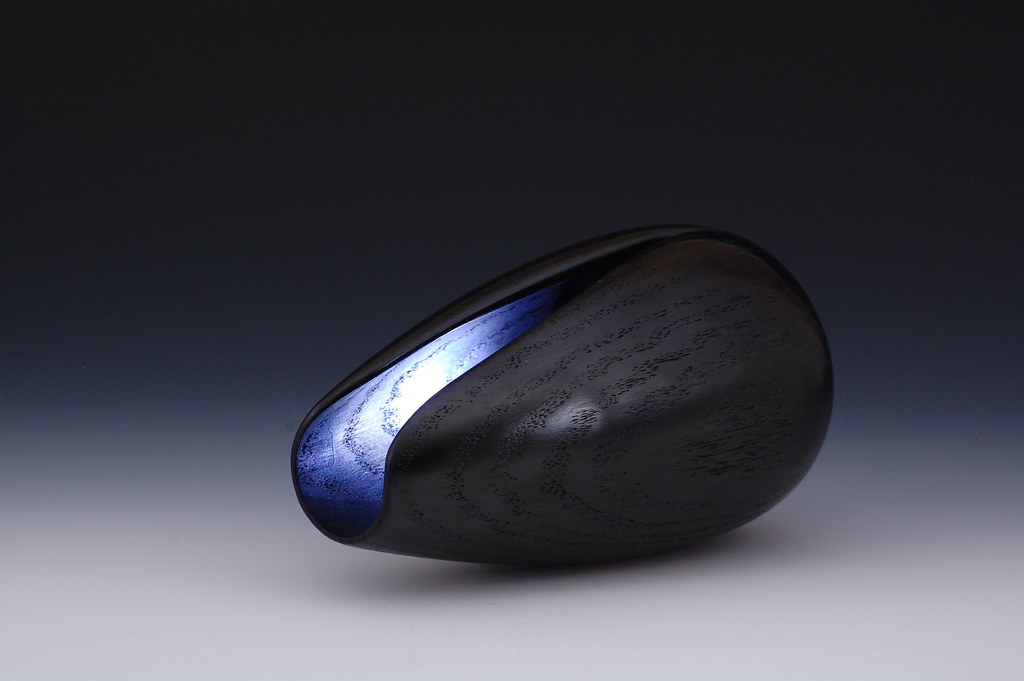
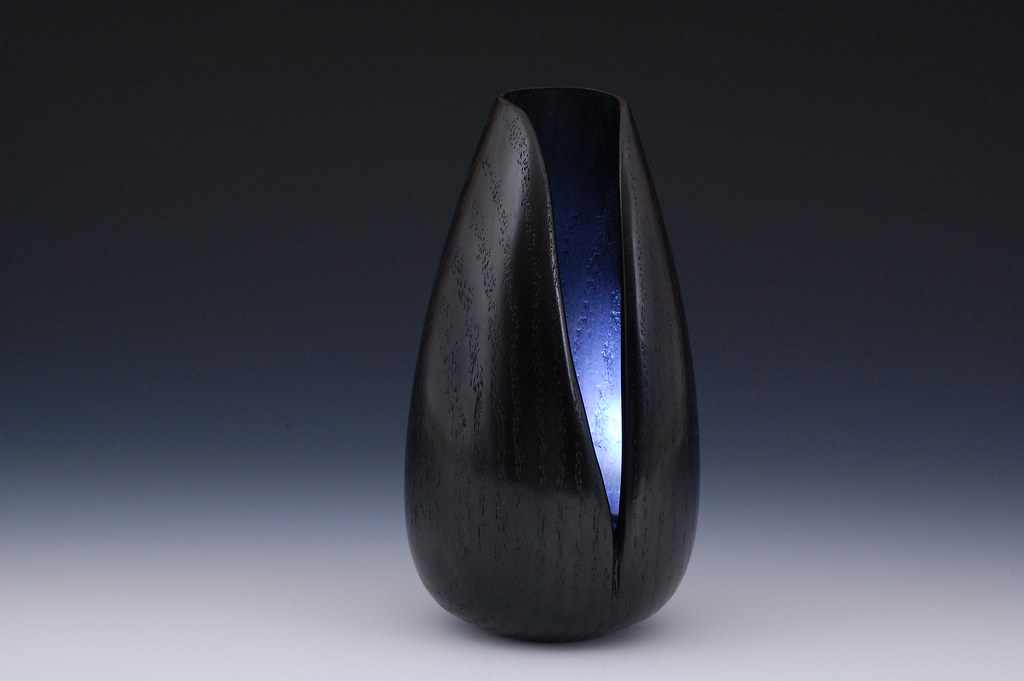
Inspired by another thread, I thought I would do a bud vase. I just need to get a nice test tube to fit. This is kiln dried red oak, ebonized with india ink. Thought I would also post a couple of different photo techniques.


 [OP]
Member
[OP]
Member
Inspired by another thread, I thought I would do a bud vase. I just need to get a nice test tube to fit. This is kiln dried red oak, ebonized with india ink. Thought I would also post a couple of different photo techniques.
Last edited by Mark Hubl; 03-17-2010 at 12:44 PM.
Member
That's a great piece Mark. I really like the lit interior in the second pic too.
 Contributor
Mark, that piece is inspirational - I love it! What are the dimensions? And, in using the India ink, did you wetsand first to raise the grain? What was the finish?
Sorry for the barrage of questions, but I do like this piece, and with the hassle I have recently had with "ebonizing", I am curious of other methods.
The couple of times I have used India ink on flatwork, I wetsanded prior to using as the India ink is water based.
 Member
Very nice - How did you cut the slot out? Bandsaw?
 Moderator

Mark - great form and excellent finish - especially on Oak! Nice photos as well!
Steve
You never know what you got til it's gone!
Please dont let that happen!
Become a financial Contributor today!
 Member
That is a very neat piece. Very different from anything I have seen.
 Contributor
Very nice piece. Form, finish and photo's are great.
Bernie
Never put off until tomorrow what you can do the day after tomorrow.
To succeed in life, you need three things: a wishbone, a backbone and a funnybone.
Member
Simple. Elegant. Beautiful.
[OP]
Member
John,
The piece is 6" tall, 1 1/2" at the top and 3" at the widest diameter. The piece was sanded to 600 and then wet sanded from 220 to 600. Then brushed on India ink. Probably 3 coats. Lightly sanded/steel wooled between coats. Then, I use a shoe brush to buff the exterior. This piece doesn't have a finish yet, I will probably use wipeon poly to complete.
I am drawn to black pieces for some reason. I think there can be a certain elegance to them. But, black tends to accentuate any and all flaws, especially to the creators eye.
So, I have tried leather dye, Writ dye/alcohol, gesso and India ink. No favorites, mixed outcomes. I want to try "Fiebings" solvent base leather dye and aniline dye next. I know different woods and pieces will lend them selves to different techniques, but I want to have a go to favorite.
Greg,
The piece was carved into using a Dremel and burr. The shape was refined with rifler files and sandpaper. This became a design opportunity since the Dremel was having a mind of it's own. The cut was originally only going to be around 1" to 1 1/2".
 Member
I love it. The lighting gives a great effect to the interior. It reminds me of a mussel or clam. Great piece and definitely inspirational.
Contributor
Mark, it was Fiebings that I used on the last piece I did, final pics of which I hope to post tonite. The piece was sugar maple, and it took the dye wonderfully. But, the brush on lacquer was the big mistake!! It picked up the dye and made a mess. Had I carefully sprayed the finish, then I think it would have worked great. With one coat of the dye, the maple took on a very black look.Originally Posted by Mark Hubl

Member
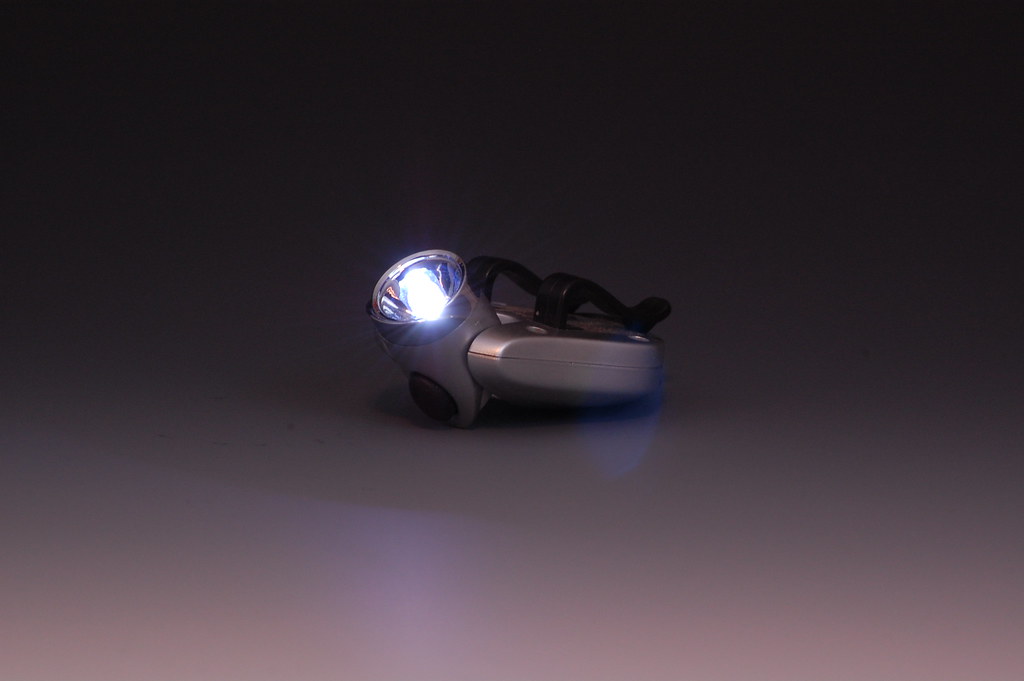
So, tell us about this interior lighting technique.
[OP]
Member
Frank,
It's magic!
Here's the trick. It is just a little one of those LED's that goes on the brim of a baseball cap.
[OP]
Member
John,
That has been one of the challenges with the different techiques. Knowing what kind of top coat to use without thinning or removing ebonizing agent. Good luck, can't wait to see the latest.
 Member
Mark, Great piece. I have been considering a similar design. Thanks for all the info on your process. I've had difficulty with dremel's and burrs too. I've thought about using a fret saw to get the general cut and then refining with riflers. Nice pic set-up too.
Mark
You can sometimes count every orange on a tree but never all the trees in a single orange. -A.K. Ramanujan
 Posting Permissions

 Reply With Quote