Page 1 of 2 12 LastLast
Results 1 to 15 of 18

Thread: QS Quad-linear Legs.. attn. Shawn Patel

  1. #1
    Join Date
    Dec 2006
    Location
    Atlanta , Ga.
    Posts
    3,970

    QS Quad-linear Legs.. attn. Shawn Patel

    Shawn ask for a picture of a quad-linear QSWO leg with fleck on all four sides which can't be obtained by laminating two peices. That will give 2 sides fleck and two sides long grain. So.. here ya go Shawn. I decided to do a new thread as the other has changed direction to end grain orientation on top glue ups. Surprise.. surprise..

    I jammed 4 sticks through at 45 degrees on both sides Shawn to get a picture as my 4 legs have been done a week ago. Once you get your mitered pieces.. I make two passes on the pointed end with a block plane for two reasons. I prefer applying the two strips of package tape with the apex of the point down on the table. If you don't flatten a small area they simply won't balance side by side with the point down.

    Second.. the flat area creates a small hollow square opening in the center after glueing that allows any excessive glue to squeeze out into in lieu of trying to force it's way back to the outside which can off-set the edge orientation if applied too excessively.

    The pieces are placed glue side down (point faces down).. edge to edge.. then I apply a strip across the top portion then the bottom. At that point they are oriented on the package tape. Turn them over so the glue side is now up. Fold your package to see if the edges align and if they don't.. adjust so they do.

    At that point they are glue ready. Apply with a chip brush and simply fold the package together. Add another strip of package tape around the center to hold it together checking to make sure all edges align. Once done.. you can now wrap the tape warp with flexible 3/8" (I use 3/8") surgical tubing and allow to dry.

    You can figure it out from there.. Everyone may not be interested in this process as it was done at Shawn's request. Sorry to those that opened the thread to see what the title suggested. If ya ain't interested.. ya ain't interested.

    Sorry about the pictures Shawn.. didn't even bother to take to photo shop as simply so you get the picture so to speak. I got mortises to cut before sundown so I was in a hurry and did the best I could considering that. So.. here's an order of southern fried quad-linear legs... hold the finish! ha.. ha...
    Attached Images Attached Images
    Last edited by John Thompson; 02-03-2010 at 3:20 PM.
    Sarge..

    Woodworkers' Guild of Georgia
    Laissez Les Bons Temps Rouler

  2. #2
    Join Date
    Feb 2008
    Location
    Cicero (syracuse) NY
    Posts
    104

    Wink flake on all sides

    John,

    Thanks for the tutorial. I've done it two ways (assumiing the top and bottom are not visible). First is with a lock miter bit in my router. This is the way Stickley does it. The second is to wrap veneers around a solid substrate. I did this for a king size bed I made (see pic).

    The legs were about 3.5" square and I wanted them to be very "beefy" to hold the lag bolts that would support the side rails. I glued up some squares of substrate (it was fiberboard, or some such thing, but I can't remember exactly what it's called). Then I ripped down some 3/8" veneers on my band saw. Next I planed them down to 1/4' and put a 45 bevel on each side. I then bradded and glued two opposing faces around my substrate. Finally, glued in the other two pieces and clamped. This method used very little wood, gave me "meaty" legs and allowed me to have beautifil flake on all four sides. The bed is 5 years old and the legs have held up wonderfully.

    Guess there are more than one way to skin a cat
    Attached Images Attached Images

  3. #3
    Thanks, John. I've seen it done 'wrapped around a substrate' but this seems easier.

  4. #4
    Join Date
    Dec 2006
    Location
    Atlanta , Ga.
    Posts
    3,970
    Alan is absolutely right about several ways to skin a cat. The lock miter is the exact way the Stickley Bros. did them at the Stickley factory. They used a machine to do so with the whole A & C movement developing from getting away from machines... go figure as most A & C was machined in some manner with maybe exception of a few small shop craftsman.

    If I had a shaper I would miter lock them also even though I have had no problem without. As far as the warp around substrate that was also a Stickley idea in the original method to save cost on the better wood using sub-strate. The sub-strate was solid wood though.. just cheaper than the primary.

    These legs are only 1 3/8" x 1 3/8". I did a mini tutorial in the past here showing using sub-strate. But.. I use strickly wood and usually well dried poplar. When my legs are 1 1/2" or under.. I simply use solid QSWO as you're not saving that much and you have added steps to glueing the veneer. When I go over 1 1/2" on QL legs I use QSWO veneer about 1/4" thick over poplar which becomes the core when all is glued. I use 3/8" to 1/2" in some instances as I will explain in the next sentence. The thickness of the QSWO can be very thin for that matter but here's a caution. If you intend to taper the bottom and you use thin veneer you will cut through the veneer and both long grain and the glue line where the veneer and substrate join will stick out like a sore thumb.

    Latter guys...
    Last edited by John Thompson; 02-03-2010 at 6:40 PM.
    Sarge..

    Woodworkers' Guild of Georgia
    Laissez Les Bons Temps Rouler

  5. #5
    Join Date
    Feb 2006
    Location
    Country Club, MO, USA
    Posts
    897
    The Stickley way, on some thick legs:


    Then you stuff a piece to fit in the void. Great stuff, and it works!!!

    .
    Al
    http://www.sawmillcreek.org/images/buttons/fotc.gif
    Sandal Woods - Fine Woodworking

  6. #6
    Join Date
    Feb 2009
    Location
    Whitehorse, Yukon, Canada
    Posts
    1,148
    Thank you Sarge, it is indeed a great tutorial, it should go into the the wisdom thread!
    thank you again.

  7. #7
    A question about solid wood core: at what point do you worry about expansion splitting the miter on the veneer?
    Thanks!
    Salem

  8. #8
    Join Date
    Dec 2006
    Location
    Atlanta , Ga.
    Posts
    3,970
    Your welcome Dave..

    Al... the core as you mention is indeed important IMO. A question?.. Did you do that lock miter with a router bit and table or on a shaper. I've been hesitant for years to use a router (even though I have a Milwaukee 3 1/2 under my table) to take off large amounts as this cut is. I had a piece kick big-time about 25 years ago using a larger cutter head on a complex cut and I do believe the router was running at lower speed.

    So.. if you did do it on a router and table.. did you sneak up on the final cut with shallower passes. I may consider a lock miter bit as many of these as I do but... still hesitant until I have someone that has experience with using the table for that cut tell me how the approach they take. That joint looks great.
    Last edited by John Thompson; 02-03-2010 at 8:12 PM.
    Sarge..

    Woodworkers' Guild of Georgia
    Laissez Les Bons Temps Rouler

  9. #9
    Great thread, Sarge!! And, some good input from Al and Alan, too! Thanks to all!

  10. #10
    Join Date
    Jan 2006
    Location
    Grand Forks, ND
    Posts
    2,336
    Great post, I've got an oak dressor next up and would like the posts to be done this way.

    If I would like to yield a 1 1/4" finished post, can I go slightly oversize so I can joint and plane for accurate surfaces? I would imagine if the same amount was taken off of each side the miters would not show?

  11. #11
    Join Date
    Feb 2006
    Location
    Country Club, MO, USA
    Posts
    897
    Quote Originally Posted by John Thompson View Post
    ...A question?.. Did you do that lock miter with a router bit and table or on a shaper. I've been hesitant for years to use a router (even though I have a Milwaukee 3 1/2 under my table) to take off large amounts as this cut is...

    ...So.. if you did do it on a router and table.. did you sneak up on the final cut with shallower passes. I may consider a lock miter bit as many of these as I do but... still hesitant until I have someone that has experience with using the table for that cut tell me how the approach they take. That joint looks great.
    John,

    On the router table, with a DW-618 under the table. But I have also done it with the DW-625, which does a great job, too. I hog most of the wood in two or three passes, then take a very shallow pass to finish it off, and to avoid splintering of the walnut (in this case), as the edge is literally sharp as a knive's edge. The outer bit is the Sommerfeld lock miter; they make two sizes of lock miter bits: The Baby Lock Miter bit is good up to 7/8-inch thick wood (I think), and the large one is good up to 1-1/4-inch thick wood, I believe.

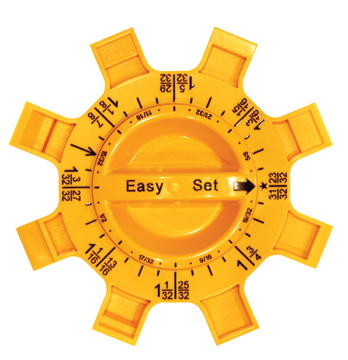
    Now, to adjust the lock miter bit height, all that is required is the Sommerfeld Easy Setup Jig - this makes the height adjustment trivial, as you set up the jig for the wood thickness; and will usually it take only two adjustments or so to dial it in perfectly:


    The second adjustment is made at the fence, to yield the knife edge at the corners.

    The joint is cut with the first work piece flat on the table, and the companion piece is cut with the work piece on the fence. The key is to make sure you have the proper orientation for each piece, so that the quarter-sawn figure wraps around from piece to piece...

    This is the best method to make really thick legs!

    The second step, to prepare the core, requires sneaking up on the final thickness. But with today's planers this is a trivial exercise. I use the DW-735 lunch box planer (and good hearing protection...)


    Quote Originally Posted by John Keeton View Post
    Great thread, Sarge!! And, some good input from Al and Alan, too! Thanks to all!
    Glad to pitch in, John.


    .
    Al
    http://www.sawmillcreek.org/images/buttons/fotc.gif
    Sandal Woods - Fine Woodworking

  12. #12
    Join Date
    Aug 2007
    Location
    Greenville, SC
    Posts
    750
    Great post Sarge!

    For those looking for some more information on this, Walt Caza made a great "essay" on this in the past also. It can be found here:

    http://www.sawmillcreek.org/showthread.php?t=86109

  13. #13
    Join Date
    Dec 2006
    Location
    Atlanta , Ga.
    Posts
    3,970
    Quote Originally Posted by Salem Ganzhorn View Post
    A question about solid wood core: at what point do you worry about expansion splitting the miter on the veneer?
    Thanks!
    Salem
    Looks almost like your question got over-looked Salem. I personally use solid wood up to 1 1/2". Over that thickness of a leg I do use veneer but... I generally go no thinner than 1/4" for when I don't use a taper and 1/2"-5/8" when I do to avoid tapering through the veneer into long grain which will show as I mentioned in another post.

    So... if you have intentions of using ver thin veneer I don't qualify to answer your question as I have no experience with using it that thin. But.. with the technique I use in the thicker veneer.. I laminate the QSWO to the poplar before I cut the 45 degree edges. Thats a lot of glue surface. Then I take the lamination to the TS to rip the 45 d edges in one solid piece.

    Generally a leg is from 1" + to usually no more than 4" in my work. The largest I have made is for a country kithchen break-fast nook table which are 4" at the very top 6" and then are tapeer on two sides to the bottom where they are around 2 3/4". Those table legs were built about 6 years ago. I have numerous talbe legs that are much smaller in the 1 3/8" - 2 1/2" range but with only two years service so far.

    The kitchen table sees steam.. extra heat from leak off of an oven often. No splits on it nor have I experienced any on any of the other smaller legs. So... I thing considering the large amount of glue surface.. the fact I don't start a project until I properly allow the wood to come to proper moisture content and the fact I then allow it to acclimate in the shop.. along with the fact I finish all sides including sealing ends... I have experienced no problem to this point.

    I cannot comment on what tomorrow brings but at this point don't expect any surprises. I think the biggest mistake one can make it not using properly dried wood.. not acclimating and often mixing batches of heart-wood and outer sapwood with various moisture contents together which IMO can throw a monkey wrench into the plan in the long haul. I certainly have been guilty in earlier years due to being in a hurry or simply just not knowing any better. In my early years there was no inter-net for instant answers from more experienced and very few books and mags.

    Frankly I could probably build a house with all the trial and error wood I have wasted searching for answers in those early days. Bottom line is if you proceed properly on quad-linear and the fact that generally the widest piece you would use is 4" and normally much narrower... I simply don't worry about expansion of the miter under the circumstances I try to control before the fact. So far.. so good in my own case!

    Regards..
    Sarge..

    Woodworkers' Guild of Georgia
    Laissez Les Bons Temps Rouler

  14. #14
    Join Date
    Dec 2006
    Location
    Atlanta , Ga.
    Posts
    3,970
    Thanks JK.. Jeff and Ben... it was originally done as I mis-understood Shawn in another thread and I thought he was asking about the use of tape package wrap and surgical cord but... he actually wasn't. If I had known that many would view I would have taken time to to it properly.

    Notice that burn on a few pieces of the strips. I had an Infinity 40T on my TS which has a 30 degree positive angle and side grind from use on cross-cutting a top. I use that blade because it delivers an almost burnished end grain cut cross-cutting and the ends will show on this top. But.. you jam wood through on a rip as I did as I had mortices and tenons to cut... that 30 degree will burn an edge pronto on a rip cut. I generally put a 24 tooth rip blade on to do any rip but was in a hurry to get those pictures done. So.. the lesson is don't get in a hurry which I normally don't as I don't allow myself too...
    Sarge..

    Woodworkers' Guild of Georgia
    Laissez Les Bons Temps Rouler

  15. #15
    Join Date
    Dec 2006
    Location
    Atlanta , Ga.
    Posts
    3,970
    Thanks Al.. for the detailed explanation and additional pictures. I do believe I may give some serious consideration to getting that set-up as it would speed things up considerably. I can see where it would be very useful with larger legs and I am considering doing another country kitchen table soon that would have legs just under 4" at the top before I taper so...

    I have always wanted a shaper and power feed but a carcass project produced every two months with finish and cure times doesn't warrant the investment for me personally so.. toss that idea.

    Again thanks and that is some excellent router work you show-cased...

    Regards...
    Sarge..

    Woodworkers' Guild of Georgia
    Laissez Les Bons Temps Rouler

Posting Permissions

  • You may not post new threads
  • You may not post replies
  • You may not post attachments
  • You may not edit your posts
  •