Hi All,
I've posted here a couple of times and finally decided to get serious on my work bench.
The story goes I have a friend who owns a number of green houses here in Oregon and he heats them in the winter burning wood. He gets bundles of rough cut wood from a local beam manufacturer at some ridiculously low prices. Much of what I salvaged is 8/4 x 10' x 10"+. A few surprises with some really hard spalted maple in the bundle most is Doug Fir and pretty well seasoned at that. Beyond ripping the timber to width on my table saw most of the bench will be build the Neander way, so can't say all done using hand tools. Pretty much Following the Roubo design from Chris Schwarz. Starting with the legs I've finally gotten far enough to show a little progress and wanted to document it. I'll post more as I go. Feel free to ask questions and I'm really new to this level of woodworking but having a lot of fun doing it.
This is the pile of wood I started with:
Ripped and cut to rough length using Table saw and SCMS:
Flattened the boards to prep for glue up:
The Glue-up, I'm going to need more clamps for the top!
Cutting the Tenons, Got better on each one but still tended to undercut so lost about 1/8" on the tenon width. should have been 3" not 2 7/8". Used Japanese pull razor saw. Works pretty well but not the easiest thing to cut these massive ends.
All 4 leg tenons now done. One to the mortices and milling the wood for the top. 28 1/2" to the shoulder of the tenon and 3 1/2" tenon, May lop off 1" prior to mounting to the top. Top will be about 4 1/2" thick mostly Doug Fir giving me a bench height of 33" when finished. I'm 5'7" and think this height is about right for me. If not I can adjust it.
Next installment will be the stretchers. It'll probably take me a couple weeks to get that part done in concert with milling up the wood for the table top.
Next question is to put in sq. dogs or wait and just bore round ones? Any inputs on that one?
Front vise will be a leg vise like shown in Christopher's book end vise I'm thinking I'll use a 9" Jorgensen Quick release I bought about a year ago. Also might consider a wagon vise but that means more money which I'm a bit short on at the moment. Any suggestions? pro's or con's? Keep in mind I'm a hobbiest.


 Reply With Quote
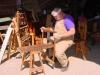

 Jr.
Jr.