
Dr SWMBO flew off to Bean-town early, so after a lazy morning with a large latté, catering to a couple of birds' every needsand a trip to HD to buy some more plywood for the drawer bottoms (cut it just about 1/2" too short...and even measured more than once!
), I got back to work on the armoire project in between some home maintenance things that needed to be done. This, of course, involved spending some more "quality time" with the Festool 150/3 sander getting ready for what's described below.
Pics
All the "building" is pretty much complete at this point.
- The right door on the piece will have a full length mirror on the inside, so the rail that divides the frame between the two panels had to be reduced in thickness to make a flat surface even with the back of the panels. This was quickly done on the bandsaw and the surface was then cleaned up with my L-N low-angle block plane in at least a partial Neander spirit. This leaves room for about a 70" tall mirror panel that will be secured by moldings to avoid wood movement issues that might result from using adhesives
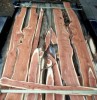
- The drawers were glued up after the dyed fronts were sealed with a coat of dewaxed garnet shellac. The number of clamps might seem like overkill, but I needed to be very careful not to distort the joint between the front and the sides since they cannot be sanded further in that area without messing up the color contrast. For anyone who missed the previous commentary on this, all four pieces of the drawers are poplar, but I wanted the faces to contrast with the rests of the drawers as wel as match the color of the casework. They were pre-sanded "dry" to avoid removing the color once dyed. The joints will not be quite as smooth as they would if sanded after gluing, but the contrast is more important to me.
- After the clamps were removed a few hours later, the drawers were set aside to dry completely. I also clear-coated the T&G pine strips for the cabinet back with de-waxed blond shellac to seal the resins in so that the Target Coatings USL that will be used to clear coat this project will not have any adhesion problems.
- The cabinet doors were then glued and clamped. Working with full 1" thick material is really nice for this kind of thing...the joints have plenty of meat and will be very sturdy. The panels were pre-dyed to insure that any shifting will not result in a "white line".
I have a few joints to stuff with slivers and then the finishing process will proceed on the rest of the armoire. Of course, I'm already trying to think of a good reason to entice a few fellow woodworkers to the shop...to help lift this sucker to the 2nd floor of the house...


 Reply With Quote


 Thank you! For newbie's, such as myself, that's greatly appreciated! Can't wait to see the final results. And very sincerely, I do wish I lived closer, as I'd be happy to give you a hand with hauling that piece to its ultimate home. Well, in exchange for a hands-on lesson or two, of course!