Page 4 of 9 FirstFirst 12345678 ... LastLast
Results 46 to 60 of 121

Thread: Armoire Progress

  1. #46
    Join Date
    Sep 2003
    Location
    Philadelphia, Pa
    Posts
    2,266
    Jim,
    Your piece is coming along nicely. Sorry I meissed yesterday, but a wedding was on the schedule. Oh well.
    Next time, when you get even more in to the neander way of working, you might consider wedged through tenons on the verticals, or sliding dovetails on the front and rear of the vertical partitions so that the weight of the shelves is carried on two boards, for less deflection. This is more important on drawers, where slight sagging will cause the drawers to be misfit after the passage of some time.
    If you go with the sliding dovetails, then to make the assembly possible, since the DT portions will only be about 2" long each, just cut the partition overwide, rip the partition, join from front and back, and make the edge glue joint in place. It does make disassembly a destructive process, however.
    Alan

  2. #47
    Join Date
    Mar 2003
    Location
    SE PA - Central Bucks County
    Posts
    65,885
    Thanks, Alan. It was a good time yesterday. For this piece, I was following Thos Moser's design which did not use sliding dovetails; rather, stopped dados provided nice glue area. That said, these partitions are only glued in the front due to the cross-grain situation with the "shelves" and since they will not carry much weight, things should be fine. A mechanical fastener in the rear of the lower partion that can "move will help support the weight in the rear for the shelves.

  3. #48
    Join Date
    Sep 2003
    Location
    Philadelphia, Pa
    Posts
    2,266
    Jim,
    This does not seem to be a cross grain situation, except for the bottom. Otherwise, the grain on all of the components of the carcase, shelves, and vert. dividers, run the same direction, so with the same wood, the expansion rates should be about the same. On the bottom frame, which is probably M&T, glue the front one, but leave the back one loose, to slide as the wood moves.
    As to the fancy joinery, I was just pulling your leg a bit, although were there drawers, then it would be something to think about. Bird's article on the Penn. Secretary has a nice detail on this joint, with both a sliding DT, and a shallower dado. It looks harder than it is, and I have machine cut this joint, but today I would hand cut the DT socket to avoid tearout.

  4. #49
    Join Date
    Mar 2003
    Location
    SE PA - Central Bucks County
    Posts
    65,885
    Alan, you are right, I misspoke about the cross-grain situation specifically about the top...that one is fine. The bottom "frame" is pocket screws for expediency, but the stituation holds the same as with M&T. That one is glued in the front and has mechanical fasteners in the back that can move.

  5. #50
    Join Date
    Mar 2003
    Location
    SE PA - Central Bucks County
    Posts
    65,885

    Update - 16 October 2004

    After some errands and a bit of electrical work in the shop (Contactor setup for the DC and replacing the switch in the J/P), I got back to work on the armoire project. Two things were completed today:

    1) The T&G beaded boards for the cabinet back were sized and dados cut on the top and bottom on the backside to allow them to slip into moldings created to hold the back in place and still allow for wood movement. The top molding is held in place with screws so that I can remove the back while working on the project and so it can be finished separately. That makes for easier spraying inside the cabinet of the shellac and WB lacquer that I will be using to finish the project as well as insuring that the back will remain natural in color while the cabinetry is dyed to compliment the wide, pumpkin pine floors in our guest room where the armoire will be living

    2) The crown was fabricated and assembled to the cabinetry with consideration for cross-grain wood movement on the sides. Rather than deal with a sliding dovetail as I originally intended for that purpose, I took advantage of the fact that I had to put blocking on top to hold up the molding above the casework. The blocking along the slides was screwed on with the rear screws in slots, allowing it to move. The crown was glued to that and nailed from the inside with a few brads to hold it in place on the sliding blocking until the glue cured. I did need to use a couple brads to keep the corners tight, but they will become nearly invisible during the finishing process. I almost made a MAJOR boo-boo on this thing...nearly forgot to account for the door thickness when putting on the crown. Thankfully, the glue was not dry and I could pull it off quickly and put in the necessary 1" thick filler. Sheesh!

    Tomorrow it's time to deal with the bottom front of the case and build the doors. If I have time, I'll get the material milled for the two drawers that go inside the piece at the bottom.
    Attached Images Attached Images
    Last edited by Jim Becker; 10-16-2004 at 9:03 PM.

  6. #51
    Join Date
    Feb 2003
    Location
    Just outside of Spring Green, Wisconsin
    Posts
    9,442
    Hey Jim, that's certainly coming along nicely! Really like the beaded boards for the back. You know, even with "limited" working time on it, you're still gettin' that thing further along than I would've in twice the time! Nice job.
    Cheers,
    John K. Miliunas

    Cannot find REALITY.SYS. Universe halted.
    60 grit is a turning tool, ain't it?
    SMC is totally supported by volunteers and your generosity! Please help if you can!
    Looking for something for nothing? Check here!

  7. #52
    Looks very nice Jim! I like the beadboard back.

  8. #53
    Jim, glad to see all the progress your making on the project. It's coming together nicely! Glad to hear that you fixed you "boo-boo" in time. Most of the ones I make are well after the glue dries. 
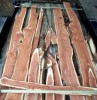
Anyway, thanks for the updates. I really like the contruction pics.

  9. #54
    Join Date
    Mar 2003
    Location
    SE PA - Central Bucks County
    Posts
    65,885

    Sunday Update - 17 October 2004

    After a late start due to just plain laziness and the need for the latté to do its magic, I got quite a bit more done on the armoire. The carcass is basically completed at this point. The crown was wrapped on Saturday after milling the stock and was sanded through the grits this afternoon. The "foot" of the piece was also fabricated, built up and sanded. Before taking the piece off the bench, I took the time to deal with the hinge mortises as it was easier to work on them at chest level and horizontal than it would be with the case standing up.

    Then it was time to start milling the 1" stock for the doors. As I found that I only had one existing piece long enough for two of the vertical stiles, I pulled a thicker piece of rough stock out from under the miter station, flattened and thicknessed it to 1" and proceeded to rip everything to width after a few passes on the jointer to be sure the edges were straight. The final task for the day was to resaw and thickness some wide stock for the two drawers that go in the bottom of the case. I didn't want to glue up narrow pieces of 1/2" material and this way, I'll be able to have drawer fronts that have a continuous grain pattern across the entire armoire.

    Pics:

    1) Using the router to remove most of the hinge mortise area--a thick block of wood was clamped to the case to provide good support for the tool. The ends were then cleaned up with a very sharp chisel
    2) Completed casework
    3) Resawing drawer stock
    4) Thicknessing drawer stock
    Attached Images Attached Images

  10. #55
    Join Date
    Jan 2004
    Location
    Ringoes,NJ
    Posts
    1,492
    Blog Entries
    15
    Jim, I guess that the armoir will be getting to the guest room via your bedroom and not the staircase in the older part of the house. From what I can remember, that staircase didn't seem roomy enough to lug the armoir up and into the guest room. By the way, nice looking piece. And it must be awesome to know that it is made from wood harvested from the back forty.
    There's one in every crowd......and it's usually me!

  11. #56
    Join Date
    Mar 2003
    Location
    SE PA - Central Bucks County
    Posts
    65,885
    Thanks, Fred. Yes, any furniture destined for the upstairs of the "old" part of the house (the 250 year old stone portion) must transit through the MBR. I'll be looking for a volunteer to help with that! hee hee This is not a light-weight piece of furniture. I can lift it myself on and off the dolly...with the back off...but all bets are off once the back and the doors are affixed. I did provision for lift-off hinges that let you remove the doors, but the crown "may" interfere with that. Time will tell.

    You are right about the wood. It's really nice using material that is completely off the property for this project!
    Last edited by Jim Becker; 10-17-2004 at 8:10 PM.

  12. #57
    Join Date
    Mar 2003
    Location
    SE PA - Central Bucks County
    Posts
    65,885

    23 October Progress Report

    After a visit from Jay Knoll, I got back to work on the armoire. Today's efforts included final milling of the door stock, sizing the 1/2" drawer stock and gluing up the door panels from the remaining 1/2" thick material. Next weekend I should be able to get the doors glued up and drawer boxes dovetailed and assembled as well as doing some testing on scrap for the "dye job".

    Pics:

    1) Roughing out the hinge mortises on the door stock with the router. This time, I did something different...put on the Leigh dust collection hood and hooked everything up to the CT22. This greatly reduced the dust and chips flying and will be the way I'll do any edge work in the future with this tool. It's not quite as effective as the Festool routers, but again, worked fairly well to control the splash coming off the bit.

    2) Test fitting the door frame components. The armoire doors are 1" thick and are using a simple cope and stick construction with grooves and short tenons.

    3) These are the 1/2" thick panels glued up for the doors. They should look just fine, but I did not have any stock milled that was long enough to do a continuous grain pattern through the over and under panels in each door. I'll accept that for this project, but will not make this error in the future. It really can make a difference in the look of the cabinet, especially since the stiles are all matched across the piece. Oh well...
    Attached Images Attached Images

  13. #58
    Nice looking work Jim - and a nice mix of tools and techniques. Can't wait to see the finished article.

    BTW - I am completely with you on the hearing protection. Ear defenders go on as I enter the shop and I have been known to walk into the local gas station wearing them! I am less good (though getting better) about eye protection. I also like your "routing bib". Is it a turners smock or somesuch?

  14. #59
    Join Date
    Mar 2003
    Location
    SE PA - Central Bucks County
    Posts
    65,885
    Quote Originally Posted by Ian Barley
    Nice looking work Jim - and a nice mix of tools and techniques. Can't wait to see the finished article.
    Thanks, Ian...I see you are burning the "midnight oil" tonight!

    BTW - I am completely with you on the hearing protection. Ear defenders go on as I enter the shop and I have been known to walk into the local gas station wearing them! I am less good (though getting better) about eye protection.
    Yes, I have a couple sets of these particular hearing protection devices from AO Safety. I prefer them over all others...except for my Bose Quiet Comfort-II active headphones, of course. I can't use those "stick in the ear" earplugs very well...they will not stay in my right ear for some reason. Of course, I can't hear very well in the ear, either... (really) I do occasionally end up in the house with the blue wand around my neck!

    I also like your "routing bib". Is it a turners smock or somesuch?
    That is the armless version of the Packard Woodworks turners smock which I prefer over all others due to the very comfortable knit neck and velcro fasteners. Strangely enough, I really didn't need it this time with the CT22 hooked up to the router...there was almost no material coming at me from the bit, unlike when the router is used "naked". Routing can be a messy job and the smock helps be performing the same job it does at the lathe...keeping the stuff out of my clothes, especially my shirt neck line!

  15. #60
    Join Date
    Sep 2004
    Location
    Etobicoke, Ontario
    Posts
    415
    Hey Jim,

    Is that a bullet proof vest you're wearing when you use the router?!? Mine's made out of chain maille...and you should see my steel plated gloves!!! After all these years, the router still scares the be-hey-seus out of me!!!

    ...oh, awesome progress BTW...some people are just amazing time managers.
    Louis Bois
    "and so it goes..." Kurt Vonnegut Jr.

Similar Threads

  1. Slow progress, but shop progress!!
    By Brad Hammond in forum General Woodworking and Power Tools
    Replies: 8
    Last Post: 09-23-2004, 7:08 AM
  2. Scrubs and smoothers and project progress
    By Tim Sproul in forum Neanderthal Haven
    Replies: 4
    Last Post: 08-21-2004, 2:07 AM
  3. Shaker Tall Cabinet Progress w/pics
    By Jason Tuinstra in forum General Woodworking and Power Tools
    Replies: 14
    Last Post: 05-16-2004, 4:46 PM
  4. W&H Molder progress
    By John Miliunas in forum General Woodworking and Power Tools
    Replies: 12
    Last Post: 01-26-2004, 9:56 PM
  5. Segmented Bowl in progress **LOTS OF PICS**
    By Ken Salisbury in forum General Woodworking and Power Tools
    Replies: 4
    Last Post: 07-04-2003, 7:06 AM

Posting Permissions

  • You may not post new threads
  • You may not post replies
  • You may not post attachments
  • You may not edit your posts
  •