Good work, Jim. I love the in progress pictures. You do sorta remind me of Roy Underhill, although he has more freckles and is better looking....
Keep posting your progress so the peanut gallery can learn something.


 Member
Good work, Jim. I love the in progress pictures. You do sorta remind me of Roy Underhill, although he has more freckles and is better looking....
Keep posting your progress so the peanut gallery can learn something.
Big Mike
I have done so much with so little for so long I am now qualified to do anything with nothing......
P.S. If you are interested in plans for any project that I post, just put some money in an envelope and mail it to me and I will keep it.
 Member
Handcut dovetails, what an art. You are much braver than I am...and you seem to have it down quite well for the first go round. Is your house listed in the historical directories where you live?
 [OP]
Moderator
[OP]
Moderator
No, only a portion of the house is "old", but we'd like to do some research on its provinence. According to a young lady who stopped by one day looking for loose stones for repairs on their house (this is a limestone area), the old portion of the house was built by a particular mason...and she pointed out certain tell-tale signs of them that she had learned from one of the conservancies. The property was originally part of the "Paxton Estate" which was calved out of the original William Penn land grant "way back when".Originally Posted by Kelly C. Hanna
In general, I like it. For an occasional user like me, it is likely I might have been more comfortable with a pull-cut saw, especially for starting the cut, but after a bunch of these, I got the hang of starting a kerf in the right place without it "jumping around".
I thought about that, but wanted to do this set by hand. It's also given me some additional incentive to finish building the bow-saw I started from the FW article long ago after I turned several sets of knobs for that project for a friend somewhere in TN. (I supplied the knobs to him for his and he supplied the rough parts for the saw for me)
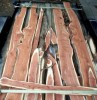
Each panel is three boards. Grain matching is something I'm really anal about and is part of the lumber selection activity. Actually...it's the very first step of the finishing process! My goal is always to get as close to a "single board" look if I can...when a single wide board isn't available. This makes a huge difference in how a project turns out and is particularly important for any large surfaces, such as table tops and side panels for casework. Same goes for panels between rails and stiles...they need to look like a single board unless there is a specific artistic reason not to, such as alternating strips of tiger striping, or something like that. IMHO, of course.
That all said, the remaining "cross pieces" that go lower in the carcass do not have such good grain matching, but it will not be a real issue since they are not seen when the piece is closed up and I was using up material that was too nice to throw out.
 Member
I have never tried to hand cut dovetails(never even used a jig to cut them for that matter, yet), but I commend you on the results. As usual you push yourself with each new project. Can't wait to see the next series of photos!
Michael Mastin
McKinney Hardwood Lumber
Exotic and figured woods
 Member
I gotta' agree with everyone else about the handcut dovetails!As it happens, I *have* tried to do some, albeit on a much smaller scale and I must say, you are far, far more courageous than I and have done a much better job than I could ever hope to do on them!
Me thinks if the piece is too big or cumbersome for the Leigh, I'd have opted for a different joint!
Keep us posted on progress, Jim. Always lots to learn from your project posts! Thanks!

Cheers,
John K. Miliunas
Cannot find REALITY.SYS. Universe halted.
60 grit is a turning tool, ain't it?
SMC is totally supported by volunteers and your generosity! Please help if you can!
Looking for something for nothing?
Guest
Jim, I think that you did a fine job on the hand cut dovetails. That's the only way I have ever made dovetails, so I am looking forward to the day when I have a good router and a Leigh jig.
I am interested in the fact that you are using your own poplar. If you saw my thread about my projects at Pellow's Camp this summer, you will have seen that I have lots of poplar at my disposal. If you have any pictures and words about how you "created" the boards from the trees, I certainly would be interested in seeing them.
[OP]
Moderator
http://sawsndust.com/a-milling.htm
[OP]
Moderator
Once again, I got to spend a whole bunch of "quality time" in the shop today working on the armoire. None of that Neander stuff, for the most part...today the electrons were flowing free! At this point, all the major casework components are cut, milled and sanded through 180 except two small panels that I conveniently forgot to make last weekend. I glued them up before I started sanding late in the day today. Next weekend, after some "scheduled" landscape work, I'll start assembly of the carcass and move on to the frame and panel doors and two interior drawers. I think I'm going to use T&G cedar for the back of the case...will check that out sometime during the week.
Pics:
- Creating the stopped dados using a router and a shop-built guide. Rather than trying to match a bit to the size of the panels (hard to do since they are not exactly 3/4", I used a 1/2" spiral bit and made the jig such that I could make the width in two passes without re-clamping. I learned really quick (after the first dado) to score the lines with my marking knife to insure a clean cut. This was a very messy job...routers are not exactly the cleanest machines in the shop to use!
- The ends of the stopped dados were squared with a very sharp chisel...oopsss....a Neander step again...
- The panels that span the width of the case also get stopped dados for a vertical piece that separates the two lower internal drawers as well as divides the "cubby hole" just below the top of the carcass.
- Oh boy...does that 150/3 make for a fine finish. I must have been sanding for more than a hour and a half and I didn't feel like I was "vibrating" when I was done. Not a spec of dust anywhere, either.
Member
The panels look great Jim! I can appreciate the old ways, but I love power!
Member
Looking at the gaps in the dovetails tell me that it is time too invest in power tools, but most of all the Leigh D4 Dovetail jig.
I love my DeWalt 625 and D3 and would never be able to acomplish hand cut dovetails, So I thought I'd give you a hard time.
Last edited by mike lucas; 09-27-2004 at 12:22 AM.
Member
I won't sugar coat it either Jim. Frankly, those dovetails look just like mine.
The only reason I clicked on this thread is because LOML's armoire project hit a snag - dovetail time. Mine too will be covered by molding, so while my reason to attempt them is the same as yours, you bravely moved on and completed them. Good on you. Still, I think I'll lay them out with a ruler to get the spacing just so. Methinks the saw guide might be a good idea too. And if they look like all the others I have attempted, I know its twin is somewhere in your house.
Are the shelves going to sit in stopped dadoes as opposed to sliding dovetails? I always thought the dovetail thing made sense to pull the center of a tall armoire together. Unless you plug the screw holes that come from outside...
What kind of wood you workin' there?
Member
Jim, I think the dovetails look fine. If the gaps concern you cut thin shavings of the same material with a plane and glue them in as you do the assembly. Sanded flush after dry only you and the Shadow will know...
Big Mike
I have done so much with so little for so long I am now qualified to do anything with nothing......
P.S. If you are interested in plans for any project that I post, just put some money in an envelope and mail it to me and I will keep it.
Guest
Thanks for the update Jim. But, I am dissapointed because I thought that you were going to build the whole thing with hand tools. Oh well, it still looks good.
Guest
Thanks for the pointer Jim. I never looked at your WEB site before. Very interesting!But, now you have me lusting after the Mini-Max jointer-planner.

[OP]
Moderator
I only measured for the two outside pins and decided to just eyeball the others. It matters not for the strength of the joint...the interlocking is what does it combined with the glue. So many pieces I've seen with hand-cut dovetails don't have them "regularly spaced" with space age precision that I figured I'd follow suit...quite an accomplishment for someone as totally anal as I happen to be about things being "just so" spatially!!!
The Moser design calls for stopped dados for the shelves...so that's what they are. Sliding dovetails would have been pushing the envelope for this project, but if I build another one for our master BR, I might do that for the reason you indicate. But then again, today's glues are pretty awesome. As to the screws...there will be no metal fasteners in this project, other than the hinges for the doors, screws to hold the male portion of the sliding dovetails on the cross-grain crown molding connection and micro pins to hold the fitted moldings around a mirror that goes inside one of the doors.Are the shelves going to sit in stopped dadoes as opposed to sliding dovetails? I always thought the dovetail thing made sense to pull the center of a tall armoire together. Unless you plug the screw holes that come from outside...
Tulip Poplar (Liriodendron tulipifera L.), also known as Yellow Poplar...right out of the back yard. This is nearing the end of my supply from the milling project referenced in a post above and is the more knotty material...perfect for this kind of project. The piece will be dyed, oiled and shellac-ed to compliment the wide, pumpkin pine floors in the room it will reside in. I may or may not top coat with acrylic lacquer. It's not really necessary, but it's too early to make that decision.What kind of wood you workin' there?
Well...my body couldn't handle that nor do I have all the hand tools to do that properly. I look at it this way... Tools, no matter what kind, are there for a purpose--to help the craftsman reach some goal. I figure it's a nice thing to use a combination of hand-powered and electric-powered tools and use them where they each have advantages to "me". Hand tools are far better suited to a lot of the fine tuning and delicate things that I find myself doing more and more of. Power tools are better for me for a lot of the more major operations, especially when my time is limited...which it always is, unfortuantely.
 Posting Permissions


 Reply With Quote