Page 1 of 3 123 LastLast
Results 1 to 15 of 33

Thread: Boat Building for Idiots

  1. #1
    Join Date
    Dec 2004
    Location
    Lake Leelanau, MI
    Posts
    2,630

    Boat Building for Idiots

    Hi all,

    I've been documenting a boatbuilding project on another forum. I thought it might be helpful here also. I'm not an expert, in fact, I'm far from it. While this is my second boat, the first one was a kit, so this one is quite a challenge. I've often seen boat building projects documented on the web, but most are done by pros and they have a different perspective. I thought the perspective from a "challenged" boat builder might be instructive, as well as amusing at times.

    First, in boatbuilding you have to build some kind of strongback. I cut out the parts from 2x6x10's. Everything has to be square, straight and level. The cross pieces are called "spalls" and are what the moulds will be attached to. They are a square 1 1/2 x 1 1/2. A centerline is draw on all sides of all pieces.

    Strongback Parts.jpgFinished Strongback.jpg

    There isn't much I would do different with this part of the project. It's 15' long and 2 1/2' wide. It's probably overkill for this size boat, but I've had to climb all over it to use handplanes, and at my size, it was best built strong.

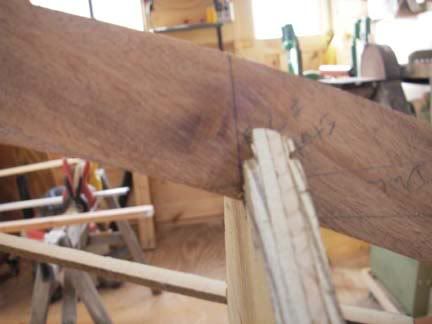
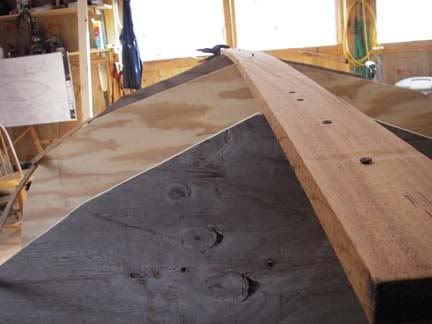
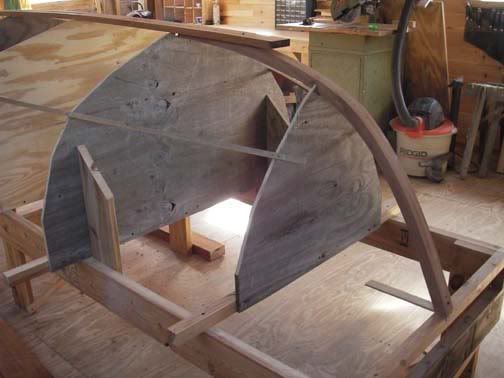
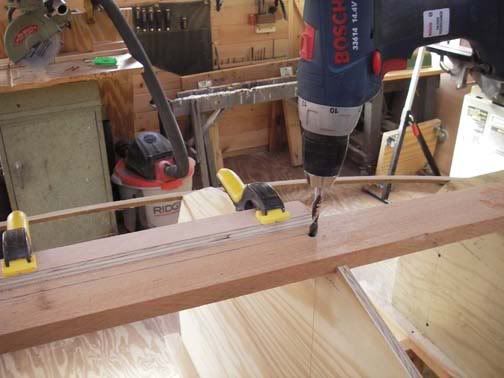
    The next was to cut out the moulds and attach them to the strongback. The moulds were easy to cut out because I was using full sizes plans. By the way, this is a Whilly Boat designed by Ian Oughtred. The moulds are made of 1/2" ply. They are marked with the centerline, the sheer line and where all the planks will "land," thereby being called "lands." Next time I'll use 1x stock. You end up nailing and screwing patterns and planks to the moulds and the ply just doesn't hold up. Once you get the moulds up, you have to align and shim them so they are exactly in line and level. You see how I've clamped sticks to the centerline so I can sight down the moulds, which are at different heights. After you get everything all set, you nail braces on a few of the moulds so they stay square and level, then nail battens to the mould edges to keep everything stiff.

    Stations 1&2.jpg Moulds Straight on.jpg

    And when it's all done, hopefull it'll look something like this.

    whillyboat6.jpg


    John


    Last edited by John Bailey; 12-04-2006 at 8:18 AM.
    John Bailey
    Sawmill Creek is a member supported forum. Click here to donate.


  2. #2
    Join Date
    Apr 2005
    Location
    Palm Beach Gardens, Florida
    Posts
    58
    Hi John,

    If I ever get to have a workshop again, one of the first projects I would like to try is this size boat. Please keep the story going as I think I qualify by your title and can use as much help as I can find.

    I do have a question, already, you said:
    The moulds are made of 1/2" ply.Next time I'll use 1x stock.
    My question is, if the moulds are those big rounded triangles how do you get 1x that wide? Or have I missed the mark again?

    Regards,
    Bill

  3. #3
    Join Date
    Dec 2004
    Location
    Lake Leelanau, MI
    Posts
    2,630
    Quote Originally Posted by Bill Antonacchio
    Hi John,

    If I ever get to have a workshop again, one of the first projects I would like to try is this size boat. Please keep the story going as I think I qualify by your title and can use as much help as I can find.

    I do have a question, already, you said:
    My question is, if the moulds are those big rounded triangles how do you get 1x that wide? Or have I missed the mark again?

    Regards,
    Bill
    I just did a search all over the internet and can't come up with a good picture. Basically you use 1x stock and join pieces that that have ends cut on an angle so, when put it together, they will cover the shape of the outside edge of the mould. Then you trace the outside edge of the mould on the 1x stock. You then have to brace it so it stays put. I don't think I'm explaining this very well, I'll get a picture sooner or later.

    John
    John Bailey
    Sawmill Creek is a member supported forum. Click here to donate.


  4. #4
    Join Date
    Apr 2006
    Location
    Kansas City, MO
    Posts
    833
    Quote Originally Posted by Bill Antonacchio
    Hi John,
    Please keep the story going as I think I qualify by your title and can use as much help as I can find.
    You think "You" qualify? I was wondering why John didn't just PM me. Let me add my vote to keep us up to date John. I have a couple of boat plans on my looong range plan.
    Chuck

  5. #5
    That's a big project, but I can't think of anything more satisfying.

    A little cuddy cabin sailboat is on my list, but it's so far down the list I doubt it will ever get to the top.

    Nothing, absolutely nothing, beats messing about in boats.
    Please consider becoming a contributing member of Sawmill Creek.
    The cost is minimal and the benefits are real. Donate

  6. #6
    Join Date
    Dec 2004
    Location
    Lake Leelanau, MI
    Posts
    2,630
    After the moulds are all set, straight and square, you have to attach the stems. In my case, I'm building a "double ended" boat, so there will be a bow and stern stem. I didn't get a good picture, but you start be making a patter from the full-sized plans and then transfering that pattern to your stock. Because there is quite a bend to the stems, you have to either saw them into three pieces or laminiate them. I don't like working with epoxy if I don't have to, so I used the sawn stems method. I still had to epoxy the pieces together, but it wasn't near as messy. After the pieces are epoxied, you cut the rough shape out on the bandsaw.

    After that you mark all the appropriate lines on the stems, center line, plank lands, bevel marks, etc. Then its back to the bandsaw for the start of final shaping.

    Stem shaping starts with bandsaw.jpg

    After the bandsaw work, it's a final shaping, mostly with a block plane and a spokeshave, then they are carfully lined up and attached to the moulds.

    Stern Stem.jpg Bow Stem.jpg

    At this point I expereimented with different ways of making sure the bow and stern stems lined up. I ended up using a string attached to a board and made sure the string followed all the centerline markings on the moulds. Next it will be time to cut out and attach the keelson.

    John


    John Bailey
    Sawmill Creek is a member supported forum. Click here to donate.


  7. #7
    Thanks for keeping us informed. A project like that is only worthwhile if you love the work and the product. I remember an article once which said that boat builders always had the messiest shops because when they weren't actually making boats, they didn't want to clean the shop, they wanted to go sailing.
    Please consider becoming a contributing member of Sawmill Creek.
    The cost is minimal and the benefits are real. Donate

  8. #8
    Join Date
    Dec 2004
    Location
    Lake Leelanau, MI
    Posts
    2,630
    John,

    I think there's something to that. I used to pride myself in a fairly clean and organized shop. Now that I'm building a boat, it's gettin' pretty messy around here. Although I'm not sure of the "goin' sailing" excuse. We just got home last night from a weekend in Chicago and it's hard to think about sailing with the 18" of snow we've got. I just spent 2 hrs. with a snow shovel and I've not even attempted to get to the shop yet.

    John
    John Bailey
    Sawmill Creek is a member supported forum. Click here to donate.


  9. #9
    Join Date
    Dec 2004
    Location
    Lake Leelanau, MI
    Posts
    2,630

    Update

    Next part of the project is to attach the keelson. That's the upper part of the keel, or backbone. Someone with more marine nomenclature knowledge is very welcome to correct my terms. That's part of the "idiot" part of the thread. The first thing is to line-up the stems, both bow and stern, so they match up with the moulds. You can see by the picture, it's important to have all the marks on the stems so they can be placed correctly.


    After that's done, the keelson is placed and temporarily screwed into position.


    Then, it's glued to the stems. I'm using screws for clamping.


    Then, before shaping the keelson, the slot for the centerboard is cut. First by drilling a hole for the jigsaw,


    then, cutting the slot. I've clamped a straight edge so the slot will be straight. I love that new Bosch.


    Next update will show the shaping of the keelson, and the problems I experienced with that.

    John
    Last edited by John Bailey; 12-12-2006 at 11:48 AM.
    John Bailey
    Sawmill Creek is a member supported forum. Click here to donate.


  10. #10
    Join Date
    Sep 2003
    Location
    Douglasville, GA
    Posts
    776
    Great tutorial, John, thanks for taking to time to share with all of us.

    All the best, Tom, in Houston, with an itch to build a wooden boat.
    Chapel Hills Turning Studio
    Douglasville, GA

    Hoosier by birth, Georgian by choice!

    Have blanks, will trade.

  11. #11
    Join Date
    Apr 2006
    Location
    Kansas City, MO
    Posts
    833
    Quote Originally Posted by John Bailey View Post
    Next update will show the shaping of the keelson, and the problems I experienced with that.

    John
    Not to be pushy John, but, any progress?

  12. #12
    Join Date
    Mar 2003
    Location
    SE PA - Central Bucks County
    Posts
    65,879
    You have more ambition than me, John!!! But I always love these kind of pictorials...always something new to learn...so yes, how about an update?
    --

    The most expensive tool is the one you buy "cheaply" and often...

  13. #13
    Join Date
    Dec 2004
    Location
    Lake Leelanau, MI
    Posts
    2,630
    Quote Originally Posted by Chuck Saunders View Post
    Not to be pushy John, but, any progress?
    Thanks for the push Chuck!!

    After a couple of years of loosing employment, going back to work, and learning that I liked restoring vintage woodworking machines as much as building boats (as well as having a bit of a disagreement with the local building department) I thought I'd start this thread up again.

    I know I'm not the only one that gets a bit overwhelmed by projects and burn out. However, after visiting Mystic Seaports and the Wooden Boat Show this past week, I'm charged up again. While I've got some work to do in the shop to get up to speed, like putting the finishing touches on the DeWalt radial arm saw, I felt the need to start this thread up again. I've moved it for obvious reasons. We didn't have a Boat Building Fourm when I first started.

    One thing to keep in mind. If you haven't looked at the thread from the beginning, the purpose of the thread is to show boat building from the perspective of a novice - a complete novice - thus the title. Feel free to add advice, constructive criticism or just have a good time with some of my mistakes, I certainly have.

    The first couple of pictures are of the keelson. The first is just a sighting down the keelson and the second is that of the keelson with the cutout for the dagger board.

    Keelson Sighting.jpg Keelson with Cutout.jpg

    The next picture is the first step of shaping the stems that will fit on the ends of the keelson and form the shape of the bow and stern. This is done with a bandsaw to start the angle of stem that will eventually take the strakes, or sides of the boat. Then it's off to the bench for a final clean-up.

    Stem Shaping 1st step.jpg Clean up before epoxy to keelson.jpg

    For those of you who care about such things, I had worked 52 hours on the boat at this point. This is just about double what I had expected. Although that's usually pretty good for most woodworking projects - double what you think.

    John


    John Bailey
    Sawmill Creek is a member supported forum. Click here to donate.


  14. #14
    John ,

    Keep up the good work, looks great, when the planking start?
    as always keep us posted on your progress.

    Mac

  15. #15
    Join Date
    Dec 2004
    Location
    Lake Leelanau, MI
    Posts
    2,630
    Quote Originally Posted by Mac McQuinn View Post
    John ,

    Keep up the good work, looks great, when the planking start?
    as always keep us posted on your progress.

    Mac
    Thanks Mac,

    Actually, these steps are from a couple of years ago. I'm trying to put them in order to show folks what it's like to build. At this point I've got the first two strakes (out of four) done. We'll get to that later.

    What we really need is a couple more projects going to create interest in the forum. We can check into Gary K's blog site to see his progress, but it seems you've got some plans to. So, when does the San Juan start up?

    John
    John Bailey
    Sawmill Creek is a member supported forum. Click here to donate.


Similar Threads

  1. Your Boat Trailer Lights Unreliable?
    By Bob Smalser in forum Boat Building
    Replies: 4
    Last Post: 09-17-2009, 4:46 PM
  2. Viking boat building on History Channel
    By Jim Dunn in forum General Woodworking and Power Tools
    Replies: 8
    Last Post: 08-19-2008, 2:20 PM
  3. boat building
    By Glenn Wood in forum General Woodworking and Power Tools
    Replies: 9
    Last Post: 03-30-2004, 8:35 PM

Posting Permissions

  • You may not post new threads
  • You may not post replies
  • You may not post attachments
  • You may not edit your posts
  •