Page 1 of 2 12 LastLast
Results 1 to 15 of 16

Thread: Simple OWT tutoral

  1. #1
    Join Date
    Aug 2003
    Location
    extreme southeast Nebraska
    Posts
    3,113

    Simple OWT tutoral

    Someone requesting an OWT (Old Womans Tooth) router plan came up on Traditional Tools, This simple Tutoral is how I make mine.

    I thought I would post over here too.


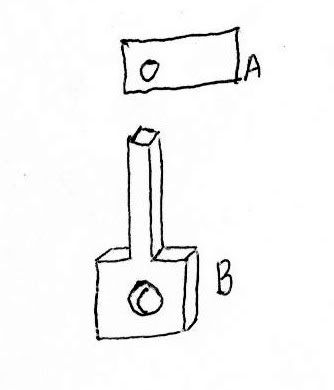
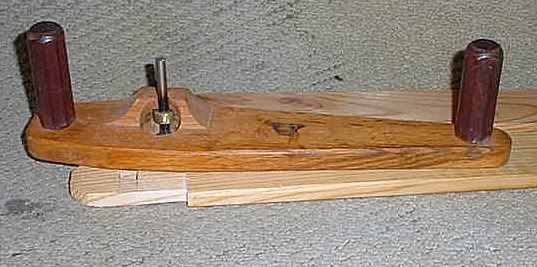
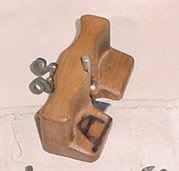
    Mini or Thumb Router.


    I prefer a couple of upright handles to just a place for the thumb and fingers to grasp the tool.

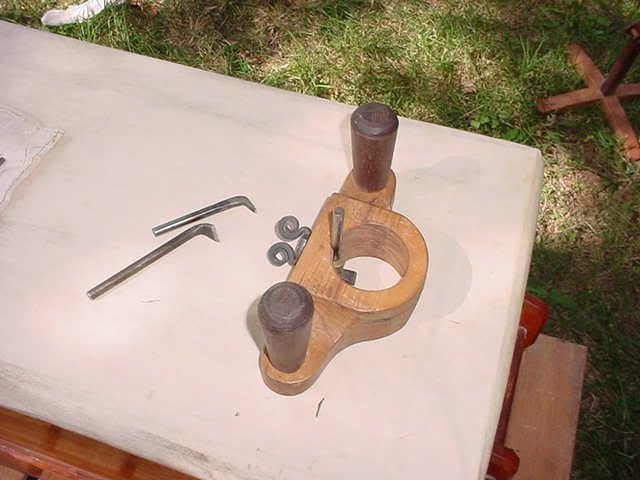
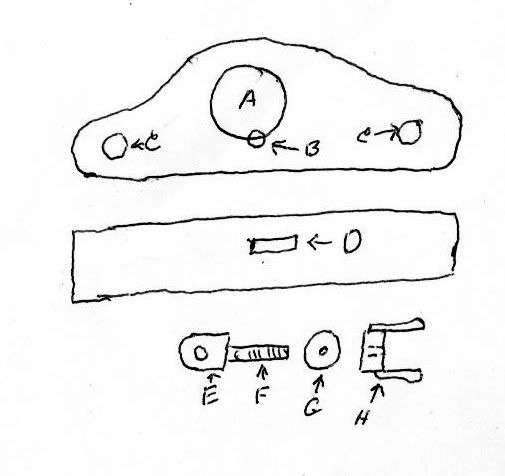
    1. I start out by sawing out a blank after deciding where to drill the holes.

    2. Then I chop the mortise "D" for the retainer, usually 1/4 by 1 inch.

    3. Next I mark the hole "A" with the bit, normally 2 inch diameter.

    4. Drill hole "B" centered on the OD of hole "A" and in the center of Mortise "D". Hole "B" is the cutting tool bed.

    5. Now Drill hole "A" usually with a Forstner bit.

    6. Then I drill holes"C" usually 1 inch and 1/4 inch deep for the handles which will set in these and have a brass screw from the bottom to secure them.

    7. I round over all the edges a bit, and use Danish oil on the body.

    8. I next make the keeper "E" out of 1/4 by 1 flat and drill hole "F" 1/2 inch in diameter, and weld on a piece of 1/4 inch all thread to tighten it with.

    9. Washer "G" goes on next.

    10. The retaining Nut "H" shown is the most common retainer I have seen on the antique ones I have repaired for others, but I prefer to use a hand forged rams horn Wing Nut on mine.
    Jr.
    Hand tools are very modern- they are all cordless
    NORMAL is just a setting on the washing machine.
    Be who you are and say what you feel... because those that matter... don't mind...and those that mind...don't matter!
    By Hammer and Hand All Arts Do Stand

  2. #2
    Join Date
    Apr 2006
    Location
    Escondido, CA
    Posts
    6,224
    Harry, I appreciate this so much. I still have a few basic hand tools that I need and this is definitely one I want to try to make instead of buy. Thank you, and I look forward to making a couple of them.

    Brian
    Veni Vidi Vendi Vente! I came, I saw, I bought a large coffee!

  3. #3
    Join Date
    Sep 2007
    Location
    Longview WA
    Posts
    27,432
    Blog Entries
    1
    Fantastic Harry,

    This should go in to the neanderthal wisdom for all time.

    jim
    "A pessimist sees the difficulty in every opportunity; an optimist sees the opportunity in every difficulty."
    - Sir Winston Churchill (1874-1965)

  4. #4
    Join Date
    Mar 2007
    Location
    Jacksonville, FL
    Posts
    733
    Jr. you know that I respect what you have to say and have learned a ton from you, but when you start throwing around terms like "simple" I sometimes cringe...

    Seriously though, thanks for posting this. One of these days I want to make one of these, and especially the extra long one that you have for cleaning up tenons. Of course, I still need to find time to make a screw box to go with that tap you made. And I still need to get up there an pay you another visit. The backlog grows...
    "History is strewn with the wrecks of nations which have gained a little progressiveness at the cost of a great deal of hard manliness, and have thus prepared themselves for destruction as soon as the movements of the world gave a chance for it." -Walter Bagehot

  5. #5
    Join Date
    Aug 2003
    Location
    extreme southeast Nebraska
    Posts
    3,113
    For those that do not have the ability to braze or weld, you can make the keeper from one piece.


    1. Drill the large keeper hole first.

    2. Using a scrap piece of any metal, drill a 1/4 inch hole in it as in "A".

    3. Lay out the shank, and using a hacksaw cut it out as shown in "B".

    4. Clamped in a vise to one side, file the shank round, using "A" to size it, then thread the shank.

    A retaining nut can be formed the same way, but drill a 23/64 inch hole and thread it first.
    Jr.
    Hand tools are very modern- they are all cordless
    NORMAL is just a setting on the washing machine.
    Be who you are and say what you feel... because those that matter... don't mind...and those that mind...don't matter!
    By Hammer and Hand All Arts Do Stand

  6. #6
    Join Date
    Aug 2003
    Location
    extreme southeast Nebraska
    Posts
    3,113
    For those of you who are not familier with what Don was referring to, its a tool I made that I call a Tenon Router.


    A lot of WWer's use a Shoulder Plane to clean up their tenons, and a shoulder plane is designed to Square a Shoulder, and you run the chance of making the Tenon uneven or worse yet Undersize and it is very time consuming to keep checking the Tenon for size when using a shoulder plane for this job.

    With a Tenon Router, you set the blade depth and cut the tenon rough a bit oversize, then Holding the handle on the long side stationary, you move the handle on the short side back and forth across the tenon to bring it to finished size. Setting the blade at a skew angle as shown below makes it cut much easier and more or less smoother.


    I have seen some router plates similar that also have a slot down the center for circle cutting.
    Jr.
    Hand tools are very modern- they are all cordless
    NORMAL is just a setting on the washing machine.
    Be who you are and say what you feel... because those that matter... don't mind...and those that mind...don't matter!
    By Hammer and Hand All Arts Do Stand

  7. #7
    Join Date
    Sep 2007
    Location
    Louisville, Ky
    Posts
    186
    I like it and a very good walk through. My question is did you make the blades for it?

  8. #8
    Join Date
    Aug 2003
    Location
    extreme southeast Nebraska
    Posts
    3,113
    Yes Kevin I did as I am a retired blacksmith, but anyone can make the blades our of Hex Allen Key Wrenches.

    Find the size Allen Wrench you want and cut the short end off so that about 3/4 " is left, then just grind the bottom off flat with about a 5 degree taper so the point is lower, then grind the top of to a taper so that its about 1/16 thick and put a secondary taper about 3/16 long to a sharp edge, then hone.

    CAUTION - KEEP WATER HANDY TO COOL IT OFF, when its hot enough that you can't touch it, cool it off.

    CAUTION, WHEN GRINDING THE BOTTOM KEEP IT 90° TO THE SHANK.

    If you know someone who does metal work, you can have them draw (pound) the end out wider and quench it in oil after doing so. Take it home, put it in your kitchen stove oven and set the temp for 400° and heat it up for 20 minutes and leave it in there till it cools off, then Hone it sharp.

    When grinding hardened blades, if you get it too hot, you destroy the temper, this is usually from 350° to 400° so unless you get it above that heat you will not damage the temper of the tool.
    Jr.
    Hand tools are very modern- they are all cordless
    NORMAL is just a setting on the washing machine.
    Be who you are and say what you feel... because those that matter... don't mind...and those that mind...don't matter!
    By Hammer and Hand All Arts Do Stand

  9. #9
    Join Date
    Sep 2007
    Location
    Louisville, Ky
    Posts
    186
    Ooh I love the idea of an allen key simple and elegant ). I can't wait to try it once I'm allowed back in the garage by the wife and drs. No forge but my cousin keeps trying to talk me into one. If the wife gives in expect more brain picking.

  10. #10
    Join Date
    Aug 2007
    Location
    Dickinson, Texas
    Posts
    7,655
    Blog Entries
    1
    I wonder how this five year old string popped up.

  11. #11
    Join Date
    Sep 2007
    Location
    Longview WA
    Posts
    27,432
    Blog Entries
    1
    Quote Originally Posted by lowell holmes View Post
    I wonder how this five year old string popped up.
    Most likely you followed a link left in the thread about Shoulder Planes.

    jtk
    "A pessimist sees the difficulty in every opportunity; an optimist sees the opportunity in every difficulty."
    - Sir Winston Churchill (1874-1965)

  12. #12
    Join Date
    Mar 2004
    Location
    DuBois, PA
    Posts
    1,904
    Yeah, but it is good to see us remembering Harry: he added a lot to this forum.
    If the thunder don't get you, the lightning will.

  13. #13
    Join Date
    Feb 2010
    Location
    Woodstock, VA
    Posts
    1,006
    Quote Originally Posted by Tony Zaffuto View Post
    Yeah, but it is good to see us remembering Harry: he added a lot to this forum.
    Cheers to that! Don't I remember Harry making a bunch of really nice holdfasts? I wonder how many here have one or two of those?

  14. #14
    Join Date
    Jan 2009
    Location
    Lawrence, KS
    Posts
    594
    Quote Originally Posted by Jeff Bartley View Post
    Cheers to that! Don't I remember Harry making a bunch of really nice holdfasts? I wonder how many here have one or two of those?
    I have some. They work better in my garage benchtop which is only 1.5" thick. The bench in the basement is nearly 4" thick (laminated up from 2x material cut out of 2x8's and 2x10's) and there the Gramercy ones work better. But my favorite is still the copy of the Record 52 (part number?) that Veritas makes. You don't strike that one, you spin the knob.

    Harry was a character. Didn't always agree with him but learned lots from him.
    Don't sweat the petty things and don't pet the sweaty things.

  15. #15
    Join Date
    Sep 2007
    Location
    Longview WA
    Posts
    27,432
    Blog Entries
    1
    Quote Originally Posted by Jeff Bartley View Post
    Cheers to that! Don't I remember Harry making a bunch of really nice holdfasts? I wonder how many here have one or two of those?
    There is a pair in my shop. At times two pair seemed like a good idea, but didn't happen.

    jtk
    "A pessimist sees the difficulty in every opportunity; an optimist sees the opportunity in every difficulty."
    - Sir Winston Churchill (1874-1965)

Tags for this Thread

Posting Permissions

  • You may not post new threads
  • You may not post replies
  • You may not post attachments
  • You may not edit your posts
  •