Im in awe of your bravery!! I just cant bring myself to sell my D4, not yet anyway!!Originally Posted by John Keeton


 Member
Im in awe of your bravery!! I just cant bring myself to sell my D4, not yet anyway!!
If at first you don't succeed, look in the trash for the instructions.
 Member
John, your work is simply inspiring. I have accumulated some walnut and I want to find a project worthy of it. After following this thread I don't think I'll be so intimidated by trying hand cut dovetails.
Guest

John, It's been a while since I've checked this thread.... been pretty busy outside of the computer zone..... But, I have to tell you.... quite an inspiring piece. Your attention to detail is fantastic (with the exception of the dominoe incident)....
Keep on keeping on.... can't wait to see the finished project!
Contributor
Wow. Really nice work there. That table base and drawer unit on top of it would look nice by themselves, substituting the web frame for a solid top. Maybe something for a future project. Keep up the fine work and thanks for keeping us posted.
 [OP]
Contributor
[OP]
Contributor
Thanks to all have looked and posted. It is the encouragement and kind comments that urge me to get this project completed in a timely fashion. There has been a lot going on recently, and not enough shop time. Sorry for lack of updates.
I wanted to get the interior of the hutch top case finished before assembly. There just would not have been a good way for me to get an acceptable finish on it otherwise since I do not have a spray setup. Next on the list is an Earlex 5000!
The varnish brew that I used for a wipe on finish was based on the Sherwin Williams Classic Fast Drying Oil Varnish. An earlier pic had some test boards. Unfortunately, the flat test boards did not give me an indication of the working consistency of the brew. It just dried too quickly to level out in any areas that were not cleanly wiped, such as corners, etc. I fought this finish the whole way, and cannot recommend this varnish at all. It leaves wiping marks regardless of what one does. I thinned, added BLO, played with the proportions nothing worked well.
In the end, I did finally get three coats on that I was able to get steel wooled to an acceptable point where I felt I could lay down a final couple of coats of good finish. After another round of research on the creek, I purchased some Arm-R-Seal in semi-gloss. From the start, I knew it was going to be a much easier situation. The Arm-R-Seal handles much like the Minwax wipe on poly. I know there is much disdain for the poly look, and it is generally disfavored in this group. But, for ease of use, and for a smooth application, it is hard to beat. The Arm-R-Seal worked very well, and I was able to get two or three coats on, depending on the piece.
This is the completed back panel.
COMPLETED BACK PANEL.jpg
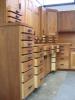
A pic of the shelves and a sidepanel.
SHELVES AND SIDE PANEL.jpg
A close up of one of the sidepanels. I noticed (too late) that I should have spent some more prep time before finishing.
COMPLETED SIDE PANEL.jpg
A pic of the completed bonnet.
COMPLETED BONNET.jpg
I will probably wipe on a final coat on the exterior of everything once the entire piece is completely assembled and finished.
[OP]
Contributor
Before gluing up the hutch case, I wanted to mark and cut the mortises for the door hinges. Although possible after assembly, it would have been very cumbersome and much more difficult.
I took both side panels and clamped them in the vise with a cushion between them and a towel on the exterior faces. The last coat of finish is only 12 hours old at this point, and still quite green. The mortise locations were marked with a square, my new BS marking knife, and my wheel-marking gauge that was used to mark the depth and width of the mortises. I will duplicate those markings on the doors when complete.
LAYOUT FOR HINGES.jpg
This pic is just a shot of the preparation for doing the mortises.
BLUE SPRUCE AT WORK.jpg
Honestly, this task was more daunting for me than anything yet on this piece. I had already had to rework the raised panels for the side panels, and I had struggled with the finish. There was already a lot of time and effort invested to this point. If I botched the hinge mortises, I would have to scrap the side panels.
The mortises were roughed out.
CHOPPING OUT.jpg
And the waste removed.
REMOVING WASTE.jpg
Because I have room for one more upload in this post, this is a pic of my Veritas scraper purchased from a fellow creeker in new and unused condition.
VERITAS SCRAPER.jpg
I have owned a Veritas card scraper holder for years, and use it. I have also experimented with the scraping plane, and did not care for it. My fallback tool for removing milling marks is an old paint scraper that just feels right. However, the metal is so soft in it that I have to sharpen it too often. Thought I would try this tool and see how it works. This is with the factory edge I have not yet touched the tool. It leaves a very nice finish. I imagine with some honing, and a little burnishing, this tool will serve me well.
[OP]
Contributor
Just as a stealth gloat, I wanted to show my BS chisels. In my new found addiction to handtools, these stand out as some wonderful examples of finely crafted, balanced works of art. Even in the hands of a novice like me, they are a joy to handle. This is a pic of the BS dovetail chisel at work. The ¼ did best for the initial work as it had less resistance and really made quick work of this part.
BS DOVETAIL CHISEL.jpg
Then I used the BS Fishtail chisel for most of the second phase of cleanout.
BS FISHTAIL CHISEL.jpg
This is a completed hinge mortise. Note that there is not much room for error on the backside of the mortise hence the backing board. These hinges have tapered leaves, and that added an extra element of challenge to the task. They are quality hinges, though. Much better than the first set that were returned, and which had cost twice as much.
COMPLETED HINGE MORTISE.jpg
This is a pic of the hinge placement in a completed mortise. I will have to darken these unfinished hinges in the final finishing stage to match better with the oil rubbed bronze pulls.
HINGE PLACEMENT.jpg
Apparently, the confidence level rose more quickly than the skill level!! On the last mortise, I blew out the back.
MORTISE SPLIT OUT.jpg
I simply did not go slow enough, and get my vertical depth cuts done sufficiently on the backside. I was able to get this glued down and I will be able to get a couple of coats of finish on the repair. It will not show in the final finished piece, but I was sick nonetheless. Lesson learned one among many on this piece.
[OP]
Contributor
After getting the mortises cut, I was able to assemble the hutch case. I want to get this in one piece so that I can build and fit the doors. I do not work from detailed drawings, so I move from stage to stage, measuring off of prior work. It was imprudent to build up the doors until I have a finished case. Much easier to build to the piece than fight a set of doors that are a bit off.
These are a couple of pics of the glued up case.
COMPLETED CASE 1.jpg
COMPLETED CASE 2.jpg
And a side view-
SIDE VIEW OF CASE.jpg
A pic of the detail of the top. The doors will fill out the overhang on the front to give an equal reveal all around.
TOP DETAIL.jpg
This is a detail shot of the edge of one of the two shelves. I used a bead to pick up on the beadwork elsewhere on the piece.
SHELF DETAIL.jpg
The plan at this point is to build of curly maple, two slotted letter/paper insets that will go in the lower shelf space to either side. They will be about 10 wide. The shelf space is about 38 wide. I will add some simple support brackets on the center side of either unit for visual appeal only. They will be very light as I do not want them to stand out, but to blend and transition to the next level up. I know this is hard to visualize, and I will do a sketch before starting that I will post. At present, it is merely a mental plan.
Then, in the middle shelf space, there will be an inset drawer unit of thin walnut, with curly maple drawer fronts, that will be about 10-11 inches wide. The appearance will be that the second shelf, on which this unit will sit, is supported by the brackets, and the drawers should draw one's eye upward from the lower shelf. This should have a very proportional appearance, and add considerably to the piece note, I said should!!
It will be a few days before I am able to make much progress, as we will be visiting our daughter.
Hope everyone has a great week and upcoming weekend, make some sawdust, and be safe!
Guest
Very nice and informative post! It looks like your project is coming right along......
This hutch is already beautiful..... Thanks for taking the time to detail your build, John.
 Member
That's a fine looking piece of furniture John
 Member
Your hutch is really starting to take shape John.
A beautiful family heirloom is in the making!
Thanks for the update.
 Member
Looks great John. The finished piece is going to be wonderful!
Lessons learned yet not visible to anyone but the craftsman.
How did the turkey hunting go? The Missouri season just opened Monday, I have been out the last 2 days but it's pouring here today.
 Member
John, this piece is really looking terrific. Thanks for all the good work and photos.
Ken
 Member
Your hutch is shaping up nicely and it's starting to make the one I'm currently working on for a computer desk-hutch look like a "hunk of junk" for certain. I guess the good news is I'm having fun regardless.
But.. I did want to comment on something you mentioned a few post back that I caught...
"Thanks to all have looked and posted. It is the encouragement and kind comments that urge me to get this project completed in a timely fashion. There has been a lot going on recently, and not enough shop time. Sorry for lack of updates"....
You don't and shouldn't have to apologize to anyone for keeping new pictures posted nor having enough shop time. I made this mistake when I did a similar thread on another forum... much as a dairy of starting and completing a chest. I pushed myself each day to find time even to the point of de-priortizing more important matters to "keep up the pace". That lead to several mistakes on my part as my attention span was burdened with the word.. dead-line.
So.. all of us with amateur status that do actually build frequently understand that you are not being paid to meet dead-lines.. that doing a pictorial is a lot of work on top of all the detail of the project itself and that you do have responsibilites to both your family.. community.. personal property.. etc. etc. that have to take priority over something you do just for the love of doing it.
IMO.. take care of what is very important first and then take care of getting this project finished as we are enjoying it but.. even in our "hurry-up" and "I want it now" world.. you can't beat the price of admission to this thread and we can be patient and wait for it to be revealed on your schedule.. not ours.
Keep up the great work... after you have the "home-front" covered throughly as it should be...
Regards...
Sarge..
Last edited by John Thompson; 04-23-2009 at 10:15 AM.
[OP]
Contributor
Sarge, good points! I try to keep priorities, but having some level of "accountability" to this project keeps me focused. Were it not for that, I may have a tendency to get sidetracked onto something else when the project requires some process that I don't care for - like finishingDesigning and building are fun, but I have never enjoyed applying finish. I am hoping that getting into spraying at some point will reduce the agony of that part of furniture building.
Greg, we had a beautiful day Saturday, but it rained Sat. nite, and all day Sunday. As you know, it all depends on the hens, and it seems our breeding season is pretty far along. I have noticed several hens that have been nested for a couple weeks or more. The toms are coming off the roost with hot hens at about 6:40 and shutting up. Makes for a tough morning. We got more action on the "second shift" at about 10:30, and my son almost scored. I hope to get in some time next week.
Thanks again for hanging with me on this project.
John
 Posting Permissions


 Reply With Quote
