cut him today
But noticed a weird pixelation effect. I enlarged him to 1.5 inches high from about 3.5 inches.
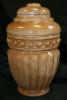
But he was roughed out using a .5 ball nose @ 110 ipm
and finished with a 1/16" ball nose @ 75 ipm


 [OP]
Member
[OP]
Member

 [OP]
Member
[OP]
Member
 Member
Angus; the dog looks nice. did you get a sale on bloodwood?Originally Posted by Angus Hines

also what is the line running through the dog tag?
[SIGPIC][/SIGPIC]Camaster Cobra 408 working table size 48 x 98
Wincnc,AspireII,PhotoVcarve,Cut3D
HX6090SE 60Wworking table 23X36
LaserCut 5.3
Coreldraw X3, photograV 3.0, Photozoom3
Sawmill Creek is financed in part through member contributions.
Many members just like you have found extraordinary value in becoming a financial supporter of SMC.
[OP]
Member
LOL yes I did hit a sale on some bloodwood about 1.00 a bf but most of it is twisted like a twizzzle stick.
The line through the dog tag is what I learned happens when you wait to tighten a clamp after the file starts cutting, this is one of those twistie pieces as you can see from the way the square cut out on only 2 corners.
Last edited by Angus Hines; 02-24-2009 at 10:22 AM.
Member
Angus; The marks do not look that bad. I do have one suggestion; make sure that the bit you think is 1/16, actually is 1/16. I have found that even with brand new bits, that they can be off by a few thousands. This could be the cause of your problem.
Jim J.
[SIGPIC][/SIGPIC]Camaster Cobra 408 working table size 48 x 98
Wincnc,AspireII,PhotoVcarve,Cut3D
HX6090SE 60Wworking table 23X36
LaserCut 5.3
Coreldraw X3, photograV 3.0, Photozoom3
Sawmill Creek is financed in part through member contributions.
Many members just like you have found extraordinary value in becoming a financial supporter of SMC.
[OP]
Member
Member
Well I doubt that .0065 is making a difference.
Thanks for humoring me.
[SIGPIC][/SIGPIC]Camaster Cobra 408 working table size 48 x 98
Wincnc,AspireII,PhotoVcarve,Cut3D
HX6090SE 60Wworking table 23X36
LaserCut 5.3
Coreldraw X3, photograV 3.0, Photozoom3
Sawmill Creek is financed in part through member contributions.
Many members just like you have found extraordinary value in becoming a financial supporter of SMC.
[OP]
Member
James I can't seem to really get a good picture of it.
But around the bottom of the model about where the climbing toolmarks start you can see pixelation just like if you blow up customer created art work and engrave it in the laser.
I can see pixels,and I'm baffeled....I need to do another one of those files just to see if it happens again.
The one I helped Keith O. outwith did it a little too @ 12" his was only Was only 6" and it didnt show on that one.
Member
Take a deep breath and restate this in English please.
I will run the file at 6in with a 1/8 in ball nose and see what I get.
[SIGPIC][/SIGPIC]Camaster Cobra 408 working table size 48 x 98
Wincnc,AspireII,PhotoVcarve,Cut3D
HX6090SE 60Wworking table 23X36
LaserCut 5.3
Coreldraw X3, photograV 3.0, Photozoom3
Sawmill Creek is financed in part through member contributions.
Many members just like you have found extraordinary value in becoming a financial supporter of SMC.
[OP]
Member
The 3D Eagle that Keith Outten did on his flag box in Bone Corian the model was only 6" it was the Eagle from the Aspire Tutorial.
Because of his schedule and needing to get that box back to the front in Afghanistan I put it together for him and then he tweaked it to his needs.
But I ran it as a 12" model first and it had some small pixelation to it. BUt the one Keith did he did as a 6" model.
But Guy had a great explanation to why and what is going on over on www.camheads.org
 Member
My original post to this problem is found at CAMheads.
Angus, without seeing the actual file that you used to create the tool path, one can only offer speculation. Since you stated that you used a 1/16th inch ball mill at a 3% stepover and assuming a parallel cut strategy, it is safe to say that pixelation is the correct term. When you resize a small stl, obj, lwo, or whatever that has been created using puff volume, inflate, sweep, or whatever command you want to call it to generate a solid object, the original shape is going to enlarge proportionatly to the scaling operation used.
Layman terms. Create a 5 circle using lines that look like a staircase and those lines are each an 1/16 inch long. When you create a puff volume of that circle, (Relief Object for half a sphere or 3D object for a complete sphere) the staircase effect transfers to the finished file. When you enlarge this, the steps get larger. This happens alot when people use Corel and create an outline of an image and save it as a DWG file. The outline is made up a little squares called pixels. When the bitmap is converted to a trace outline and scaled, stepping occurs. To eliminate this problem, smoothing of the DWG file or converting lines to arcs will eliminate the stairsteps, however, the accuracy of the original image can suffer.
This is where arcs and lines come into play in CAD software. If your circle is made using lines, choppiness occurs. When it is made using an arc command, the circle is smooth based on the tolerance selected in the original CAD program.
When you create a 50 inch circle using the lines that are 1/16 long and make the object smaller, the steps get smaller. If you create both circles using an arc instead of lines and a tight tolerance, you can pretty much scale the object and have a smooth surface.
Long story short, in my opinion, your model is to blame.
I will post some screenshots of what I am talking about later today.
I am working on the chess pieces for Jim. Unless I create a mesh file for him that has a very small decimation, (the amount of space between points) the effect will be exactly the same when he scales it up.
This all seems quite complex and there are other ways to do this same procedure so save the emails, I am aware of about 95% of them. As complex as it seems, after you create and run a few files it will become childs play.
I hope this clears things up for you. The file of the dog can probably be cleaned up. I do not use Aspire, but if the file is an stl, obj, lwo, dxf, or any of a number of extensions, chances are I can open it, smooth the detail and allow you to scale it to eliminate the problem.
By the way, the dog is super cool looking. Nice job!
Guy
Member
The two photos illustrate what I am talking about.
This is an extreme scenario but it cuts to the point. (Pun intended!)
The first photo shows the model as you would get it from the person who made it. For argument sake,
I am comparing this to the dog file that Angus used.
The pixel edges form a sharp edge every .04 inches, this is not a problem when milling with say a 1/4
inch ball mill and a milling tolerance of .01. The object would finish somewhat textured, however, since
the bit will not fit between the points, you really won't notice it.
The second photo shows what happens when the same object is scaled to produce a larger object.
Since the gap is almost 3/8's of an inch, a 1/4 inch ball mill has no problem defining the edges.
I hope this helps folks understand a little better as to what happens when you resize a file.

To see more of my work and to possibly learn more, visit CAMheads.org.
You will need to register to view my photo albums.
Last edited by Keith Outten; 02-25-2009 at 5:13 AM. Reason: Removed link to public forum
 Posting Permissions


 Reply With Quote