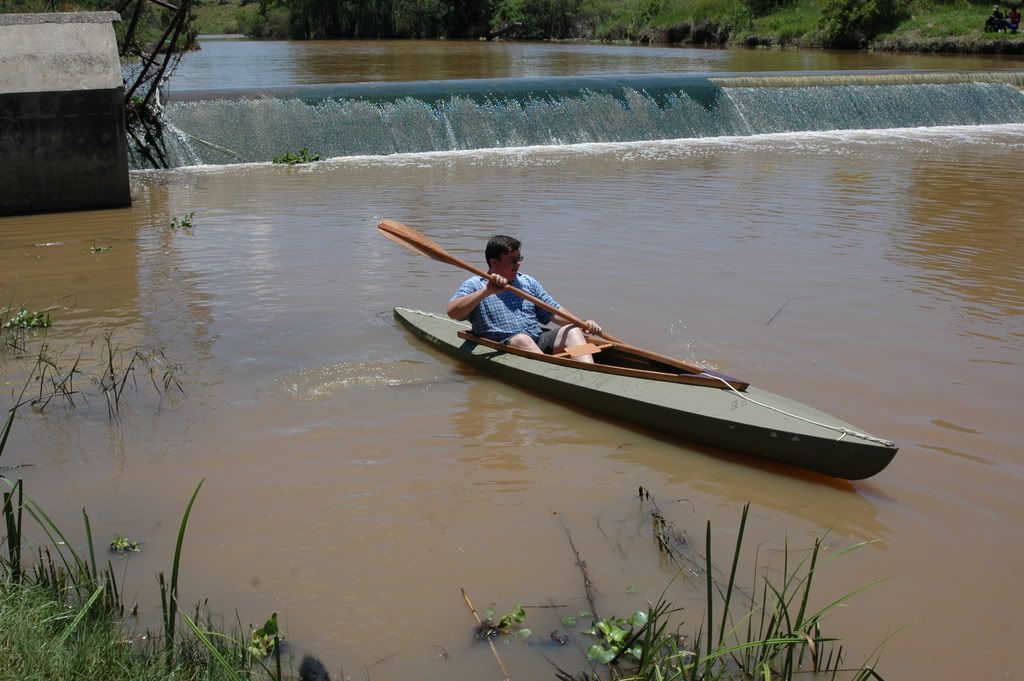
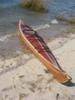
I spend my Christmas holiday building a kayak from plans my father bought in the sixties. Wooden frame with canvas covering, and also made the paddles myself. Some finishing touches still to be done.


 [OP]
Member
[OP]
Member
I spend my Christmas holiday building a kayak from plans my father bought in the sixties. Wooden frame with canvas covering, and also made the paddles myself. Some finishing touches still to be done.
 Member
Congratulations. That is a very productive holiday. Nothing beats messing around in boats. How does it feel on the water?
Please consider becoming a contributing member of Sawmill Creek.
The cost is minimal and the benefits are real. Donate
 Moderator
Not job Jacques.
Looks like the seating arrangement needs to go a little forward.
John
 Member
methinks it's a two seater.
Member
Contributor
Nice job!,Yes it looks like two seats in the uncovered framework pic. Can you give us some additional details? what type of fabric, beam dimension? weight? Who's plans? etc.
thanks,
Mac
Member
Nicely done! I started building a cedar strip kayak over the holidays but haven't moved as quickly as you have. You can see more at my blog ... http://denmankayaks.wordpress.com/
Again, you've done a great job!
John
Member
Very nice! There are some plans I've bought that I suspect my grandchildren will get around to building, and I don't even have children yet.
AKA - "The human termite"
[OP]
Member
Sorry about the little detail above, but by the time I had figured out how to post pictures it was late at night and my english abilities has gone to sleep.
The plans is by an English company called Tyne Folding Boats Ltd.
They call this boat a 15' Rigid two seater, the plans are dated 15 June 1963, and my father bought it sometime during the late sixties.
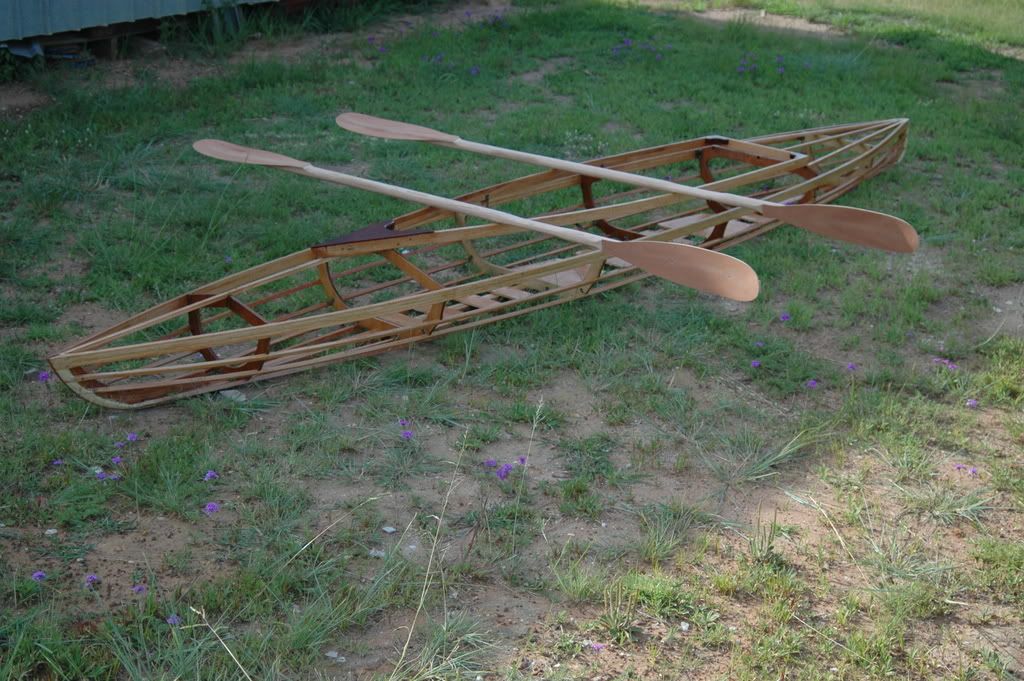
My first attempt at building this was when i was at school (middle 80's), when I cut out templates for the frames, and tried to make some of the metal fittings, before my complete lack of skills and no internet stopped me.
I started again in 2006, when I began with all the long pieces from saligna, the keel, stringers and gunwhales, cutting scarf joints and gluing them together. I had some trouble with the frames, and in the end used some 3mm commercial plywood I glued together after testing if it would delaminate. I have made the frames on a CNC router at work.
The stem and the stern I steambended a lot of little strips of saligna and glued them up. First steambending ever, and it actually worked quite well. Work then stopped mostly due to a very bad depression.
In Ocktober 2008 I made a definitive decision to complete the kayak that year.
The plans called for brass fittings and screws to join the frames and stringers together, but since we generate a lot of aluminium angle off-cuts of the right size at work, I decided to use that together with stainless steel screws.
Since the workshops closed for 3 weeks over Christmas I had the space available, and most importantly a very long table that I fastened to a smaller one to make a nice workbench.
Assembly order:
1. I screwed the stem and stern to the keel strip, and then fastened the frames to the keel with both brackets and glue.
2. The deck stringers were added next, which wasn't a good idea, they were in the way of finishing in the ends
3. The gunwales was next, starting from the middle working towards the ends, making sure everything was straight before I
scarfed the gunwale to fit to the ends.
( I tried a lot of things, but finally settled on a coping saw for a rough cut and used a flapper wheel in a die grinder for final fitting.
4. Then all the stringers were fastened, again starting in the middle, two stringers at a time, one on each side.
5. the coaming was fitted next, since it could only be measured on the assembled frame.
6. the coaming was glued and screwed together, using mahogony for the corners and the bow. ( the plans specified some square pieces of wood and plywood)
7. seats and foot rests were added next.
8. The keel rubbing strips and backrests were finished
9. everything was sanded smooth,
10. brushed with a marine varnish,
11. sanded,
12. varnished again,
(should have sanded here again)
13. and varnished again.
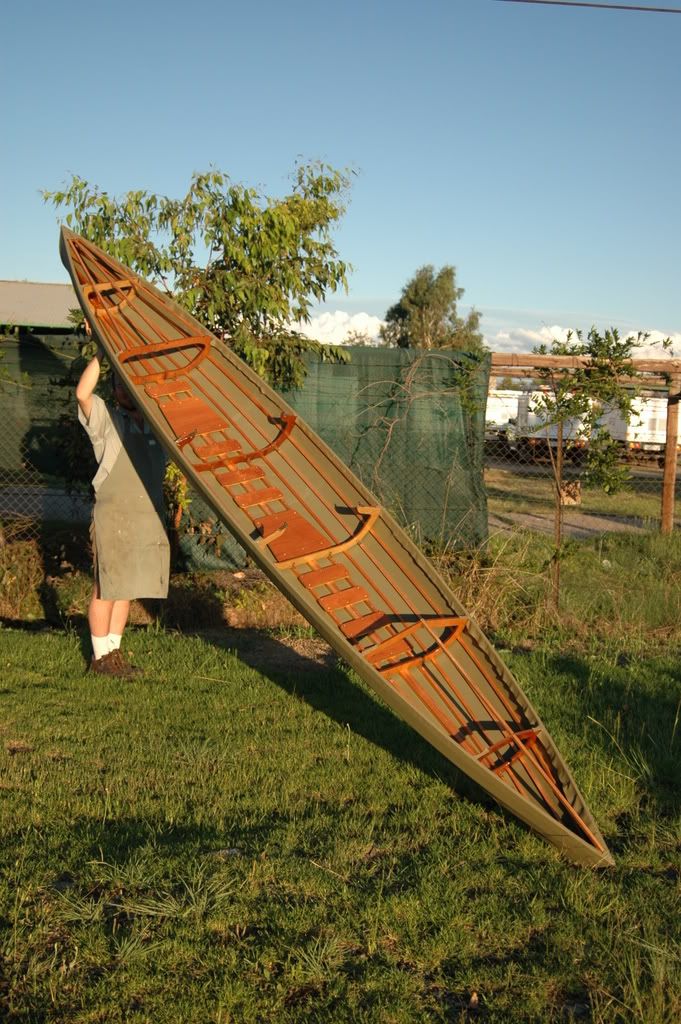
Skinning: (This is a two person operation)
1. The canvas were heated first to removed wrinkles. The fan heaters weren't very succesfull, but draping the canvas over the frame
in the sun with some black plastic over it smoothed it beautifully
2. It was then stapled right at the ends of the keel to keep it straight.
3. Then boat was turned right side up, and stretching of the canvas was started from the middle, working towards the ends, pulled over the gunwales and stapled on the inside.
4. The canvas was cut at the ends and overlapped with contact adhesive used.
5. A waterproof covering strip was then glued over the joint.
6. The hole in the deck was cut roughly so that the coaming could be put in it's place
7. Starting from the center again (very important, we didn't), stapled to the outside of the gunwales.
8. Fitting the sail to the inside of the coaming, fitting the coaming to the frame and stretching and stapling it.
Final touches:
1. Lathes were screwed to the inside of the coaming over the canvas.
2. Keel rubbing strips were added, first glued to the canvas with contact adhesive and then fastened with screws from the inside.
3. Stem and stern aluminium protective strips were fastened
4. Backrests were fastened to the inside of the coaming.
And still to come: I have to glue a rubbing strip to the gunwales to hide the staples and protect the sided. I've decided to use camouflage patterned duct tape,
I think it will look cool, especially with the green canvas, but I will probably have to order it from the United States.
Rough (very rough) material list:
1. 6 x Frames, 9mm plywood
2. Stem and stern, steam bended saligna (should also be made from plywood, 4' x 4' should be enough for everything)
3. 1 x Saligna Keel, 5m x 38mm x 19mm
4. 2 x Saligna Keel strips, 4.5m x 19mm x 13mm
5. 2 x Saligna Gunwales, 5m x 38mm x 13mm
6. 6 x saligna stringers, 5m x 13mm x 13mm
7. Coaming
2 x Oak sides, 2.5m x 38mm x 13mm
1 x Oak back, 450mm x 38 x 13mm
8. 2 x seats, 9mm plywood, 12" x 12"
9. 8 x foot rests, 9mm plywood, 2" x 12"
10. 66 x Aluminium angle brackets for stringers
11. Varnish: 2.5 litre Woodoc 50 marine gloss varnish (I had most of a tin left after finishing a door, and got some more from my brother)
12. 270 Stainless steel screws: 3.5mm x 13mm or 16mm depending on thickness of wood
and 70 of 3.5mm x 25mm screws, mostly used on the ends to fasten stringers
13. Very rough estimate of 1.5kg Cascamite glue, but I probably threw about half that away because of mixing too much.
14. 50 ml Contact adhesive
15. PVC coated ripstop fabric: 5m x 1.8m
Time taken: (again a rough estimate, but I'm a production manager and think this is within 10% accurate)
1. Stringers, keel, gunwhale - 10hrs
that is sawing, planing, scarfing and glueing
2. Frames - 10 hrs
mostly glueing plywood together, about 2 hours on CNC machine
3. Stem and stern - 20 hrs
A lot of that went into making the formers
4. Aluminium fittings - 6 hrs
cutting, drilling and deburring
5. Coaming - 6 hrs
6. Seats and footrests - 2 hrs
7. Assembly of frame - 10 hrs
8. sanding and varnish - 5 hrs
9. Paddles - 10 hrs
For a total time of 79 hours.
Weight is 22kilogram, 48 pounds
I used Cascamite for glueing since I had a tin full, but I would have preferred a quick drying marine epoxy. (four hours clamping time is a bit much)
My first trip in this kayak was my first trip ever in a kayak. (I had two short trips in a dinghy earlier)
I was surprised at the speed I managed.
I didn't get wet from going over the weir, but from falling over the first time I got in.
And I chose that spot because the water isn't deep there but I can stand upright in the middle of the river.
And a family friend and sunday school teacher of mine drowned in that very area after falling out of a boat while the river was in flood.
They only found his body seven days later.
And the video of the first trip can be seen here: http://www.youtube.com/watch?v=DOjASLMrPKo
Sorry about the metric, but I had to change everthing from imperial to metric to understand it and I don't feel like changing it back.
And if you ask for detail, you get it.
Contributor
Nice detailed breakdown, thanks,
Mac
 Contributor
Very good job!
Gary
"It is neither wealth nor splendor, but tranquility and occupation which give happiness. " Thomas Jefferson
Member
Thats cool!
 Posting Permissions

 Reply With Quote

