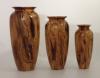

I've had this piece of spalted maple kicking around for almost as many years as I have been turning. Actually, it should not be called "spalted" which is a very generous description. This piece of wood was so "punky" that I was afraid to try anything with it. Even as a novice, I could see that "tearout" was going to be an understatement. This stuff is ripe for "stabilizing" by one of those resin impregnating processes. Unfortunately, it was not exciting enough to justify that expense. It had a bit of black line figure but most of that had vanished by the time the form was established. I had attempted to turn some similar pieces of wood with disastrous results. But I thought that now, with a better understanding of edge geometry, tool presentation, proper sharpening and the like, I might have the skill to cut this wood without completely ruining it.
big_sister_1.jpg
My assessment was borne out by the first few cuts. The wood almost disintegrated under the cutting edge of the gouge, leaving deep tearouts that would have to be filled. Since I wanted the keep the natural color, filling was not a good option. Actually, I almost abandoned it because it's not all that great of a piece of wood. I see that amazing, multi-colored spalted maple, laced with black lines and think it would be better to try and find some of that for a piece like this. But, as this was kind of an experiment in calculated proportions and since I was already into it, I decided to try something I have never attempted. The thought was that either it would "work" or it would totally ruin the piece. But since I could see no other way to get a decent surface on this piece, and since the spalted figure was not really that great anyway, I figured it was worth the risk. "It" was to cut the outside surface with a skew instead of a gouge. Like many, I have always been terrified of the skew. My few attempts to use one resulted in deep, spiral canyons running the length of the piece. But, since then, I had watched all of those You Tube videos and could at least picture in my mind how to make the necessary cuts. My skew is a smallish one and this would probably have been much easier and safer with a wider blade. But, even so, the first few cuts were clean and there was no tearing of the grain. As long as I could keep the tool under control and avoid one of those big skating catches the skew is notorious for, I could get a good smooth surface. It took a while because I was being overcautious, but in the end, I got it done.
Funny thing about this. I have mostly always worked from "the gut", working out proportions and dimensional relationships on the fly. But for this one, I wanted to test out the usefulness of some "standard" guidelines, the golden mean, the rule of thirds, catenary curves, etc. Some of these proved useful in some instances. For example, the height and width of the main body on this conforms to the golden mean with the curves being based on catenary curves and the widest point being at approximately the third point of the height which seems to have produced a pleasing (at least to my eye) form. But, when I applied the same guidelines to things like the diameter of the base, things did not look quite right (again to my eye). The finial at one third the height of the body would have been around three inches tall, much too squat looking for this piece. But at at two thirds the height or six inches, it worked much better. I also was keeping in mind a comment made by Cindy Drozda about how she never repeats a dimension in pieces like this.
Again with the threaded lid. This one also has another feature I blatantly ripped off after seeing one of Cindy Drozda's pieces a small "reliquary" attached to the bottom of the lid. Mine is not nearly as delicate as Cindy's but if I do another, I will use some stabilized wood which can be threaded with standard taps and allowing for smaller and more refined work.
big_sister_5.jpg
6.5" in diameter X 20" total height

 Reply With Quote