Page 1 of 2 12 LastLast
Results 1 to 15 of 19

Thread: Intarsia 101 - A Tutorial

  1. #1

    Intarsia 101 - A Tutorial

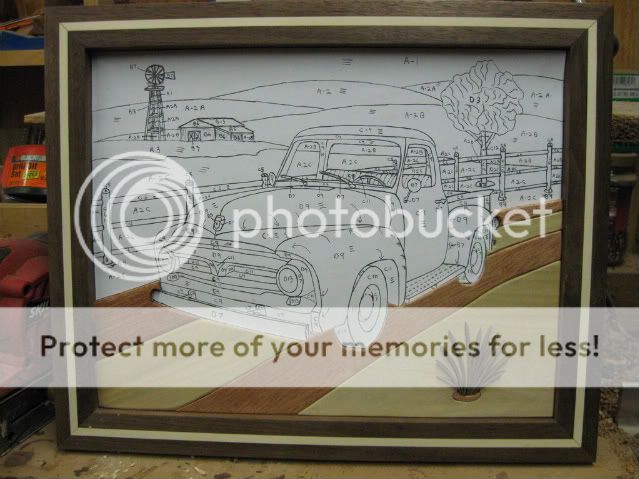
    By now you all have seen the intarsia of the 1953 Ford F100 pick-up that I recently completed and maybe you were wondering how I go about creating such a piece .
    When my son was building my web-site he asked me to give a description of what intarsia is and I told him to look at my pieces and come up with a definition. This is what he wrote—- Intarsia – the experience of merging Nature’s beauty with human ingenuity; finding the perfect combination of woods to express an object or a moment in time; a three- dimensional perspective of the world using natural colored and varied woods; painting with wood .
    I got the picture for the project from my buddy Art in Texas who wanted me to design a kit for him. Art is 93 years old and still scrolling strong.It is a picture of a 1953 Ford F100 pickup that belongs to a friend of his. I designed the pattern with a background to look like a scene from a Texas farm. I’m using an 11”x14” walnut frame with holly accents and 13 different woods ranging from 1/8” – 3/8” in thickness.
    Hope you all enjoy seeing it come to life.


    This is the photo of the 1953 Ford F 100 pick-up that I will use in this project. It shows that I have traced the outline using carbon paper onto regular paper.

    This next photo shows the outline of the truck but not all details have been added yet.


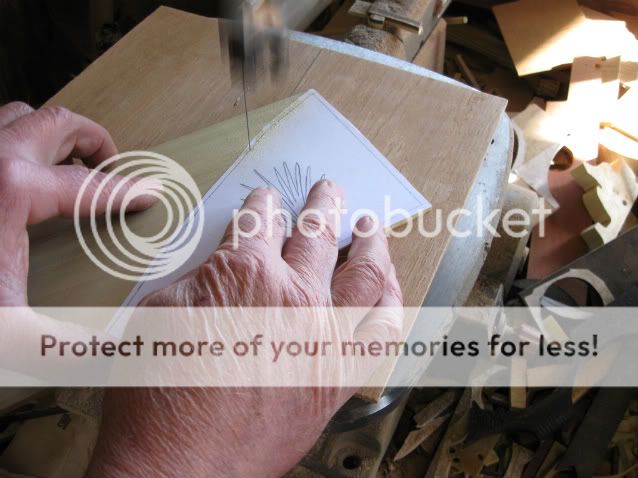
    This next pic shows that I have cut the outline of the truck out and pasted it to my new pattern sheet. It also shows that I have drawn the frame perimeter lines.


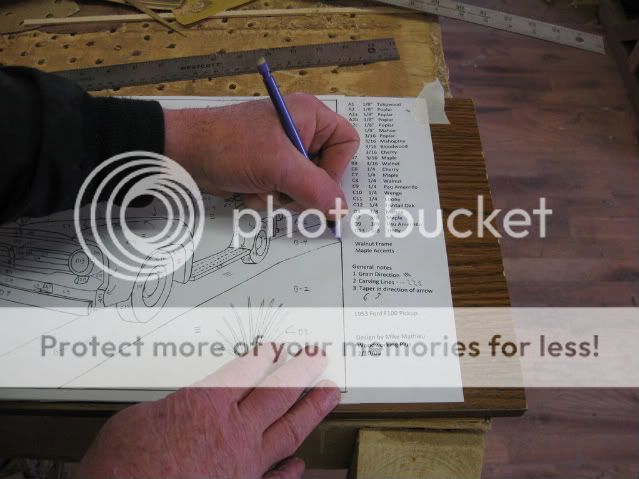
    This is what the finished pattern looks like after I have drawn in the background and added all of the details that are needed to do the intarsia including the woods list.


    This next photo shows the woods that will be used to create this intarsia.


    The next entry will be about how to make the frame for this project
    Mike
    midlothianwoodworks
    ---------------------
    Why buy it if you can build it

  2. #2

    Intarsia 101 The Frame

    Before I start the inlay work I have to make the frame so these are the steps required for this process. My walnut frame stock has been sized to the inside perimeter of the pattern. In this photo I have set the router to make a 1/4" groove 1/4"deep,1/8" from the back to accept the backboard.
    [ 1/4" luan plywood ]


    In this next photo I have set the router to make a 1/4" groove 1/8" deep in the center of the frame face.


    This next photo shows the frame dry fit to check for fit and square.


    The next photo shows that I have glued the accents in and cutting flush with miters.


    Photo of glued up frame


    This next photo shows the finished frame after finish sanding and first coat of wipe on poly. I like to cut a pattern and lay in the frame to use as a reference as I add the cut pieces of the intarsia.
    Now we're ready to have some fun.
    Mike
    midlothianwoodworks
    ---------------------
    Why buy it if you can build it

  3. #3
    Join Date
    Nov 2006
    Location
    Fallbrook, California
    Posts
    3,562
    Mike, thank you for starting this "how to" thread. Intarsia is something I'm interested in trying some day. I'm looking forward to more from you.
    Don Bullock
    Woebgon Bassets
    AKC Championss

    The man who makes no mistakes does not usually make anything.
    -- Edward John Phelps

  4. #4
    Join Date
    Feb 2008
    Location
    Flowery Branch, GA
    Posts
    729
    Blog Entries
    1
    Mike, What a beautiful art! Thanks for posting such a wonderful tutorial.
    This will go in to my favorites....

    Thanks for posting!

  5. #5
    Join Date
    Dec 2003
    Location
    SF Bay Area, CA
    Posts
    15,332
    Sorry if I am jumping the gun here but I'd like to hear your thought process in the selection of the various wood you will use. I certianly couldn't just look at the picture and go, "yeap, that hood is definately maple and the bumper is obviously cherry and, duh, walnut for the tires..."
    Wood: a fickle medium....

    Did you know SMC is user supported? Please help.

  6. #6
    Hi Chris
    Wood selection is based primarily on the experience that I have gained through the years as to what certain woods will do when exposed to light and air.I have collected samples of over 100 different woods and each one is added to a sample board so I can see what the effects of time will be.
    Mike
    midlothianwoodworks
    ---------------------
    Why buy it if you can build it

  7. #7
    Mike, I too, appreciate the time and effort of doing this thread. I want to "raise my hand" to ask a question as well.

    The pattern, with the background, appears to be generated by a computer. Did you scan the truck tracing into a file, and use Corel or some other program to do the remainder of the background, wood designations, and legend? Thanks.

  8. #8
    This is fantastic, can't wait for the next installment

  9. #9
    Hi John
    As a kid I always knew that I could draw but never really had a use for it.When I began doing intarsia I put my artistic skills to use and started drawing the patterns for my projects. It is one of the most rewarding parts for me, to be able to envision what a project will look like before I put it on paper.So to answer your question all of my patterns are drawn by hand.I wouldn't know where to begin designing something on the computer and don't really care to learn.
    Mike
    midlothianwoodworks
    ---------------------
    Why buy it if you can build it

  10. #10
    Quote Originally Posted by Mike Mathieu View Post
    Hi John
    As a kid I always knew that I could draw but never really had a use for it.When I began doing intarsia I put my artistic skills to use and started drawing the patterns for my projects. It is one of the most rewarding parts for me, to be able to envision what a project will look like before I put it on paper.So to answer your question all of my patterns are drawn by hand.I wouldn't know where to begin designing something on the computer and don't really care to learn.
    Then, let me just say that there are two masterpieces at work here - the finished product, and the pattern!! The draftsmanship is superb in its own right!

  11. #11

    Intarsia 101 Tracing,cutting, shaping

    I managed to get a few pieces done today so I’ll begin by showing the steps needed to begin the intarsia process. This photo shows the set-up to trace a section from the pattern onto sticky back label paper. I have taped the pattern down and have slid the carbon paper and label paper under the section I am tracing.I use a fine point mechanical pencil to do the tracing because it gives a crisp consistent line. Use a straight edge to trace any frame border lines.


    Once the tracing is complete I cut the section of label paper out and peel off the wax paper on the back and place the section onto the wood blank paying attention to the grain direction as indicated on pattern detail. Next photo


    This next photo shows a simple zero clearance jig that I use on the bed of my saw to cut small pieces. Simply a piece of 1/4” plywood run thru to the center of the jig. As the hole becomes wallowed out I just make a new cut and am good to go again.


    In this next photo I’m cutting out the section on the scroll saw.I’m using a #5 double tooth blade which is a good all-around blade for the thicknesses of the woods used for this project. Where the bush is, I drill a 1/8” pilot hole to insert the blade ,always cutting on the center of the lines.


    Next 2 photos Once a piece has been cut out of the blank it needs to be sanded along the edges to remove any burrs and to give it a more finished look. For this I use a 3×18” belt sander and lightly work it along the edges just enough to round over. On pieces that are too small to use the belt sander I use a 1/4” or 1/2” drum sander mounted on my rotary tool with a 36” flex shaft. I finish by hand sanding with 220 grit sandpaper and apply a coat of spray-on satin poly and wipe off. This lets me see the true color of the wood plus shows if any more sanding needs to be done to remove scratches.

    Using 1/2” drum sander to round edges.


    I like to assemble the pieces into the frame from the bottom; fitting, sanding and first coat finishing as I go. As you can see in the next photo, having the pattern in the frame makes it pretty easy to see the progress of the intarsia and to make any necessary adjustments in fitting ,sanding or contouring. Woods used so far: grass-heart poplar, road—mahogany, bush—blue mahoe.
    Mike
    midlothianwoodworks
    ---------------------
    Why buy it if you can build it

  12. #12
    Hey Mike, maybe between you and the moderators, the previous thread and this one could be combined, so that all future posts are on one continuous thread. That way it can be preserved for future viewers as one link.

    Great, and I do mean, great tutorial, BTW.

  13. #13
    Join Date
    Dec 2007
    Location
    West Michigan
    Posts
    558
    Blog Entries
    8
    Mike
    This is a great thread!! Keep it coming.
    Life's journey is not to arrive at the grave safely in a well preserved body, but rather to skid in sideways, totally worn out, shouting "...Holy Cow....what a ride!"

  14. #14
    Join Date
    Apr 2007
    Location
    Birmingham, AL
    Posts
    263
    Mike, I love old pickup trucks, wood working, and good tutorial threads, so I am really enjoying watching this one. Thanks for taking the time to post up pictures of your progress. Looking forward to more.
    If I could ever finish working on my shop, maybe I could find the time to start working in my shop.

  15. #15

    Intarsia 101-More shaping and carving

    On the last segment I went over the basics of tracing, cutting and sanding so now I will go into some of the details of carving and contouring that make intarsia unique.
    After a piece has been traced,[including carving lines as per pattern] and sawn out, now is the time to carve in the details.
    In this photo I have placed a sheet of 60 grit sandpaper on the workbench and have placed the piece on it. Using a 5/64” high speed cutter I carve the lines thru the paper pattern at a 45 degree angle while holding it down with my thumb nail. When all lines have been carved I remove the pattern and check to make sure that all lines are uniform. I re-carve if needed.


    Once I’m happy that the carving looks good I shape the edges with a 1/2” or 1/4” sanding drum then clean the surface with 220 grit sandpaper. I then check for fit and adjust if needed.


    In the next photo the pattern calls for C9 Pau Amerrillo which is 1/4” next to D9 Pau Amerrillo which is 3/8”. The arrows on the pattern indicates that the D9 has to be contoured so that the two pieces are the same thickness where they meet. For this I use my 3×18” belt sander and work it down along the edges until the 3/8 is close to 1/4”. I do the final shaping with the 1/2” drum sander and 220 grit sand paper. Once I am happy that it looks good I spray on a coat of satin poly and wipe off. Check for fit and adjust if needed.


    This next photo shows what the contouring should look like.


    Well this has been a good day. I managed not to lose or break any pieces and things have fit together pretty good without alot of adjusting. It is important to trace and cut the pieces accurately and not to get in any kind of a hurry when shaping and sanding.


    Woods used so far: Poplar—grass ;Mahogany—road ; Blue Mahoe—bush ;
    Maple—Bumper, rims and headlight trims; Holly—headlights; Ebony—fenderwells and front grill; Wenge—tires; Pau Amerrillo—truck body
    Mike
    midlothianwoodworks
    ---------------------
    Why buy it if you can build it

Posting Permissions

  • You may not post new threads
  • You may not post replies
  • You may not post attachments
  • You may not edit your posts
  •